Liz Barbour's Creative Feast
  • HOME
  • Programs
    • Lecture Programs
    • Fees
    • Schedule a Program
    • Testimonials >
      • Class Survey
  • EVENTS
    • Calendar
    • Intermittent Fasting Classes
  • FOOD & FUN
    • Recipe Blog >
      • AARP 2025-Cook-Along Classes
      • AARP 2024-Cook-Along Classes
      • AARP 2023-Cook-Along Classes
      • Artisan Bread-Master Recipe
    • Intermittent Fasting
    • Recipes from Hollis
    • Low-Carb
    • Kitchen Tools Liz Loves
    • Barbour Chicks
    • Liz's Edible Gardens
    • Liz's Kitchen Remodel
  • Liz's Cookbook
  • Contact Liz
  • About Liz
    • Liz's Story
    • Liz in The Press >
      • Newspaper
      • Magazine
      • Television
      • Articles by Liz

Butternut Squash with Herbs

11/3/2020

0 Comments

 
Picture
Serves 6-8
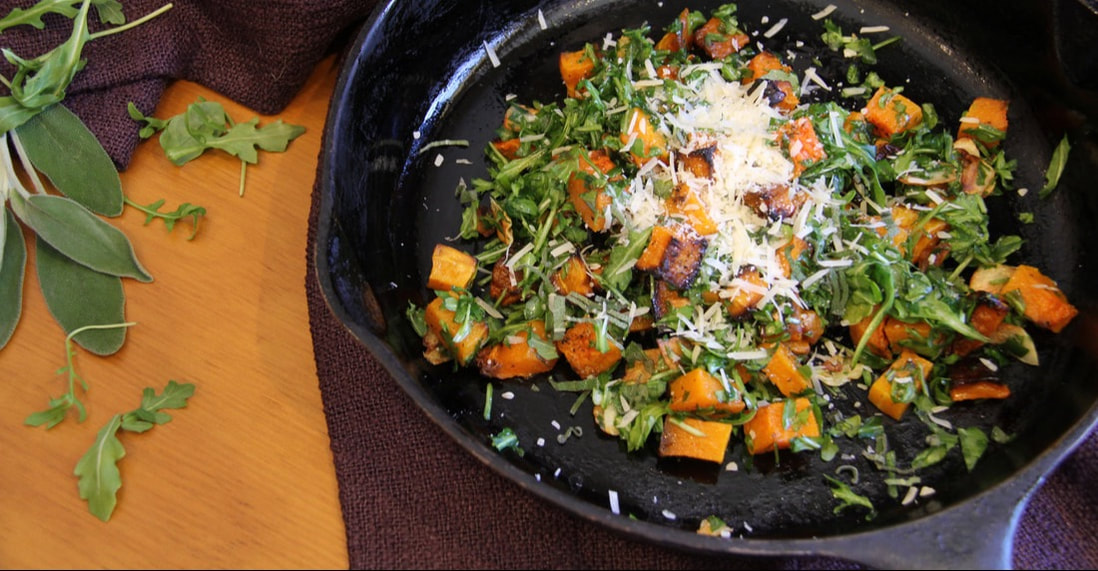
1 butternut squash (about 2 pounds), peeled, seeded and cut into ½” cubes
4 tablespoons olive oil
10 large thinly sliced garlic cloves
4 cups chopped baby arugula 
1 tablespoon chopped sage or rosemary
1 cup chopped flat-leaf parsley
Kosher salt
Pepper, freshly ground
½ cup shredded Parmesan cheese or crumbled feta
 
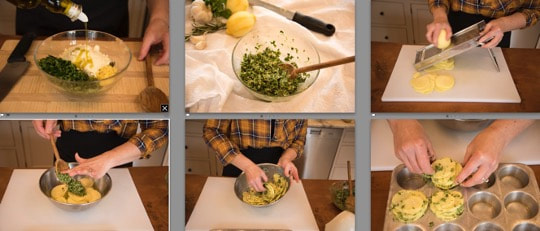
  1. Preheat the oven to 400 degrees.  In a large bowl combine the butternut squash and olive oil with 1 teaspoon of salt and ½ teaspoon of pepper.  Divide the squash between 2-3 sheet pans.  Cook for 10-12 minutes or until it is just fork tender. Remove from the oven and set aside uncovered. As an alternative to roasting, steam the squash for 8-10 minutes in a large covered sauté pan with ¾ cups of water and 1 teaspoon of salt.   
  2. Place 3 tablespoons olive oil and the garlic slivers in a large sauté pan.  Cook over medium-low heat, stirring occasionally until softened and lightly browned, about 5-8 minutes.  
  3. Add the chopped arugula, sage, and parsley to the garlic and toss for 3 minutes or until the arugula is wilted and the sage is fragrant. Add the cooked squash into the pan and toss gently to combine and heat through.  Taste and season with salt and pepper as needed. Place the squash onto a platter and sprinkle the shredded parmesan cheese on top.  
Optional: Top with Greek yogurt (1 ½ cups Greek yogurt, 1 garlic clove-crushed, 1 tsp lemon zest, salt to taste. 
 
0 Comments

Celery Root and Potato Puree

11/3/2020

0 Comments

 
Picture
Serves 6
 
4 tablespoons unsalted butter
1 ½ pounds celery root, peeled, cut into 1/2-inch pieces 
1 ½ pound baking potato, peeled and cut into 1/2-inch pieces 
2 garlic cloves
​1 cup chicken stock
¾ cup heavy cream, warmed
3 Tbs fresh scallions, minced 

  1. In a medium saucepan, combine the butter, celery root, potato, garlic, and stock and bring to a boil. Reduce the heat and simmer until tender, about 30 minutes. If stock remains, drain in a colander set over a bowl and reserve the cooking liquid. 
  2. Mash the celery root and potato with a potato masher or put through a potato ricer. 
  3. Add as much of the warmed cream and reserved cooking liquid as necessary to form a soft puree.  Season with salt and pepper.
  4. Transfer the puree to a serving dish and top with the minced scallions.
 
Notes: For a low-carb option, use cauliflower in place of potato.
0 Comments

Vanilla Glazed Carrots-Ana Sortun

11/3/2020

1 Comment

 
Picture
This recipe is from the wonderful cookbook "Spice" by Ana Sortun. Ana is a celebrated Boston based chef who I had the pleasure of working for at the beginning  of my cooking career. If you are in the Boston area you must seek out her restaurants Oleana, Sarma, and Sofra Bakery
Serves 4
 
4 medium carrots
2 Tbs butter
½ vanilla bean or ½ tsp vanilla extract
1 Tbs lemon juice
Kosher salt and freshly ground pepper

  1. Peel the carrots and slice on the bias into ¼ inch thick slices.
  2. Melt the butter medium heat in a 4 quart saucepan. Slit the vanilla bean in half lengthwise and scrape the seeds with a knife into the butter.  If using extract, add it to the butter. 
  3. Add the carrots and ½ cup of water to the pan and cook over medium heat until they soften and become lightly glazed, about 10 minutes. 
  4. Add the lemon juice and stir.  Season with salt and pepper.
1 Comment

Cheesy Pasta

10/14/2020

0 Comments

 
Adapted from Alton Brown's "Cacio e Pepe"
Picture
​Serves 6
1 pound dry spaghetti
Cold water to cover
1 teaspoon coarse salt
3 ounces parmesan cheese, finely grated
1/3 cup extra-virgin olive oil
3/4 to 1 cup pasta water
Salt and pepper to taste
1 ounce grated parmesan cheese for serving
​
Additions: Add any of the following: Cherry tomatoes, cooked chicken, sausage, broccoli, or other vegetable of your choice.
​
  1. Combine pasta, water and salt in a 3-quart, high-sided saute pan. (Water should just barely cover pasta and measure 1 1/2 inches deep total.) Cover and set over medium-high heat.
  2. When water reaches a boil, remove the lid and decrease heat to medium to maintain a simmer. Stir the pasta every minute or so, making sure the ends of the noodles stay submerged and that they aren't sticking together. Add more water as needed to keep it submerged.
  3. While the pasta cooks, begin the sauce. Combine the Parmesan and the olive oil in a large, deep mixing bowl. Work ingredients together with a whisk until it forms a batter-like sauce.
  4. When the pasta has been simmering for 5 minutes, ladle 1 cup of the cooking water into a measuring cup then slowly drizzle 3/4 cup into cheese paste while mixing until smooth.
  5. After the pasta has been cooking for 10 minutes start checking for doneness; you want it to be just barely al dente (a little bite).
  6. Use tongs to lift the pasta out of the cooking water and allow to briefly drain before adding to the cheese paste. Grasp the pasta with the tongs and stir vigorously for 2 minutes. The pasta will continue to release starch and the sauce will emulsify. Around a minute thirty you will see cheesy water magically transform into a proper sauce. If you find your sauce clumping, add a bit more of the pasta water and continue working the pasta. Season with salt and pepper to taste.
  7. Portion pasta into bowls, top with reserved parmesan cheese and serve immediately.


0 Comments

Broccoli or Cauliflower with Rice and Cheese Sauce

10/14/2020

0 Comments

 
Picture

Serves 6
2 pounds broccoli or cauliflower
8 oz heavy cream
8 oz cheddar cheese, shredded
2 oz cream cheese
1 pinch cayenne pepper
Kosher salt and pepper to taste

  1. Cut broccoli or cauliflower into florets. Steam  in salted water for 4-5 minutes until just tender. Remove from heat and drain well. Set aside.
  2. While your broccoli or cauliflower is cooking, add the heavy cream, cheddar cheese, cream cheese, and cayenne pepper into a small saucepan. Heat over medium-low heat, stirring until smooth.
  3. Place the broccoli or caulifower onto a platter and pour the cheese sauce over. Season with salt and pepper to taste. Serve as is or pour into baking dish and brown under the broiler.
Notes: If you would prefer to use brown rice, increase the rice cooking time to 30 minutes.

0 Comments

Crunchy Thai Salad with Peanut Dressing

10/1/2020

0 Comments

 
Makes 6-8 servings

4 cups chopped Napa cabbage, red cabbage, or combination of both
1 cup shredded carrots
1 red pepper, thinly sliced thinly
1 small English cucumber, halved lengthwise, thinly sliced or spiralized into thin strands
2 medium scallions, thinly sliced
1/2 cup loosely packed chopped fresh cilantro
Optional: add cooked, shredded chicken, pork, sirloin, or whole cooked shrimp.

Dressing
1/4 cup creamy peanut butter

2 tablespoons unseasoned rice vinegar
2 tablespoons fresh lime juice, from one lime
3 tablespoons avocado oil or peanut oil
1 tablespoon soy sauce 
2 tablespoons honey
2 garlic cloves, roughly chopped
1-inch square piece fresh ginger, peeled and roughly chopped
1 teaspoon salt
1/4 teaspoon crushed red pepper flakes
2 tablespoons fresh cilantro leaves

 
To prepare the salad, combine all the vegetables in a large bowl and toss to combine. If serving right away, drizzle the peanut dressing over top and toss; otherwise, serve the dressing on the side so the salad doesn't get soggy.

To prepare the dressing, combine all of the dressing ingredients except for the cilantro in a blender and process until completely smooth. Add the cilantro and blend for a few seconds until the cilantro is finely chopped. Refrigerate until ready to serve.
0 Comments

Fried Green Tomatoes in the Air Fryer

9/21/2020

0 Comments

 
​This recipe is written to be prepared in an air fryer. You can prepare the tomatoes in the oven or fried in oil if you prefer. See notes below.

Serves 2-4

2-3 medium green tomatoes (unripe, cut into 1/4 inch slices)
2 eggs
½ cup flour
1 cup Panko crumbs
1 cup yellow cornmeal
1 teaspoon Italian seasoning
1 teaspoon kosher salt-sea salt, mineral salt 
1 teaspoon paprika
½ teaspoon ground black pepper
½  teaspoon garlic powder
½  teaspoon onion powder
Avocado oil spray (or other non-seed oil spray)
  1. Pre-heat air fryer to 400ºF.
  2. In a medium bowl whisk the eggs. Place the flour on a plate.
  3. In a wide shallow container, combine the Panko crumbs, cornmeal, and the seasoning.
  4. Sprinkle the tomatoes with a little salt. Dip the tomato slices in the flour, dip in egg mixture, and then press Panko crumb mixture into both sides. Sprinkle a little more salt on them.
  5. Spray the air fryer basket generously with avocado spray, and place as many coated tomatoes in the basket that will fit with plenty of space in between. Spray coated tomatoes with additional avocado spray to lightly coat.
  6. Cook for 10 minutes or until browned and crispy. 
  7. Repeat with remaining tomatoes.
  8. Serve hot.
 
Serving suggestions:
Serve with a dipping sauce. Serve in a sandwich. Top with fried or poached eggs. 
To fry: In a deep 12-inch skillet heat 1 inch avocado oil to 350-360°F. Fry in batches to avoid over crowding the pan. Fry for 4-5 minutes total, gently turning as needed until golden.
To oven cook: Heat oven to 400 degrees. Cook coated tomatoes for 20 minutes, If you have a convection setting, be sure to use it!
0 Comments

Watermelon and Herb Salad

8/5/2020

0 Comments


From Liz's book "Beautifully Delicious, Cooking with Herbs and Edible Flowers"

Picture
​Serves 6
¾ cup balsamic vinegar
1 teaspoon sugar
1 small seedless watermelon
1 pint cherry tomatoes (assorted colors)
2 tablespoons thinly sliced red onion or scallions
2 tablespoons chopped mint
2 tablespoons thinly sliced basil
2 tablespoons extra virgin olive oil
Kosher salt
Pepper, freshly ground
½ cup feta cheese 
½ cup assorted edible flower petals (nasturtium, calendula, garlic, chive, cherry tomato, cucumber)


  1. To create the glaze, bring the balsamic vinegar and sugar to a boil in a small saucepan over high heat.  Reduce the heat to low and simmer until the vinegar is reduced and syrupy, about 20 minutes. Set aside to cool. *You can purchase a balsamic glaze if you prefer.
 
  1. Remove the rind from the watermelon and slice into 1 ½- inch thick slices. Cut disks from the watermelon slices using a 2 ½- inch cookie cutter. Save the leftover melon for nibbling.

  2. Slice the tomatoes in half from top to bottom. Cut the feta into tiny cubes and set aside for garnish. Combine the sliced tomatoes, onion, herbs, and olive oil in a bowl and toss gently with salt and pepper to taste.  
    ______________________________________________
To serve as a plated appetizer:
Place a watermelon disk on each plate. Evenly distribute the tomato and herb mixture onto the top of each watermelon disk and drizzle with balsamic glaze. Finish with a sprinkling of feta and flower petals.
 
To serve as a salad:
Remove the rind from the watermelon. Cut the watermelon into 1 inch cubes. Place 4 cups of watermelon into a large bowl. Combine with the tomatoes, slice onions, and herbs. Toss gently with 2-3 tablespoons of the balsamic glaze and olive oil. Season with salt and pepper to taste. Finish with flower petals and feta. Serve.    
0 Comments

Roasted Radishes with Mint

8/4/2020

0 Comments

 
Serves 4 as a side dish 
​
2 cups radishes cut in half or in quarters depending on their size. 
1 tablespoon olive oil
½ tsp kosher salt
2 grinds of fresh black peppercorns
2 tablespoons mint, chopped
Salt and pepper to taste


  1. In a bowl, toss the radishes with the olive oil and salt and pepper.

  2. Place the seasoned radishes in the air fryer basket and cook at 400F for 7-10 minutes. Check to ensure the radishes are fork tender. 
  3. Place the radishes into a serving bowl and toss with the fresh mint. Serve hot.
If cooking in an oven, heat the oven to 400F and cook for 10-12 minutes or until the radishes are fork tender.
0 Comments

Roasted Southwest Corn-in your Air Fryer!

8/4/2020

1 Comment

 
Picture
This recipe can be made in your air fryer, oven, on the grill, and with steamed corn. 
Serves 4 
4 tablespoon butter
3 cloves garlic, chopped
½ teaspoon red pepper flakes
4 ears of corn-medium sized to fit in air fryer
¼ cup fresh cilantro, chopped
1 cup shredded Queso blanco cheese or parmesan cheese
1 lime, cut into 4 wedges   
  1. Place the butter, garlic, and red pepper flakes into a 7-inch round baking pan and place into the basket of your air fryer. Cook at 350 degrees for 6 minutes. Remove the pan and set aside.

  2. Brush some of the melted butter mixture onto each piece of corn to lightly coat. Place corn into the basket of the air fryer and cook at 350 degrees for 5 minutes. 

  3. Remove the corn from the air fryer and place onto a serving platter. Drizzle the corn with the remaining butter mixture, sprinkle with the cheese and chopped cilantro. Serve hot with lime wedges.
Options:
Herbs: If you are not a fan of cilantro, use chopped parsley and/or basil. 

Cheese: Ricotta salata, mozzarella, parmesan, and sharp cheddar are all delicious alternatives.
1 Comment

Raw Broccoli Salad

7/23/2020

0 Comments

 
Serves 4 with leftovers

5-6 cups fresh broccoli florets and cut stems (about 1 pound of florets)
¼ cup of red onion, chopped
½ cup dried cranberries or raisins
1 cup mayonnaise (or ½ cup mayonnaise and ½ cup sour cream or plain yogurt)
2-3 tablespoons apple cider vinegar
1 tablespoon honey, or 1 teaspoon sugar
Salt and pepper to taste.
 
Additions: 2 cups shredded sharp cheddar cheese, cooked bacon, 1 cup peas, chopped celery, pumpkin seeds, sunflower seeds, or slivered almonds.
 
  1. Combine the cut broccoli florets and stems, chopped onion, and dried cranberries in a large serving bowl. 

  2. In a separate bowl whisk together mayonnaise, cider vinegar and honey. Add the dressing to the salad and toss to mix well. Season with salt and pepper to taste. Chill thoroughly before serving. The salad will keep in refrigerator for 3-4 days.
0 Comments

Plum and Cucumber Salad w/Rosewater Vinaigrette

7/13/2020

0 Comments

 
Serves 4
3 black plums, pitted and thinly sliced
Cucumber-about 2 cups thinly sliced (peeled or unpeeled)
¼ cup parsley, chopped
2 tablespoons chopped mint
2 tablespoons olive oil or avocado oil
1 tablespoon rice vinegar
2 teaspoons rosewater-to taste (1/4 tsp rose extract-adjust to taste)
¼ cup fresh rose petals for garnish
Kosher salt and pepper to taste
 

1. Combine the plums, cucumber, parsley, and mint, in a bowl. 
2. In a small jar combine the oil, vinegar, and rosewater and shake to combine.
3. Toss the salad with the vinaigrette. Season with salt and pepper to taste. Serve in bowls with the rose petals.
0 Comments

Fiddleheads

6/17/2020

0 Comments

 
Picture
Serves 4

​1 pound fiddle head ferns, trimmed and washed
2 Tbs unsalted butter
2 cloves garlic, sliced thinly
Kosher salt and pepper

1. If the fiddleheads are clean, you can move to step 2 and sauté them with the butter and garlic. If the fiddleheads have brown fronds in the center, blanch in boiling water. Bring 2 quarts water and 1 tsp salt to a boil. Drop the fiddleheads into the pot of boiling water and cook for 5 minutes. Skim any brown “fuzz” from the water.  Drain the fiddleheads in a colander and rinse with cold water. 


2. Place the butter, garlic, and fiddleheads in a large sauté pan and heat over medium-low heat. Cook for 5 minutes or until the fiddleheads are just fork tender. Season with salt and pepper and serve hot.  


Additions:
Lemon zest
Orange zest
Feta, parmesan, or goat cheese
Garlic scapes- sauté with fiddleheads
0 Comments

Three Sweet Peas Salad with Mint-w/Variations

5/18/2020

0 Comments

 
Picture
Serves 6 as a side dish

4 ounces sugar snap peas
4 ounces snow peas, sliced on the bias
4 ounces frozen petite peas, thawed
2 scallions, about ½ cup chopped-or equal about of chives, chopped
2 cups pea shoots or tendrils-water cress or mixed greens can be substituted
2 Tbs fresh mint, roughly chopped
2 Tbs fresh flat leafed parsley, roughly chopped
optional: 2-3 radishes, thinly sliced
5 Tbs cider or red wine vinegar
1 tsp Dijon mustard
1/2 cup olive oil
Kosher salt and Pepper
Ricotta salata or parmesan, shaved
Edible flowers for garnish

  1. Heat a saucepan filled halfway with water and 1 tsp kosher salt. Bring to a boil. While the water is coming to a boil, prepare an ice bath with ice and cold water, set aside.
  2. When the salted water reaches a boil, add the sugar snap peas and the sliced snow peas. Cook for 3 minutes. Remove the peas from the water with a slotted spoon and immediately place them into the ice bath. Once cold, drain and place on a cotton towel to pat dry-as dry as possible.
  3. Prepare the dressing by combining the vinegar, Dijon mustard, and olive oil in a lidded jar. Cover and shake until combined.
  4. Place the sugar snap, snow, and thawed peas, into a large bowl with the greens and optional radish slices. Add the herbs and enough dressing to lightly coat the salad and gently toss.  Season with salt and pepper to taste.  Serve immediately garnished with cheese and edible flowers.


Check out my Facebook Live cooking demo of this salad with the 3 variations below: https://www.facebook.com/thecreativefeast/videos/561124908113428/
​

Make this salad a meal: Hard boiled eggs or poached eggs with roasted potatoes and roasted radishes.

Appetizer: Dress the salad and place on top of toasted bread smeared with ricotta cheese

Pasta: Add the undressed salad to Pasta Carbonara https://www.thecreativefeast.com/recipeblog/pasta-alla-carbonara
0 Comments

Mint Vinaigrette

4/10/2020

0 Comments

 
Picture
Mint is the unsung hero of the herb family. It is such a wonderful addition to a meal any time of year. It always reminds me of spring. I use this vinaigrette as a dressing for side dishes and as a sauce for lamb, seafood, and chicken.

​Makes about 1 1/4 cups

¾ cup avocado oil or olive oil
¼ cup rice vinegar (or white vinegar)
1 teaspoon sugar
½ cup mint leaves, chopped
½ cup flat leafed parsley, chopped
Kosher salt and ground pepper

  1. In a blender, combine the oil, vinegar, and sugar with the chopped herbs and pulse until the ingredients are pureed. Store in the refrigerator until ready to use.

How to use this vinaigrette:
  • ​Serve as a sauce for lamb, chicken, and seafood
  • Drizzle over roasted vegetables
  • Add to any rice dish
  • Combine with mayonnaise to create a creamy dressing
  • Toss with sweet peas, asparagus, or any other spring vegetable. 
0 Comments

Stacked Potatoes with Gremolata

4/10/2020

0 Comments

 
Serves 6

​Gremolata is a traditional Italian herb paste that is a simple combination of five ingredients: parsley, garlic, lemon, Parmesan, and extra virgin olive oil. With its bright, citrusy flavor, gremolata transforms ho-hum recipes into amazing dishes! Here I’ve combined gremolata with thinly sliced potatoes and roasted them to create a tasty side dish. It’s simple, delicious, and gorgeous!  
Low-carb trick-prepare and cook the stacked potatoes one day ahead and refrigerate. The refrigeration changes the structure of the starches in the potatoes to make them "resistant starches". Resistant starches have a reduced absorption rate in our bodies and helps to keep our insulin low. Learn more about this amazing phenomenon RESISTANT STARCH
 
½ cup loosely packed chopped flat-leaf parsley
Zest of 1 lemon
2 small minced garlic cloves
½ cup grated Parmesan cheese
4 tablespoons extra virgin olive oil
½ teaspoon Kosher salt
1 pinch pepper, freshly ground
8-10 Yukon Gold potatoes
 
Preheat the oven to 400 degrees. Spray 12 standard muffin cups generously with nonstick cooking spray.

To make the gremolata, combine the parsley, lemon zest, garlic, Parmesan, oil, salt, and pepper in a bowl and set aside. 

Peel the potatoes and slice them thinly (about ⅛ of an inch) using a sharp knife or mandolin. Add the potato slices to the gremolata and toss to coat. I use my hands to be sure to coat the potatoes evenly. Stack the potatoes to fill each muffin cup over the rim by about ½ inch. Press the stacked potatoes down firmly. Bake until the tops and edges of the potatoes are browned and the centers are tender when pierced with a fork, about 35 to 45 minutes. Remove the potatoes from the oven. Cut around each stack with a sharp knife and remove them with a spoon. Serve hot. These can be made one to two days in advance and reheated, covered, in a 300 degree oven for 20 minutes, or until heated through.  
Picture
0 Comments

Baked Polenta

4/9/2020

1 Comment

 
Traditionally prepared polenta is amazing, but it takes lots of stirring and time. If you are looking for a quicker, less labor intensive method for making polenta, baking it in the oven is a nice alternative. Please, never, ever, ever, ever buy pre-made polenta in a package. It is an awful substitute for homemade. I won't say anything more about that. 
1 cup polenta
4 cups hot water
1 teaspoon salt
4 Tbs unsalted butter (or more if you like)         
1/2 cup grated Parmesan cheese
kosher salt and ground pepper 

  1. Preheat the oven to 350 degrees. Combine the polenta, hot water, and salt in a 8X8 pan or other 2 quart baking dish. Bake for 25-30 minutes or until the liquid is almost absorbed and the polenta is creamy when stirred. Remove from the oven. 
  2. Stir in the butter and the parmesan cheese. Season with salt and pepper to taste.
    Serve hot or refrigerate for later use.
Polenta Serving Notes:
  • If you’d like a firm polenta for grilling, frying, or as an hors d’oeurves leave the polenta in the serving dish until the polenta is firm and cool, about 2 hours or overnight in the refrigerator.  When firm, turn polenta out onto a cutting board and cut into squares, triangles, or use a cookie cutter and cut into shapes.  
  • To Grill: Brush polenta pieces with olive oil.  Grill as desired.
  • To Fry: Heat butter in a sauté pan and fry pieces until light brown on both sides.  Serve hot.
1 Comment

Shirataki Noodles A Low-Carb Alternative for Pasta

3/31/2020

0 Comments

 
Shirataki noodles are my favorite low-carb alternative to pasta. Shirataki noodles have only 6g of carbs per 8oz serving while pasta has 45g of carbs per 1 cup serving...45grams!!!!
Shirataki noodles are made from plant-based ingredients including yam flour and soybeans. They are packaged in water and can be found in the refrigerated produce section of the grocery store with the tofu products. You can use shiritaki noodles in soups, noodle bowls, and as a pasta substitute. Preparation is key to achieving the right consistency for your dish.

Rinse your noodles

When using the noodles in a soup or noodle bowl simply rinse the noodles. You will notice a "fishy" odor when you open the package and drain it. No worries, this will rinse away. Allow the hot broth of your soup or noodle bowl to heat up the noodle. Over cooking them will make them too soft and gummy.


How to "dry fry" your noodles
If using the noodles as a pasta substitute, you'll want to "dry fry" them. This technique will steam away the excess water in the noodles and result in a firmer texture that will hold up well to a sauce. 
Heat a large sauce pan. You pan does not need to be a non-stick pan. Do not add anything to the pan-no oil, butter, or fat of any kind. Heat the pan so that it sizzles when you add the noodles-medium heat should be fine. Now let the noodles steam off the excess liquid. Gently move the noodles in the pan for 3-5 minutes. That's it! Serve hot with your favorite sauce, butter, or extra virgin olive oil. Enjoy!
Picture
0 Comments

Southwest Red Cabbage Salad

3/25/2020

0 Comments

 
My husband has the steak thing down! His plate was so beautiful I had to take the picture. This is a perfect dinner featuring t-bone steak cooked in the Airfryer, my salmon Gravlax (see recipe posted), and my Southwest coleslaw. This coleslaw recipe is one of my "go to " recipes for any occasion. The dressing is great on sandwiches, veggie salads, and as a sauce for chicken or fish. Make extra of the Southwest seasoning and keep it on hand for meats, poultry, fish, and veggies. Enjoy!
Picture
Serves 8-10
4 cups red cabbage, shaved thin
1 small red pepper, sliced thinly
½ cup cilantro, chopped
¼ cup onion, minced or thinly sliced (or sliced scallions)
1 cup mayonnaise (choose Sir Kensington's avocado mayonaise or make your own using avocado oil or olive oil)
3 Tbs cider vinegar
1 Tbs honey
2 tsp Southwest seasoning or to taste-see below
Fresh ground pepper
 
1. Combine the cabbage, peppers, and cilantro in a large bowl.
2.  In a small bowl combine the remaining ingredients and stir to combine.
3. Toss the cabbage mixture with ¾ to 1 cup of the dressing (save the rest for another salad).  Season with fresh ground pepper and kosher salt as needed.
 
Southwest Seasoning   
Makes ¼ cup
2 tablespoons smoked paprika-I get mine at Homegoods! You can use sweet paprika instead, but it will not have a smokey flavor-still delicious!
½  tsp chipotle power or ¼ tsp cayenne pepper
1 ½ teaspoons garlic powder or granulated garlic
1 ½ teaspoons ground coriander
1 teaspoon ground cumin
1 teaspoon salt

Combine all ingredients and store in an airtight container.
 
Baja Chicken Tacos: Buy small corn or flour tortillas and a roasted chicken and shred the meat. Line the tortillas with Southwest coleslaw and top with shredded chicken. Substitute the chicken with broiled white fish to make fish tacos.
0 Comments

Mashed Cauliflower-My Low-Carb Answer to Mashed Potatoes

11/22/2019

0 Comments

 
Picture
I love to discover a delicous low-carb substitute for a favorite starchy or high-carb recipe. This mashed cauliflower is a delicious replacement for mashed potatoes. Here it is served with my low-carb stuffed pork loin.
 
​Serves 6
1 head cauliflower
4 cloves garlic
1 teaspoon salt
3 ounces cream cheese-full fat
2 tbsp unsalted butter
salt and pepper to taste
½ cup flat leafed parsley, chopped

  1. Separate the head of cauliflower into florets. Slice the core. Fill a covered large saucepan with 2 inches of water and add 1 teaspoon salt. Add the florets, the stems and the garlic cloves. Cover and heat the water to a strong simmer. Cook the cauliflower and garlic until soft when pierced with a fork, about 15 minutes.
  2. Drain and place the cooked cauliflower and garlic into a large mixing bowl.
  3. Add the cream cheese and butter and mash with a potato masher or purée with an immersion blender. 
  4. Stir in the chopped parsley and season with salt and pepper to taste. Serve hot.
0 Comments

Swiss Chard Tart-Sweet and Savory

9/27/2019

0 Comments

 
You can make this tart with or without a crust. When I want a lower carb tart, I butter a pie plate or cast iron pan well and pour the filling right in and bake. For a rustic tart I bake with the dough folded up over the edges of the filling and bake. This crust recipe is my favorite. I use it for pies and tarts of all kinds. The Pate Brisee recipe is from chef Jaques Pepin. It is the easiest pastry to prepare and the dough freezes well if you are only using one disk for this recipe.
Picture
Tart Filling
 fills a 10-inch tart, pie or oven proof pan. Serves 8
 
1 pound Swiss chard
1 small onion, diced
6 eggs
1/3 cup heavy cream
1/2 cup golden raisins or dried cranberries
½ cup pine nuts, toasted
¾ cup grated parmesan
½ teaspoon salt
½ teaspoon ground pepper
** for crustless tart-2 tablespoons of unsalted butter to cover the bottom and sides of your pie plate or tart pan.
 
***If a crust is desired: 1 recipe Pate Brisse (see recipe below) and follow further directions

  1. Preheat oven to 375 degrees.
  2. Remove the center stem of the chard and chop into thin slices. Roughly chop the leaves. 
  3. In a sauté pan, heat 2 Tbs of olive oil with the onion and chard stems. Sauté over medium heat until stems are tender, about 5 minutes. Add the chard leaves and cover the pan to wilt the leaves, about 3 minutes.  Remove from the heat and let mixture cool to room temperature. 
  4. Combine the eggs, heavy cream, raisins, toasted pine nuts, parmesan, salt and pepper in a medium-size bowl. Add the cooled chard mixture, and combine. 
  5. Generously butter a 10” pie pan or ovenproof skillet, covering both the bottom and sides well. 
  6. Spoon in the tart filling and smooth. Cover with tinfoil. Place into the preheated oven and cook for 20 minutes. Remove the foil and cook for an additional 15 minutes or until the filling is set. Remove and serve warm or at room temperature. 

***If a crust is desired: 1 recipe Pate Brisse
Preheat oven to 400 degrees
 
Pate Brisee- Jaques Pepin
Makes Enough for 2 Galettes or 2 tarts without top crust or 1 pie with top and bottom crust
 
3 cups all-purpose flour (dip the measuring cup into the flour, fill it, and level it with your hand)
1 cup (2 sticks) sweet butter, cold, and cut with a knife into thin slices or shavings (l use unsalted butter)
1/2 teaspoon salt
Approximately 3/4 cup very cold water
1 egg lightly beaten (to brush on crust before baking)
 
“In a well-made pâte brisée the pieces of butter are visible throughout the dough. If the pieces of butter get completely blended with the flour so that they melt during cooking, the pastry will be tough. The flour and butter must be worked and the water added as fast as possible to obtain a flaky pastry. If you work the dough too much after adding the water, it will be elastic and chewy. If you use too much butter and not enough water, it will resemble sweet pastry dough and will be hard to roll thin and pick up from the table; it will be very brittle before and after cooking, sandy, and with no flakiness.

This is deceptively simple dough. You may get excellent results one time and an ordinary pastry the next. Try it a few times to get a feel for it. Wrapped properly, it can be kept in the refrigerator for 2 or 3 days, or it can be frozen.” Jaques Pepin
  1. Mix the flour, butter, and salt together very lightly, so that the pieces of butter remain visible throughout the flour.
  2. Add the ice-cold water and mix very fast with your hand just enough that the dough coheres.
  3. Cut the dough in half. The pieces of butter should still be visible. Refrigerate for 1 or 2 hours or use it right away. If you use it right away, the butter will be a bit soft, so you may need a little extra flour in the rolling process to absorb it.
  4. Roll out 1 disk of pastry into a 12-inch circle. (Wrap the remaining disk in plastic and freeze for another tart or pie) Place  the dough on the bottom of a 10 inch tart tin with a removable bottom or 10 inch cast iron pan or pie plate.
  5. Spoon the chard mixture onto the dough. Fold the edges of the dough up over the filling, leaving an opening in the center. Brush the dough with the beaten egg. 
  6. Place the tart into the preheated oven and bake for 40-45 minutes or until the crush is beautifully browned and the center of the tart is firm. Remove from the oven and cool to room temperature. Serve slightly warm or at room temperature. 
Picture
0 Comments

Stir Fried Cauliflower Rice

9/24/2019

0 Comments

 
Serves 2-4 
 
2 tablespoons butter, ghee, coconut, or avocado oil
12 ounces riced cauliflower fresh or frozen
1 cup frozen peas, thawed
1/4 cup carrot finely diced (optional)
1 ounce green onion, sliced
2 cloves garlic, chopped or sliced thinly
1-2 large eggs, beaten
2 tablespoons soy sauce or Tamari (more or less to taste) I love Bragg’s Aminos
1 teaspoon toasted sesame oil
½ cup cilantro, chopped
 
  1. In a large heavy skillet, heat oil of choice over medium-high heat.
  2. Add carrots, garlic, and riced cauliflower. Cook, stirring occasionally, until vegetables begin to soften--about 5 minutes. 
  3. Make a large well in the center of the cauliflower and pour in the egg and stir it to scrambled. Combine gently when the eggs are cooked. 
  4. Stir in the soy sauce, scallions, sesame oil, and cilantro. Taste and adjust seasoning.
Optional Additions:
Eggs, hard boiled
​Fried Tofu-see Liz's recipe
Shrimp
Shredded-cooked chicken
Thinly sliced, cooked sirloin or pork

Picture
Stir Fried Cauliflower with Edible Flower

*yes, this is rice in the photo, I need to recreate my photo using cauliflower and repost. And, the flower petals are bee balm and daylilly.
0 Comments

Kale Spinach Bites

10/12/2017

1 Comment

 
I don't know about you, but I had to learn how to like kale. The texture is tough, the flavor is bitter, and until it was promoted as "the BEST, HEALTHIEST, vegetable EVER!" I rarely encountered it beyond a garnish on a plate and in the seafood case at my local grocery store. Like many of you, I climbed on board the kale band wagon and started working it into my recipe rotation. 
A few years ago I discovered Trader Joe's Spinach & Kale Bites. They sounded delicious so I took the idea and created my own version of their recipe. They are so versitile. I use a small cookie scoop to create meatball sized bites and a larger scoop to make larger "patties" that I recently used as "buns" for an edible flower sandwich I recently featured at a cooking demonstration. They are easy to make and can be cooked and frozen with great results. Give these a try!
Picture
​Makes 24 1 ounce portions

1 small onion, diced, about ½ cup
2 Tbs olive oil
4 cups (packed) fresh baby spinach
2 cups (packed) with fresh kale, spine removed
2 eggs
1/3 cup cream cheese
1/2 cup panko breadcrumbs
1/2 cup grated Parmesan cheese
dash of cayenne pepper
½ cup fresh flat leafed parsley leaves
½ cup fresh basil leaves
½ tsp Kosher salt
¼ tsp freshly ground pepper
4 tsp unsalted butter, melted


  1. Preheat oven to 375 degrees and brush a baking pan lightly with olive oil. 

  2. In a medium sauté pan place the olive oil and diced onion and cook over low heat until soft and translucent, about 5-8 minutes. 
 
  1. Using a food processor, combine the eggs and cream cheese and blend until smooth.  Add the spinach, kale and herbs and process until smooth.  Add the bread crumbs, parmesan cheese, and seasoning to the kale mixture and mix again. 
 
  1. Using a 1 ounce cookie scoop, portion the mixture onto a baking pan.  Flatten each slightly and brush with melted butter.  Bake until firm, about 10 minutes.   Serve hot or at room temperature.  Refrigerate or freeze for later use.
 
Ways to serve:  Serve as a side dish, hors d’oeurves, or with sauce as a vegetarian alternative to meatballs.  Use a larger scoop to make larger patties to use in place of bread for a sandwich.
1 Comment

Ginger Marinated Kale-I'm addicted to it!

10/12/2017

14 Comments

 
Picture
This recipe is a favorite of mine, there is something about it that has me craving it for breakfast, lunch, and dinner! Don't be afraid that this recipe makes too much. You will love this recipe so much that you will be eating it morning, noon, and night!  The vinegar in the dressing marinates the kale and over time helps to soften the texture of this tough green. You can enjoy this salad for up to 5 days. Each day add something different to your salad plate...sliced grilled peaches, diced tofu, dried cranberries, sunflower seeds, cold shrimp, cold sirloin or cold chicken...anything you like!
Makes 12 servings
​
8 Cups of de-veined and chopped Kale 
1 glove of garlic
½-inch piece of ginger root
1/3 cup olive oil or avocado oil
1 -2 tbsp Braggs Liquid Aminos or soy sauce
1/2 cup water
¼ cup lemon juice
1/4 tsp Kosher salt
Pinch or two of cayenne 
* Optional: 2-4 peaches-ripe, but firm (freestone peaches are ideal for this recipe, but any ripe peach will do)

1.  Place the chopped kale in a large bowl.
2. Using a blender, combine the remaining ingredients to create a marinade. Toss the kale with the marinade. Let your dressed salad sit for at least 30 minutes. This salad will get better the longer it sits. Place your dressed salad in the refrigerator and enjoy for up to 5 days. Don't store this salad with the additional toppings-add them each time you serve. 
3. If adding grilled peaches, heat up a grill pan or your outdoor grill. Cut each peach in half and remove the pit. Cut each half again. Brush the cut sides of each peach with a neutral flavored cooking oil and sprinkle with a little salt. Grill on each side for 3-5 minutes or until the peaches have dark grill marks. Remove and serve with kale salad.

Additions: cooked shrimp, chicken, beef, pork, or tofu
Grilled peaches, sliced plums, black berries, raisins, craisins-any fruit is tasty!
Feta cheese, Queso Fresco, ricotta salata, fresh mozzarella 
Pecans, almonds, sunflower seeds, pumpkin seeds.

14 Comments

Sesame Soba Noodles with Veggies

2/20/2016

1 Comment

 
Makes 6-8 servings

1 pound soba noodles, cooked and drained (follow the package directions)
4 scallions, chopped
1 large red pepper, cored, seeded and sliced thinly or 1 bag frozen sliced peppers, thawed
2-3 cups frozen broccoli florets, thawed
4 garlic cloves, minced
1/2 cup fresh cilantro, chopped
1/4 cup soy sauce (low sodium)
3 Tbs toasted sesame oil
 
 
  1. Place the cooked noodles, veggies, and cilantro in a large bowl.
  2. Whisk the soy sauce, garlic and sesame oil together in a small bowl.
  3. Pour the sauce over the soba noodles and veggies and toss to coat.  This can be served warm or cold.

Substitutes and additions:
  • Use whole grain thin spaghetti or brown rice instead of soba noodles.
  • Add shredded chicken, cooked shrimp, or tofu for more protein.  
1 Comment
<<Previous
Forward>>
    Picture

    Picture
    Follow Liz on Instagram

    Picture
    photo credit-Judy Santos-jsantosphotography.com

    Recipe Categories

    All
    15 Minute Meals
    Air Fryer
    Appetizers/Hors D'oeurves
    Avocados
    Baking
    Beautifully Delicious
    Beef
    Bread
    Breakfast
    Chaffles
    Charcuterie
    Chicken
    Cocktails
    Cookies
    Cooking For 1 Or 2
    Cooking With Beer
    Cooking With Chocolate
    Cooking With Wine
    Cooking W/Spices
    Cook's Corner TV
    Cook The Book Cookbook Series
    Dairy
    Desserts
    Dressings
    Drinks
    Edible Flowers
    Edible Garden
    Edible Landscapes
    Eggs
    Entrees
    Facebook Live
    Fall Recipes
    Fats
    Food Film/TV
    Grain Bowls
    Herbs
    Hollis NH Recipes
    Instant Pot
    Intermittent Fasting
    Kitchen/Pantry
    Knife Class
    Lamb
    Lobster Tails & Cocktails
    Local Farms
    Lowcarb
    Low Carb Breakfast
    Mocktails
    Pantry
    Passionate Dishes For Your Valentine
    Pasta
    Pie Classes
    Pies Savory
    Pork
    Rubs
    Salads
    Sandwiches
    Sauces
    Seafood
    Seasoning Blends
    Seed Oils
    Sheet Pan Meals
    Side Dishes
    Smoothies
    Soups/Stews
    Starches/Pasta/Beans
    Stock
    Tapas
    Tarts Savory
    Thanksgiving
    Turkey
    Tuscan Recipes
    Vegetables
    Vegetarian
    Winter Pantry


    Liz's Cookbook

    Liz's Gardens

    Picture

    Liz's Kitchen

    Picture

    Archives

    November 2023
    September 2023
    August 2023
    May 2023
    April 2023
    March 2023
    February 2023
    January 2023
    December 2022
    November 2022
    October 2022
    September 2022
    August 2022
    July 2022
    June 2022
    May 2022
    April 2022
    March 2022
    February 2022
    January 2022
    December 2021
    November 2021
    October 2021
    September 2021
    August 2021
    July 2021
    June 2021
    May 2021
    April 2021
    March 2021
    February 2021
    January 2021
    December 2020
    November 2020
    October 2020
    September 2020
    August 2020
    July 2020
    June 2020
    May 2020
    April 2020
    March 2020
    February 2020
    January 2020
    November 2019
    October 2019
    September 2019
    May 2019
    October 2018
    March 2018
    November 2017
    October 2017
    September 2017
    August 2017
    June 2017
    May 2017
    February 2017
    June 2016
    February 2016
    December 2015
    November 2015
    October 2015
    August 2015
    July 2015
    June 2015
    May 2015
    April 2015

    RSS Feed

CONTACT US

Email

[email protected]

Telephone

Location

603-321-5011
Hollis, NH