Liz Barbour's Creative Feast
  • HOME
  • Programs
    • Online Cooking Programs
    • In-Person Lecture Programs
    • Fees
    • Schedule a Program
    • Testimonials >
      • Class Survey
  • EVENTS
    • Calendar
    • Intermittent Fasting Classes
    • Liz's Open Garden 2022
  • FOOD & FUN
    • Recipe Blog >
      • Artisan Bread-Master Recipe
      • AARP 2023-Cook-Along Classes
    • Intermittent Fasting
    • Recipes from Hollis
    • Low-Carb
    • Kitchen Tools Liz Loves
    • Barbour Chicks
    • Liz's Edible Gardens
    • Liz's Kitchen Remodel
  • STORE
    • Liz's Cookbook
    • Shop
  • Contact Liz
  • About Liz
    • Liz's Story
    • Liz in The Press >
      • Newspaper
      • Magazine
      • Television
      • Articles by Liz

Winter Squash and Spinach Pasta Bake-Smitten Kitchen

10/11/2022

1 Comment

 
Picture
Picture
Picture
Picture
Picture
Picture
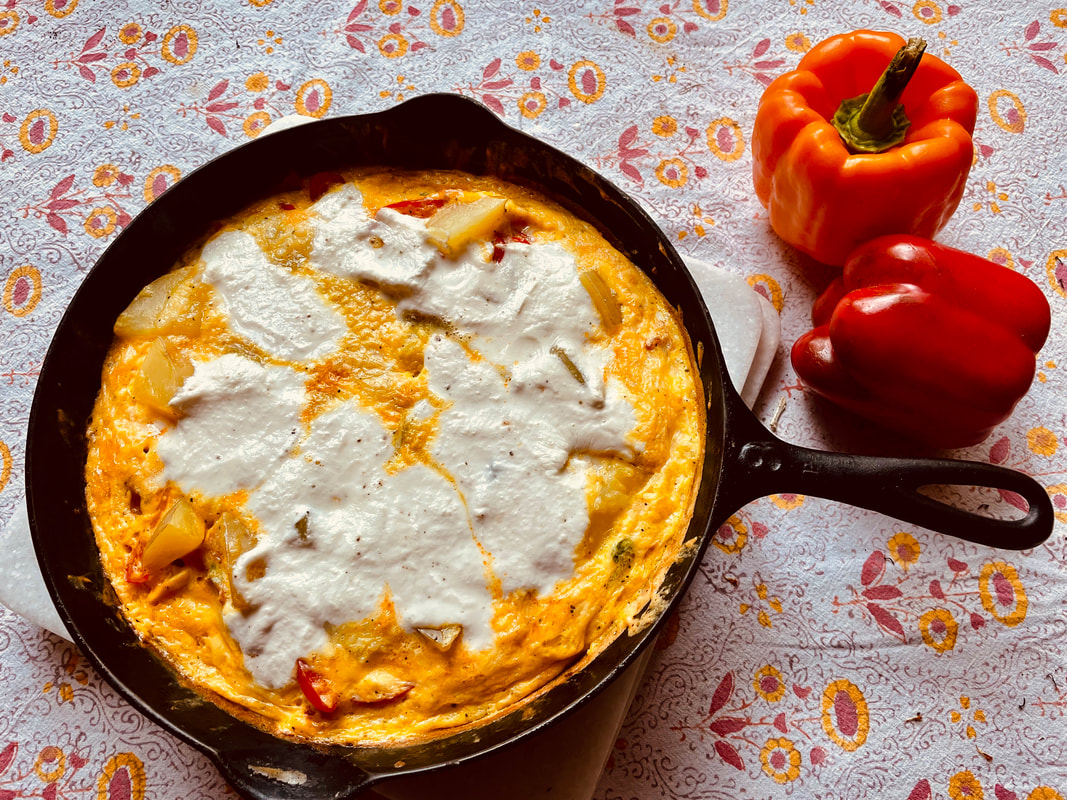
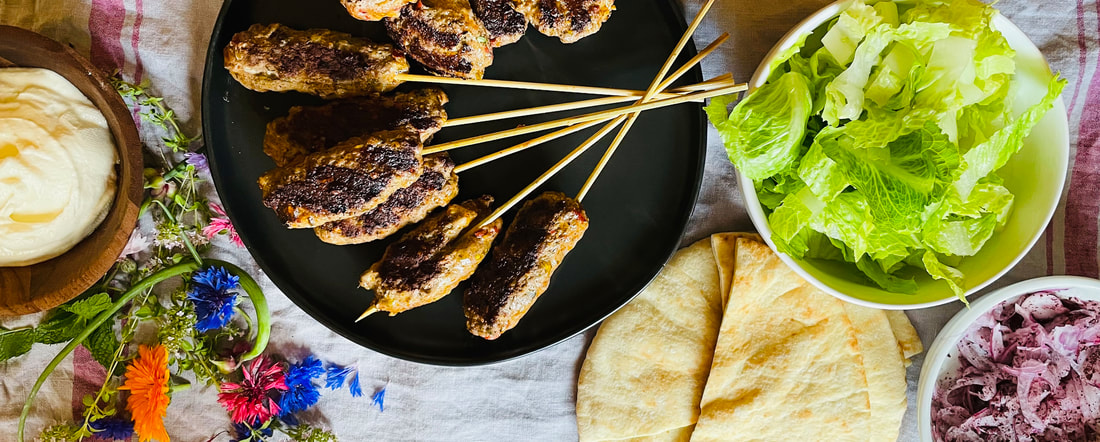
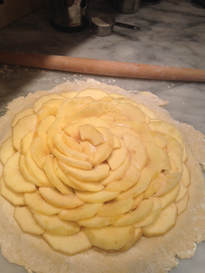
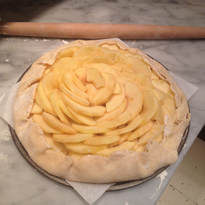
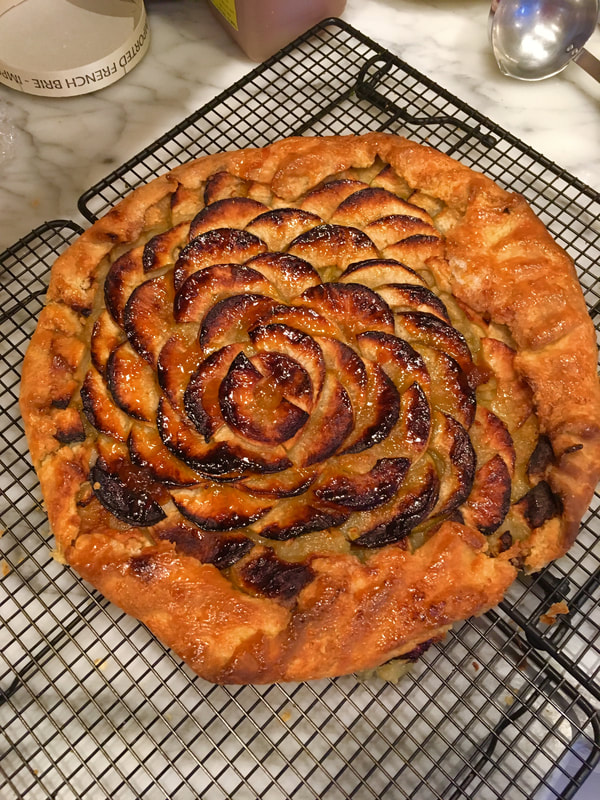
This recipe is from one of my favorite recipe authors Deb Perelman. Smitten Kitchen is her website and Instagram page. I suggest you follow both and buy every one of her cookbooks. This recipe popped up in my Instagram feed and because I had all of the ingredients on hand, I went right into the kitchen and got busy. I hope you enjoy! Here is the link to her recipe page.
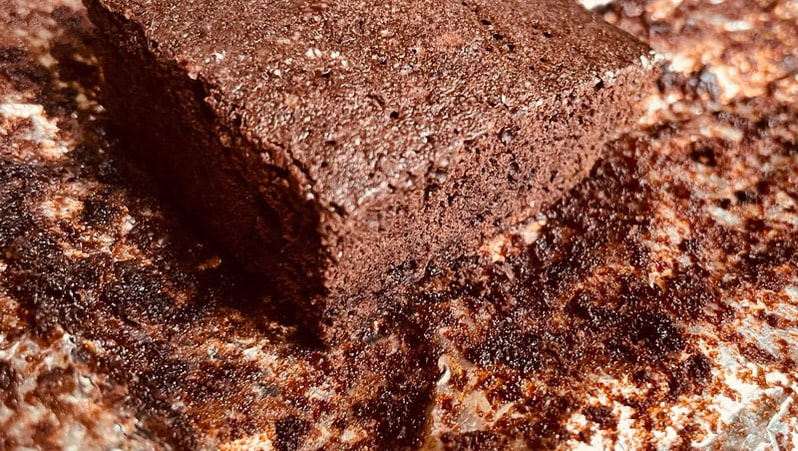
I taught this recipe in a recent class and used only 4 oz of Rotini and 1 1/4 cups water. I really liked it. I think the pasta and the squash were softer and creamier. 
This is Deb's recipe with her notes. I did make one change and noted it below.

​Serves 8

​1 large egg
1 cup (250 grams) ricotta
1 cup (100 grams) finely grated parmesan, divided
1 cup (85 grams) coarsely grated fontina cheese
1 1/4 cups (300 grams) water
3 tablespoons (45 ml) olive oil, divided
1 tablespoon (8.4 grams) kosher salt (I use Diamond; use less of other brands)
Freshly grated nutmeg (optional)
Freshly ground black pepper
1/4 to 1/2 teaspoon red pepper flakes, to taste
3 garlic cloves, thinly sliced
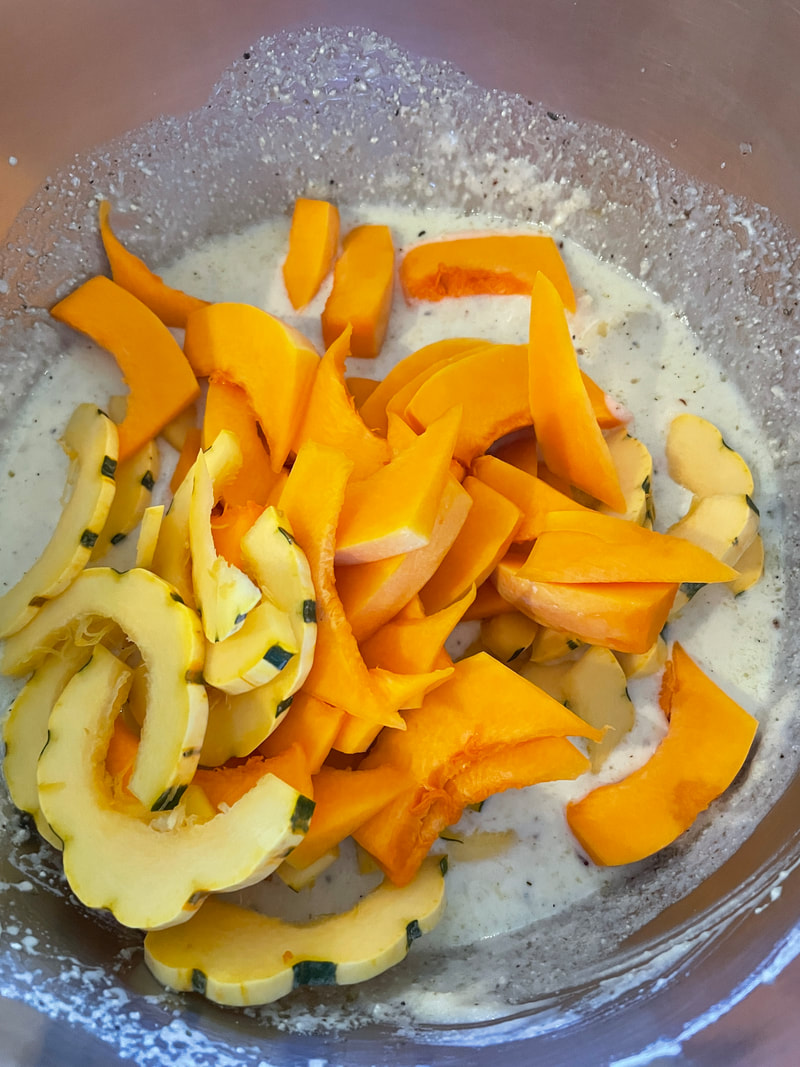
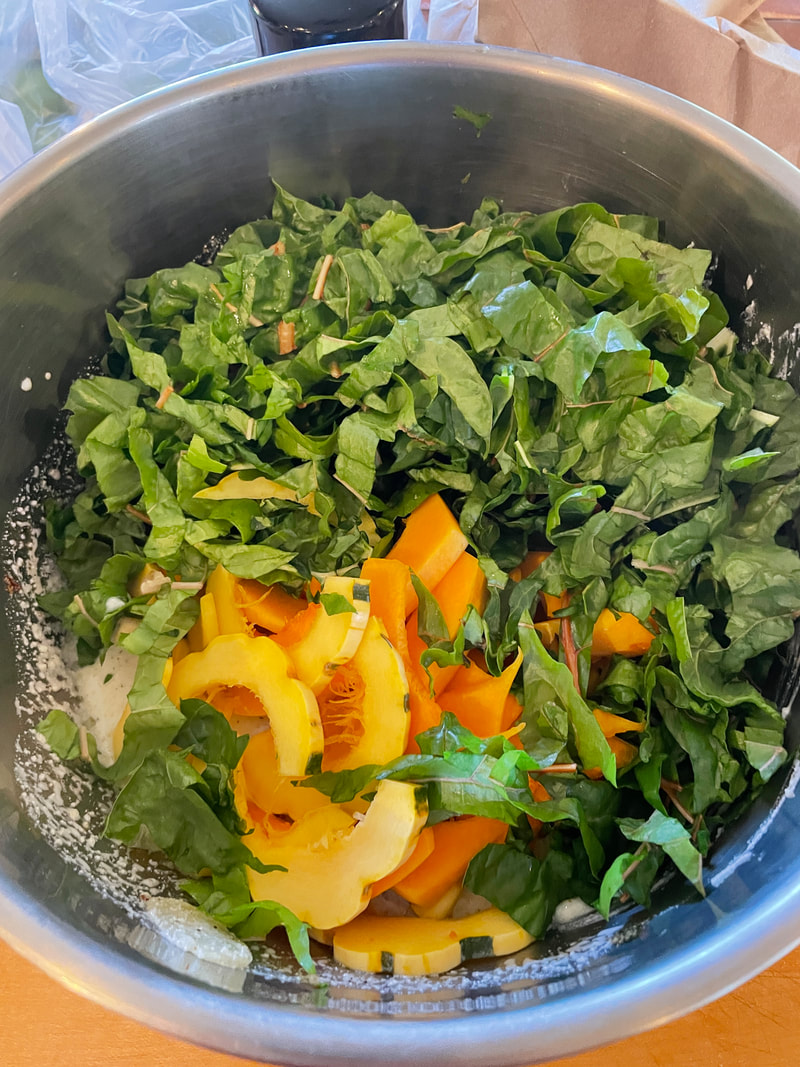
5 ounces (140 grams) baby spinach, roughly chopped
2 tablespoons thinly-sliced sage leaves or 1 teaspoons chopped thyme leaves (optional)
1 1/4-pound (560-grams) butternut or another sturdy winter squash, peeled, seeded, sliced thin or 1 pound (455 grams) in prepared chunks, sliced thin
**8 ounces (225 grams) dried pasta (see Note), broken into pieces if large/long
​
  1. Heat oven to 350°F (176°C). Line a 9-inch springform with 3-inch sides (see Note) with a sling of parchment paper, pressing it across the bottom and creasing the sides to get it to fit as best as possible. If the sides aren’t well covered, repeat with a second piece of parchment in the other direction.
  2. Whisk egg and ricotta in a large bowl. Stir in half of the parmesan, fontina, water, 2 tablespoons of olive oil, salt, a few gratings of fresh nutmeg, lots of freshly ground black pepper, red pepper flakes, and garlic. Stir in squash, spinach, and sage or thyme, if using. Add dried noodles and stir until everything is coated.
  3. Pour into prepared pan and press gently so everything is in as even of a layer as possible. Sprinkle with second half of parmesan. Gently fold any parchment that extends over the rim of the pan into the center and cover the pan tightly with foil. Bake on a sheet (for extra security against drips) for 1 hour, then remove foil, reopen the parchment folded over the top, and drizzle the dish with remaining 1 tablespoon olive oil. Return to the oven uncovered for 30 minutes. Pasta will be baked through and the top will be crisp. If it doesn’t have as much color as you’d like on top, you can finish it under the broiler for a minute or two.
  4. Cool in pan on a rack for 30 minutes before removing the springform ring, sliding the pasta bake by its parchment onto a serving plate, and cut it into wedges.
Do ahead: This keeps in the fridge for up to 1 week. Rewarm uncovered in a 350-degree oven. I haven’t frozen it, but would expect it to freeze well, tightly wrapped.


Notes:
***Liz's Note: I used 4 ounces of pasta (Rotini) and 1 1/4 cups water. I thought the pasta and the squash cooked up a little creamier than with 8 oz of pasta. I liked the texture better with less pasta.
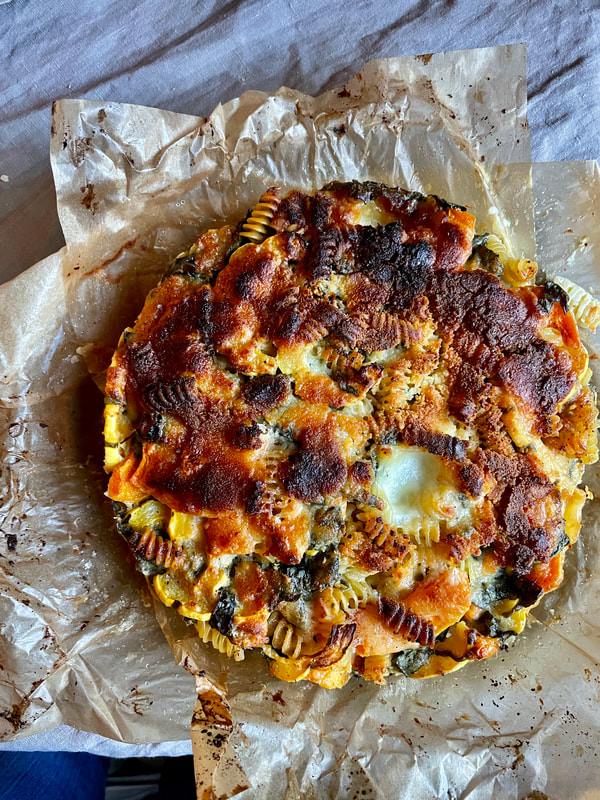
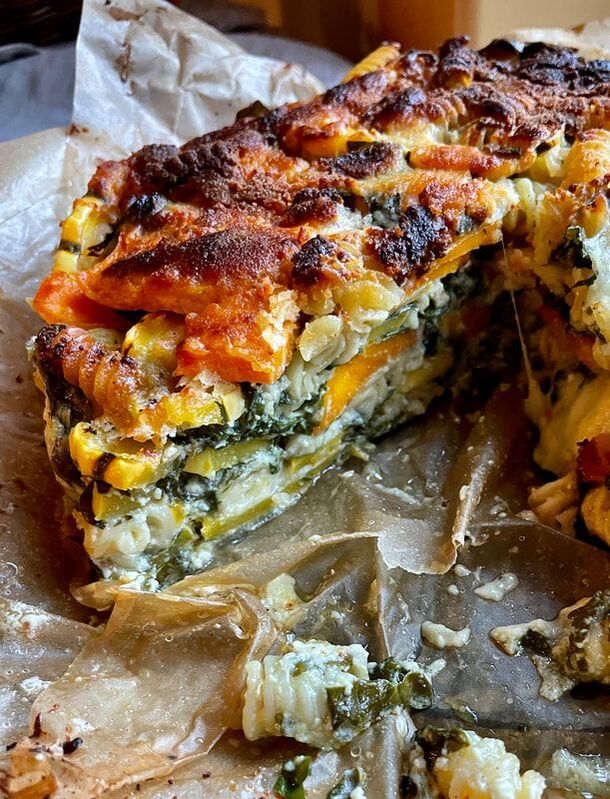
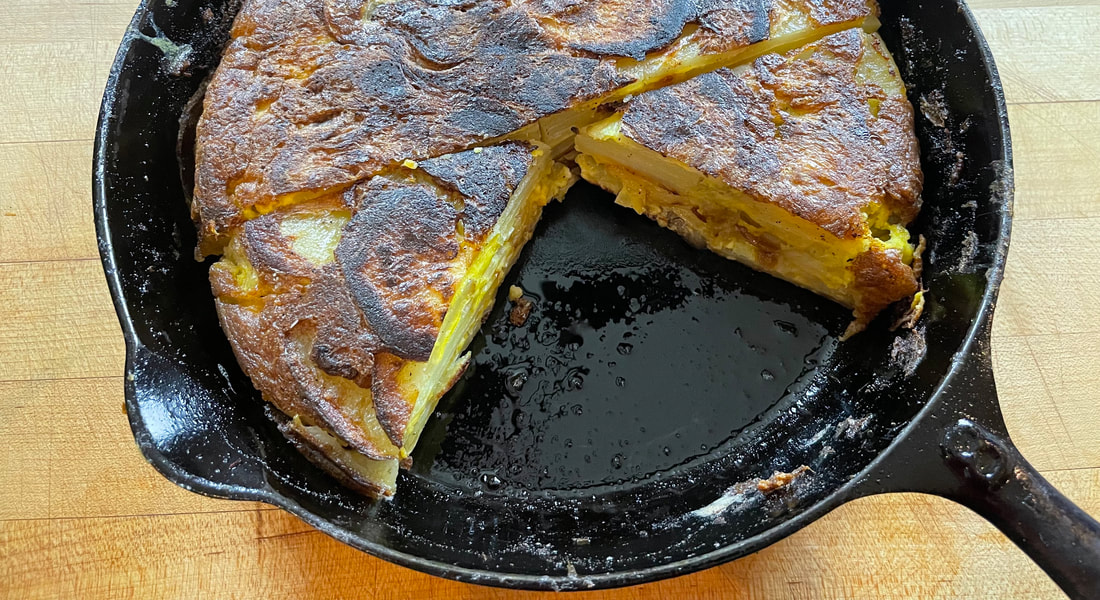
* Structural note: Like a lasagna, this is more wet and messy when it first comes out of the oven. I recommend a 30-minute rest at minimum (what you see here in the loose slices) but it will be cleaner to cut and more set the longer it hangs out. It reheats fantastically and keeps up to a week in the fridge. Last night, we reheated wedges from 6 days ago and they were (still) perfection.
* Pan size: I only tested this in a 9-inch springform but would expect it to also fit in a 11 to 12-inch ovenproof skillet and also, less glamorously, a 9×13-inch baking dish. No need to line with parchment if you’re serving it from the pan or not worried about leakage.
* Pasta shape: I am using a ribbon-shaped pasta called mafaldine or reginette. You can find it from many brands with slight variations such as: Anna (what I used), Sfoglini, Garofalo, Eataly. Classic ruffle-edged lasagna noodles broken into pieces will work too.
* Adaptation notes: I used Ottolenghi’s recipe as general inspiration, but not a literal guide. I skipped the tomatoes, pine nuts, feta, basil, parsley, and even the fresh noodles, instead using dried ones and adding more liquid so they could fully cook. I add some fontina for richness, a bit more parmesan, more salt, and sage.
* Salt [an update]: There have been so many comments about the salt level, I’m adding the weight of the salt and more guidance. As originally noted, Diamond brand kosher salt is much lighter than other brands of kosher salt so if you’re not using it, it’s a good practice to use half of any other brand when reading a recipe. More about salts here.

1 Comment

Spaghetti with Swiss Chard

9/14/2022

0 Comments

 
By Joshua McFadden “Six Seasons”
 
Serves 4
½ cup raisins
Red wine vinegar
Kosher salt and freshly ground black pepper
8 ounces spaghetti
Extra-virgin olive oil
2 garlic cloves, thinly sliced
½ cup pine nuts           
½ teaspoon dried chile flakes
1 bunch Swiss chard, dried ends trimmed, stems thinly sliced, leaves torn into strips
3 tablespoons unsalted butter
Parmigiano-Reggiano cheese, for grating
 
  1. Combine the raisins, a splash of vinegar, and warm water just to cover in a bole and plump for 20 minutes. Drain.
  2. Bring a large pot of water to a boil and add salt until it tastes like the sea. Add the spaghetti and cook according to the package directions. Start tasting a minute or so ahead of time so you don’t overcook it. With a ladle or a measuring cup, scoop out about ½ cup of the cooking water, and drain the pasta well.
  3. Meanwhile, pour a healthy glug of olive oil into a large skillet over medium-low heat. Add the garlic and pine nuts and let them toast very slowly until lightly browned, about 5 minutes. Add the chili flakes and cook for another 10 seconds so they can bloom, then add the drained raisins. 
  4. Increase the heat to medium, add the chard stems, season with a bit of salt and black pepper, and cook slowly until the stems are slightly tender, 3-4 minutes. Add the torn chard leaves and splash of water (use the pasta water, needed), cover the pan, and cook until the leaves are wilted, 2-3 minutes. 
  5. Add the drained pasta the butter to the chard and toss well. Taste and adjust the seasoning with more salt, black pepper, or chile flakes. Grate a bit of Parmigiano over everything, drizzle with more olive oil and pile into bowls. Serve with more cheese.
0 Comments

Beet Slaw with Pistachios and Raisins-Joshua McFadden

6/7/2022

0 Comments

 
Six Seasons-A New Way with Vegetables
​This is a salad for all seasons, but it is featured as an Early Summer recipe in Joshua McFadden's cookbook "Six Seasons". The Pistachio Butter is a condiment you can use in other recipes, so keep this on hand. I love to serve it along with a charcuterie board. BUY THIS BOOK! That is the best cooking advice I can give you. You will absolutely love every recipe. 
​Serves 4
2 cloves garlic, smashed and peeled
½ cup golden raisins
2 tablespoons white wine vinegar
1¼ pounds beets, peeled; use a mix of colors if you can
2 tablespoons fresh lemon juice
½ cup lightly packed flat-leaf parsley leaves
¼ cup lightly packed mint leaves
½ teaspoon dried chile flakes
Kosher salt and freshly ground black pepper
Extra-virgin olive oil
Pistachio Butter
Pistachio Butter
1 cup pistachios, lightly toasted
⅓ cup water
1 tablespoon red wine vinegar
1 teaspoon kosher salt
3 tablespoons extra-virgin olive oil
 
  1. Combine the garlic, raisins, and vinegar in a large bowl and let sit for 1 hour.
  2. Grate the beets on the large holes of a box grater or cut into fine julienne. Yes, your hands will get stained, but the color fades quickly.
  3. Remove the garlic from the raisins and discard. Add the beets, lemon juice, most of the parsley and mint (save the rest for finishing), and chile flakes.
  4. Season with 1½ teaspoons salt and lots of black pepper and toss. Let it sit for about 5 minutes and then taste—the slaw should be tart, spicy, peppery, and sweet.
  5. Adjust the seasoning, if necessary, then add ¼ cup olive oil. Toss and taste again.
  6. Spread a layer of pistachio butter onto each plate and top with the slaw.
  7. Finish with the reserved fresh herbs and a drizzle of olive oil.
 
Pistachio Butter
  1. Process the pistachios in a food processor to get them as fine as possible.
  2. Pour in the water, vinegar, and salt with the motor still running and process until smooth, scraping down the sides as needed.
  3. Drizzle in the olive oil with the motor still running.
  4. Taste and adjust with more salt or vinegar. Store in the fridge for up to 10 days.
 
0 Comments

​Cauliflower Steak w/Provolone and Pickled Peppers

3/22/2022

1 Comment

 
Picture

By Joshua McFadden from his book Six Seasons
Serves 2-4 
(depending on the shape of your head of cauliflower and how many “steaks” you serve per person)
 
1 large head cauliflower (1 ½ -1 ¾ pounds)
Extra virgin olive oil
Kosher salt and freshly ground black pepper
1 ½ cups dried breadcrumbs (or panko breadcrumbs)
1 cup (3 ounces) aged provolone, shredded (grated on large holes of a box grater)
Plus ¼ cup finely grated provolone for dusting (cheddar, mozzarella, or swiss are delicious too)
½ cup chopped pickled sweet hot peppers
1/3 cup chopped mixed pitted olives (kalamata, green)
¼ cup capers
¾ cup lightly packed roughly chopped flat leaf parsley
1 teaspoon lemon zest

  1. Preheat oven to 450 degrees
  2. Trim the bottom of the cauliflower so that it sits firmly on the cutting board. Trim off about ½ inch from two opposite sides (to flatten them), then cut the cauliflower into thick slabs. Use a large spatula when handling the slabs. This will help to keep them from falling apart. Brush both sides of each slab with olive oil and season well with salt and pepper. Chop the trimmings and set aside to use in the topping.
  3. Heat a baking pan in the oven for 10 minutes. Preheating the baking pan will help to brown the steaks on the bottom. Heat two if needed to cook the steaks without crowding.
  4. Using a spatula, lay the slabs on the preheated pan and return to the oven quickly. Roast the cauliflower until tender, but not falling apart, 18-20 minutes.
  5. While the steaks are roasting make the topping by mixing the breadcrumbs, shredded provolone, pickled peppers, olives capers, parsley lemon zest, and chopped cauliflower trimmings. Moisten with 1-2 tablespoons of olive oil, just to help the filling hold together. Taste the filling and season well. You should want to eat it all!
  6. Take out the baking pan again and distribute the topping among all the slabs, pressing the make a thick layer. Return the pan to the oven and roast until the topping is lightly browned and starting to crisp, 10-15 minutes. 
  7. Using your spatula, transfer the slabs to plates and top with a dusting of finely grated provolone.
 
Alternatives:
 
Variation to the above filling: (omitting the pickled peppers, olive, and capers) instead use 1 cup roughly chopped fresh mushrooms-cremini, portabella, button, ½ cup roasted red peppers, roughly chopped, 1/3 cup black beans, drained and rinsed. Follow the recipe as above.

Protein option: Place topping on slabs of fried tofu

Herb options: 2 tablespoons chopped fresh mint, ¼ cup chopped fresh basil, 1 teaspoon chopped fresh rosemary
 
How can you use this topping? 
 Stuffing for peppers, zucchini
Topping for roasted portabella mushrooms, spaghetti squash, pasta

1 Comment

Ribollita-Ginny's Ribolllita

3/15/2022

1 Comment

 
Picture
Recipe by Jael McHenry from The Kitchen Daughter
Serve 4-6

2 tablespoons olive oil
4 shallots or 1 medium onion, sliced thinly
4 garlic cloves, chopped
½ teaspoon ground black pepper
½ teaspoon dried oregano
Optional: 1/4 cup fresh basil, sliced thinly and/or 1/4 cup fresh parsley, chopped
1 14-ounce can white beans, drained
1 14-ounce can chickpeas, drained
1 28-ounce can whole plum tomatoes, torn by hand. Juices reserved.
4 cups chicken broth
4 cups kale, ribs removed, and greens cut into ribbons 
2-3 tablespoons olive oil
2 cups cubed artisan bread-onion focaccia if you have it
½ cup parmesan cheese

  1. Heat an 8-quart soup pot over medium heat with olive oil and sliced shallots or onions. Cook, stirring occasionally for 3 minutes. 
  2. Add the chopped garlic and oregano. Continue cooking until the garlic and onions begin to turn lightly golden. 
  3. Add the broth, drained beans, torn tomatoes, tomato juices, kale ribbons. Bring the soup to a quick boil then reduce to a simmer. Cover and cook for 30-45 minutes.
  4. Heat 2-3 tablespoons of olive oil until hot but not smoking.  Add the cubes of bread and toss to coat with olive oil. Toast until browned and crisp. Remove the croutons to paper towels to cool. 
  5. Serve the Ribollita in bowls with croutons and a healthy sprinkling of parmesan cheese. 
1 Comment

Midnight Cry Brownies

3/15/2022

0 Comments

 
Picture
Recipe by: Jael McHenry-The Kitchen Daughter 
 
1 stick butter-salted or unsalted
½ cup cocoa powder
1 tablespoon espresso powder
3 large eggs
1 cup raw sugar (or ½ cup granulated sugar and ½ cup brown sugar)
1 teaspoon vanilla extract
½ cup all-purpose flour
½ teaspoon coarse salt or flaked salt

  1. Preheat oven to 350 degrees.
  2. Line an 8x8-inch pan with foil. Brush lightly with neutral oil or melted butter and set aside.
  3. Melt the butter in a small saucepan. When melted, stir in the cocoa powder and espresso powder until well combined. Remove from the heat of the stove to allow to cool a bit.
  4. In a large bowl, whisk the eggs well. Add the sugar slowly while whisking. The eggs should thicken up as you whisk. The whisking is pushing air into the eggs.
  5. Add the chocolate mixture slowly while continuing to whisk. 
  6. Stir in the flour and vanilla. Stir just enough to incorporate. Over mixing at this point will flatten the batter. 
  7. Pour the batter into the prepared pan and sprinkle with the coarse salt. Place the pan into the oven. Bake for 25 minutes. Test with a toothpick. It should come out clean. If needed, add a few more minutes to the baking time. Remove from the oven and let cool. I love these brownies warm, but you should serve them as you like. 
0 Comments

Spanish Potato Omelet-Tortilla A La Espanola

10/19/2021

0 Comments

 
Picture
Recipe by Penelope Casas-Tapas: The Little Dishes of Spain
Serves 6
1 cup olive oil
4 large potatoes, peeled and cut into 1/8 inch slices
1 large onion, thinly sliced
Course salt
4 large eggs

  1. Heat the oil in an 8–9-inch non-stick skillet.  Add the slices of potato to the hot oil one at a time to avoid sticking together. Next, add a layer of the onion. Alternate layers of potatoes with layers of onions.
  2. Cook slowly over medium heat, (the potatoes will really “boil” in the oil rather than fry) lifting and turning the potatoes until tender, do not brown.  The potatoes should remain separated, not in a “cake”.  Drain potatoes and onions in a colander, save oil. Make sure skillet is very clean to avoid sticking for later use.
  3. In a bowl, beat eggs with a fork until slightly foamy. Salt to taste.  Add the potatoes to the egg pressing down to cover potatoes completely. 
  4. In the clean skillet, heat 2 tablespoons of the saved oil until smoking point.  Add the potato, onion, egg mixture, spreading it out rapidly. 
  5. Lower the temperature to medium-high.  Shake the pan often to avoid sticking. When the eggs begin to brown underneath, invert the plate of the same size over the skillet and flip the omelet onto the plate. Add about 1 tablespoon more oil to the pan, then slide the omelet back into the skillet to brown on the other side.
  6. Lower the heat to medium and flip the omelet two or three more times, cooking briefly on each side. It should be juicy within. Transfer to a platter and cool, then cut in thin wedges or into 1 ½ -inch thick squares that can be picked up with toothpicks. Serve at room temperature. Can be made ahead and warmed to serve.
0 Comments

Spiced Pimentos-Red Peppers

10/19/2021

0 Comments

 
Recipe by Penelope Casas-Tapas: The Little Dishes of Spain
Picture
Serves 6
​4 red peppers
2-3 tablespoons chicken broth
2 tablespoons olive oil
4 clove garlic, lightly crushed and peeled
¼ teaspoon cayenne pepper
salt
 
 
  1. Place the peppers in an ungreased roasting pan in a 375-degree oven for 17 minutes. Turn the peppers and continue roasting for another 17 minutes. Remove from the oven, cover the pan tightly with foil, and let cool. 
  2. Remove the peppers and deglaze the pan with the chicken broth. Reserve. Peel the peppers, remove the core and seed, and cut each into 8 strips. In a skillet heat the oil till warm but not sizzling hot.
  3. Add the peppers, garlic, cayenne, and salt and sauté slowly over low heat for 3 minutes. Add the reserved pan juices, cover, and cook slowly 5 minutes more. Can be prepared ahead. Serve at room temperature with bread.
0 Comments

Sausages with Sweet and Sour Figs

10/19/2021

0 Comments

 
Picture
Recipe by Penelope Casas -Tapas: The Little Dishes of Spain
Serves 8
Prepare the figs one day in advance
 
1 cup sugar
1 cup red wine vinegar
1 stick cinnamon
4 whole cloves
1 slice lemon
1 pound fresh small fresh figs, or ½ pound dried figs, cut in half
1 ½ lb. sausage (sweet Italian sausage)
1 Tbs. olive oil
4 Tbs. white wine
2 tsp. tomato sauce (unsalted)
salt
freshly ground pepper
 
Figs:
  1. Combine the sugar, vinegar, cinnamon, cloves, and lemon slice in a saucepan.  Bring to a boil then simmer for 5 minutes. Add the figs, cover, and simmer for 20 minutes. Cool the figs in the syrup and let them sit, covered, at room temperature overnight.
 
Sausages:
  1. Pierce the sausage skins with a fork in several places. Heat a sauté pan over medium-low heat. Cook the sausages in the olive oil and 2 tablespoons of the wine until the wine evaporates and the sausages are cooked and browned, about 10-15 minutes. Add a few tablespoons of water to the pan if it needed. Remove the sausages, cut them into 1-inch slices and set them aside.
 
  1. Pour most of the fat from the pan. Deglaze the pan with 4 tablespoons of water and the remaining 2 tablespoons of wine. Add the tomato sauce, salt, and pepper and simmer, uncovered, for 2 minutes over low heat.

  2. Remove the figs from the syrup. Save the syrup for another use. Add the figs to the pan, along with the sausages. Cover and cook briefly until the fits are heated.
  3. Serve from the pan or spear pieces of sausage and fig on toothpicks and transfer them with the sauce to a serving casserole and serve.


Notes: To use the leftover fig sauce-drizzle over Manchego cheese slices or drizzled over ripe brie. It can also be served over cooked fish and chicken.

0 Comments

Shrimp in Garlic Sauce

10/19/2021

0 Comments

 
Picture
Recipe by Penelope Casas-TAPAS The Little Dishes of Spain
serves 4
½ -3/4 pound shrimp, shelled and deveined (U-15 count)
Coarse salt
8 tablespoons olive oil
3 large cloves garlic, peeled and coarsely chopped
1 dried red chili pepper cut into 2 pieces or 1/8 tsp crushed red pepper
½ teaspoon smoked paprika
1 tablespoon parsley, chopped
1 loaf of artisan bread

  1. Dry the shrimp well and sprinkle salt on both sides. Let sit at room temperature of 10 minutes.
  2. Heat the oil in a shallow 8-inch pan. Add the garlic and chili pepper, and when the garlic starts to turn golden add the shrimp. Cook over medium-high heat, stirring for about 3-5 minutes, or until the shrimp are just done.
  3. Sprinkle with paprika, parsley, and salt. Serve immediately from the pan with some very good artisan bread.

0 Comments

Red Pepper, Potato, and Prosciutto Frittata

9/28/2021

0 Comments

 
Picture
Recipe by Joshua McFadden Six Seasons A New Way with Vegetables
 
Serves 4
1/2 pound Yukon gold potatoes, cut into 1 inch cubes
kosher salt and freshly ground black pepper
3 tablespoons unsalted butter
2 red bell peppers
1 bunch scallions
4 ounces prosciutto
6 eggs
1/2 cup finely grated Parmigiano-Reggiano cheese
Extra-virgin olive oil
1/2 cup whole-milk ricotta cheese, seasoned lightly with salt and pepper and stirred until creamy

  1. Put the potatoes in a 4 qt pan and just cover with water and add salt until it tastes like the sea. Bring to a boil and cook until they are tender but not mushy, 10-15 minutes. Drain
  2. Heat the oven to 400 degrees (this is to finish the frittata. Most of the cooking will happen on the stove top) or you can use the broiler instead. If using the broiler preheat at the same time you add the eggs to the pan.
  3. Heat the butter in a 10-inch skillet (non-stick if you have one, with an oven proof handle) over medium high heat. Swirl the melted butter to cover the bottom of the pan and up the sides.
  4. Add the peppers, scallions, and prosciutto, season lightly with salt and pepper, and cook until fragrant and the peppers ae softening but not browning, 5-7 minutes. Add the potatoes to the top.
  5. Crack the eggs into a large bowl, add 1 teaspoon salt, many twists of pepper, and the Parmigiano. Whisk until the eggs are nicely blended. Pour the eggs over the ingredients in the skillet, scraping everything out of the bowl with a rubber spatula.
  6. Reduce the heat to medium and let the eggs sit for about 2 minutes. Then carefully slip the spatula around the edges of the eggs, releasing them from the pan, allowing more liquid egg to flow underneath. Let the new layer of egg set up a bit and then repeat the process.
  7. After most of the liquid egg has cooked, but the top is still runny dollop the ricotta over the top of the frittata in 8 blobs.
  8. Transfer the pan to the oven and finish cooking the frittata all the way through, about 5 minutes. It should puff up a bit and brown. If finishing under the broiler, place the pan at least 5 inches away from the heat source. Keep an eye on the frittata and remove once it browns.
  9. Let the frittata sit in the pan for a couple of minutes, then run the spatula or small knife around the edge of the frittata and as far under the center as you can. Serve it from the pan or gently slide it onto a serving platter. Serve warm or cold the next day.
0 Comments

Seven Lists Easy-but-Memorable

8/25/2021

0 Comments

 
Picture
​Recipes by Julia Turshen Small Victories The entire book is filled with easy, delicious recipes. I love her 'seven lists". They will give you so many quick, easy, and memorable ideas. Here are a few.

​

Seven Bites to Have w/Drinks
 
Affordable Caviar:
Top good potato chips w/small spoonful of crème fraiche (or sour cream) and salmon roe and sprinkle with chopped chives. Be sure to make these just as you eat them and not ahead of time (the chips will get soggy). You can also put out bowls of crème fraiche and salmon roe next to a bag of chips and let your friends assemble their own.
 
My favorite Hors D’Oeuvre Ever:
Put sliced chorizo in a cast-iron pan, set it under the broiler until the slices are hot and slightly crisp, and then drizzle with Spicy Honey-see recipe below
 
Spicy Honey
¾ cup honey
¼ cup red wine vinegar
2 tsp kosher salt    
2 tsp red pepper flakes
In a small saucepan over high heat, stir together the honey, vinegar, salt, and red pepper flakes. Bring to a boil, then turn off the heat and let the honey mixture come to room temperature. Use immediately, or store in an airtight container at room temperature for up to 1 week.
Spin-Offs:
Drizzle on a pepperoni pizza
Drizzle on chicken, pork or ribs
Drizzle on roasted carrots and sweet potatoes
Spread ricotta on toast and drizzle on the honey
Drizzle on cooked bacon
Serve with biscuits and butter
 
Seven Desserts
 
Peaches in Cold White Wine
Slice ripe peaches into halves or wedges (you can peel them first if you like) and put them into individual glass dishes. Cover with cold white wine (or rose) and refrigerate for about 1 hour before serving
 
Sweet Focaccia
Press the dough into a generously buttered sheet pan and drizzle with more melted butter. Dollop with ricotta cheese and sliced peaches (or plums or pitted cherries) and sprinkle with granulated sugar. Bake at 400 degrees until the exposed dough and fruit are browned and the juices are bubbling, about 25 minutes.
0 Comments

Kimchi Fried Rice with Scallion Salad

8/25/2021

0 Comments

 
Recipe by Julia Turshen Small Victories The entire book is filled with easy, delicious recipes. I love her "small victories". They will give you so many different ways to use her recipes.
​
4 scallion stalks, white and pale green parts only
1 tsp toasted sesame oil
1 tsp rice wine vinegar
1 tsp toasted sesame seeds
1/2 tsp red pepper flakes
1 16-oz jar cabbage kimchi, including juice
3 tbsp avocado oil
1 small yellow onion, diced
2 garlic cloves, minced
salt
4 cups day-old cooked white rice
1 tbsp soy sauce, plus more as needed

  1. Julienne scallion into 2″ matchsticks. Combine with sesame oil, vinegar, sesame seeds, and red pepper flakes. Set aside.
  2. Drain kimchi, retaining juice. Chop finely and set aside. In a large wok over medium-high heat, heat up oil. Add onions and garlic and cook until translucent, around 5 minutes. Turn heat to high and add kimchi. Cook for another 5 minutes until the edges become crispy and kimchi begins to stick to the pan.
  3. Add chilled rice into the wok, and as it heats up, use wooden spatula to break up the chunks. Combine thoroughly. Add in reserved kimchi juice and mix until thoroughly red-orange in color. Turn off heat and drizzle over soy sauce. Taste and adjust as preferred.
  4. Transfer fried rice to a bowl, top with scallion salad.
0 Comments

Golden Gazpacho with Condiments

7/7/2021

1 Comment

 
Picture
This recipe is from Ana Sortun, chef and author of Spice Flavors of the Eastern Mediterranean. 
I highly recommend each of Ana's Cambridge, MA based restaurants.
Sofra Bakery & Cafe
Oleana
Sarma
Serves 4

2 pints sungold tomatoes (about 6 cups)
1/2 cup fesh, plain bread crumbs or 1/2 small pita bread, torn into 1/2-inch pieces
2 tablespoons Spanish sherry vinegar
3/4 cup extra-virgin olive oil
1/4 teaspoon turmeric
1/4 teaspoon curry powder
1 tablespoon salt plus fore to taste
black pepper to taste
1 cup bottled sparkling mineral water
1 cup hand-torn crouton-size bread pieces
1 hard-boiled egg
1 red bell pepper, seeded, ribs removed, finely minced
6 chives, finely minced
  1. Place the tomatoes, breadcrumbs, vinegar, 1/2 cup of the oil, the turmeric, curry powder, 1 tablespoon salt, pepper, and sparkling water in a blender. Puree until smooth.
  2. Strain the soup through a fine sieve into a medium mixing bowl, pushing it through with the back of a ladle. Discard the pulp and seeds and check the sou for seasoning. It should be a beautiful golden color. Chill for at least one hour. 
  3. Chill 4 soup bowls for 20 minutes. 
  4. Preheat the oven to 350 degrees.
  5. In a small bowl, toss the hand-torn bread in the remaining 1/4 cup of olive oil and place them on a baking sheet. Season with salt and pepper to taste. Bake for about 7 minutes, until golden brown and crispy. Cool and set aside.
  6. Grate the hard-boiled egg with the finest side of a box grater so that you have little egg "jimmies." Place them in a small bowl and season them with salt and pepper to taste. Set aside and chill.
  7. Ladle the soup into the 4 chilled soup bowls. Serve immediately with the egg, peppers, croutons, and chives, all passed around separately so that guests can add condiments with each bite.
 
1 Comment

Ground Beef and Pistachio Kebobs-Kofte

7/7/2021

0 Comments

 
Picture
This recipe is from Ana Sortun, chef and author of Spice Flavors of the Eastern Mediterranean. 
I highly recommend each of Ana's Cambridge, MA based restaurants.
Sofra Bakery & Cafe
Oleana
Sarma
Serves 4

​1 pound ground beef or ground lamb (85% lean)
2 teaspoons Kebob Spice Mix - recipe below
1 teaspoon Aleppo chilies
1 roasted red bell pepper, finely chopped or 2 teaspoons Turkish red pepper paste
1 egg white
1 cup toasted and coarsely ground pistachios
2 teaspoons salt
8 skewers
​
For Serving
Four 10-inch pitas, cut in half
1 cup red onions thinly sliced and sprinkled with 1-2 teaspoons Sumac
1 cup Greek-style yogurt or whole-milk plain yogurt
1 cup roughly chopped tomato
1 cup roughly chopped romaine leaves
1 cup slightly sweet pickles
8 roughly chopped mint leaves
  1. Prepare a charcoal or gas grill or use a stovetop grill pan.
  2. Knead the ground meat with the kebob spice, chilies, and red pepper in a standing mixer with a paddle attachment on medium speed for 5 minutes, until the meat becomes creamy and a little sticky. If you don't have a standing mixer, use a food processor fitted with a metal blade, and carefully push the pulse button on and off until the meat becomes smooth. You can also do this by hand but it will take much longer.
  3. Add the egg white and pistachios and continue to knead the meat with the mixer until the mixture comes together again and reassembles a wet dough. Pinch a bit of the meat off and cook it to taste for seasoning.
  4. Shape the meat into eight 2-ounce patties or short sausage shapes and press each patty into a skewer. Squeeze and shape the kofte into long, thin meatballs around the skewers. Set aside. 
  5. Grill the kofte for 3-4 minutes on each side, until golden brown and cooked through.
  6. Rest the kofte on pita halves. Pass them around the table with bowls of slice red onions sprinkled with sumac, yogurt, tomatoes, romaine, pickles, and mint leaves.

Kebob Spice Mix
Makes 1/2 cup

2 tablespoons ground cumin
2 tablespoons dried, sieved oregano
2 tablespoons dried, sieved mint
1 tablespoon Aleppo chilies
1 tablespoon black pepper

Combine all the spices and herbs and store in an airtight container. 


0 Comments

Farro and Roasted Carrot Salad with Whipped Ricotta

5/14/2021

1 Comment

 
Picture
This delicious vegetable dish is from my favorite cookbook Six Seasons by Josh McFadden. I've made a few changes to the directions, but it is still his lovely salad. I suggest you get this book so you can enjoy many more seasonal recipes. 
Serves 4
 
2 cups cooked farro
½ pound carrots, peeled
½ pound small radishes, cut in half
Extra-virgin olive oil
¼ teaspoon dried chile flakes
Kosher salt and freshly ground pepper
½ large red onion
4 ounces dried apricots
3 tablespoons white wine vinegar
½ cup flat-leaf parsley leaves
1 ½ cups whole-milk ricotta cheese
½ teaspoon kosher salt
1 teaspoon freshly ground pepper
¼ cup extra-virgin olive oil
½ cup pistachios, lightly toasted
½ cup crumbled ricotta salata or feta cheese1 ½ cups whole-milk ricotta cheese
½ teaspoon kosher salt
1 teaspoon freshly ground pepper
¼ cup extra-virgin olive oil

Preheat oven to 375°

  1. Cut the peeled carrots into small chunks-I like to cut mine on the biased, abour 1/2 inch thick. Toss the carrots and radishes with a small glug of olive oil, the chile flakes,1 teaspoon salt, and a few twists of black pepper. Spread out evenly on a baking sheet and roast until tender and lightly browned, about 15 minutes. Let cool slightly.

  2. Place the ricotta, ½ teaspoon of kosher salt, and 20 twists of pepper in a food processor and start to process. With the motor running, add the olive oil in a thin stream. Pause and scrape down the side if needed. The mixture should get creamy. Taste and adjust seasoning-you may want to add more olive oil as you should be able to taste it.

  3. Cut the apricots in half. Slice the onion very thin and place it in a small bowl. Cover it with cold water. Pile the roasted carrots, farro, and apricots into a bowl. Season the vegetables with the vinegar and toss. Taste and add more salt or chile flakes. Add the parsley leaves, drained onion, pistachios and toss well. Taste again and adjust with more salt, chile flakes or vinegar. Finish by tossing with ¼ cup extra-virgin olive oil.

  4. Spread the whipped ricotta onto 4 plates or a platter in a nice schmear. Distribute the salad on top of the whipped ricotta, dress with the crumbled ricotta salata, finish with another thread of olive oil, and serve.
1 Comment

Peasant Fish Soup

1/20/2021

0 Comments

 
Picture
​Adapted from a recipe by: Jacques Pepin
This soup is wonderfully flavorful and colorful. I prefer less fatty/oily fish like scrod, cod, halibut, snapper, bass, sole, and sword fish. You can also use sea scallops and shrimp or a combination of several. The rouille is a creamy mayonnaise-like sauce that is flavorful and adds a wonderful finish to the soup. Don't leave it out! I often use the rouille in other broth bases soups to add flavor. You can also use it in place of mayonnaise if you find you have leftovers. Tips for a quick fish stock below. Chicken stock if fine as well.

Serves 6-8 
Soup
3 Tbs olive oil
1 cup onions, diced 
1 cup celery, diced 
6 cups fish stock, or chicken stock
1 fennel bulb, diced 
1 Tbs fennel fronds, chopped
1 tsp fresh tarragon, chopped 
1 tsp fresh rosemary, chopped 
1 teaspoon turmeric
½ teaspoon thyme
1 cup fresh cherry tomatoes, cut in half 
2 pounds of fresh scrod or cod, cut into 2-inch chunks (other options-halibut, snapper, bass, sole, and sword fish, scallops, shrimp)
½ cup fresh flat leafed parsley, chopped 
Kosher salt
Pepper 
Rouille-recipe below
Croutons-recipe below

  1. Place the olive oil, onions, and celery into a heavy-bottomed 8-quart soup pot over medium low heat. Cook the vegetables until they are soft, about 5-8 minutes.  
  2. Add the stock, fennel bulb, fennel fronds, tarragon, rosemary, thyme, and turmeric. Bring the soup to a boil then immediately reduce heat to simmer and cook for 30 minutes, partially covered.
  3. Remove about half of the solids and puree in a blender or food processor. Return the pureed vegetables to the soup pot.  
  4. Add the cut tomatoes and pieces of fish to the soup pot. Simmer and cook for 10 minutes or until the fish is opaque. 
  5. Add parsley and season with salt and pepper. Add Rouille to taste to the entire soup or serve at the table to allow each person add it to taste. Serve soup topped with croutons.
 
Rouille-a light mayonnaise 
4 to 5 cloves garlic, peeled 
1/4-cup fish soup
1 whole egg
1/8 teaspoon cayenne pepper 
1/2 cup olive oil 
  1. Process the first four ingredients in a food processor.
  2. Add the oil slowly to make a light mayonnaise. 
  3. Add Rouille to taste to the entire pot of soup or serve at the table to allow each person to stir into their soup to taste.
    Refrigerate up to 5 days. It will thicken in refrigerator.
 
Croutons
¼ cup olive oil
2 cups 1-inch bread cubes-baguette or ciabatta
½ tsp kosher salt

  1. Heat the oven to 375 degrees. 
  2. Pour the olive oil onto a rimmed baking pan. Toss the bread cubes with the oil and the salt. 
  3. Cook in the oven for 8-10 minutes or until browned and crisp. Serve with soup.

Quick Fish Stock
adapted from Serious Eats
2 pounds bones and heads of lean, white-fleshed fish, such as snapper or bass, gills removed
2 tablespoons kosher salt
2 tablespoons olive oil

  1. Place fish bones and heads in a large bowl and cover with cold water. Stir in kosher salt until dissolved. Let stand 1 hour. Drain, then rinse fish under cold running water, washing away any large areas of blood (such as near spine).
  2. In a large saucepan, heat oil over medium-high heat until shimmering. Add the fish heads and bones and cook, stirring, until it begins to steam. Add 4 cups water (liquid should just barely cover heads and bones; if not, add just enough more to barely cover). 
  3. Bring liquid to a gentle simmer, then lower heat so that it stays just below a simmer, with only the occasional bubble. Cook for 20 minutes. Using a spoon, skim off any scum that accumulates on the surface.
  4. Strain fish stock through a fine-mesh strainer. Use right away or chill. Fish stock can be kept refrigerated, covered, for up to 5 days or frozen for up to 3 months.
0 Comments

Eggs Jeannette

12/10/2020

0 Comments

 
Picture
Jacques Pépin's Eggs Jeannette

​Serves 6
Ingredients:
6 large hard-cooked eggs, preferably organic, peeled
2 tablespoons milk
2 cloves garlic, finely chopped (1 tablespoon)
2 tablespoons chopped fresh parsley
1/4 teaspoon salt
1/4 teaspoon freshly ground black pepper
1 1/2 tablespoons peanut oil

Dressing:
About 2 tablespoons reserved egg-yolk mixture (from above)
2 teaspoons Dijon mustard
2 teaspoons red wine vinegar
1 tablespoon water
Pinch of salt
Pinch of freshly ground black pepper
1/4 cup olive oil

Preparation:
  • Cut the eggs in half crosswise at the widest point. Remove the yolks and mash them in a bowl with a fork. Mix in the milk, garlic, parsley, salt, and pepper; the mixture should be moist and hold together. Stuff the whites with the yolk mixture, reserving approximately 2 tablespoons for the dressing. (The egg yolk mixture adds texture to the dressing.)
  • Heat the oil in a skillet, preferably nonstick. When the oil is hot, add the egg halves, stuffed side down, and fry over medium heat for about 2 minutes; they will brown beautifully. (Do not cook the white side.) Remove the eggs from the skillet, and arrange them on a platter or in a gratin dish.
  • For the dressing: Put all the ingredients except the oil in a food processor, and, with the motor running, add the oil slowly. Pour the dressing on top of and around the eggs, and serve.
0 Comments

Kale-Sauce Pasta by Joshua McFadden

9/21/2020

0 Comments

 
Picture
I enjoy creating delicious recipes to share with my students, but when I discover a recipe by another chef I never hesitate to share it. And, when that chef has cookbook that I love, you know I'm going to share that too. Joshua McFadden's book Six Seasons-A New Way with Vegetables has become a favorite, seasonal cookbook for me. You MUST get this book! McFadden has opened my mind and my pallet to so many new flavor combinations and wonderful ways to prepare vegetables seasonally. This recipe is a wonderful example of an easy, beautiful, and delicious recipe I use often. Enjoy!
Makes 4 cups
Kosher salt, to taste
¼ cup extra-virgin olive oil, plus more for serving
2 cloves garlic, smashed flat and peeled
1 pound kale, thick ribs removed (dark green, curly kale)
 Freshly ground black pepper, to taste
½ pound pasta, like pappardelle or rigatoni
¾ cup coarsely grated Parmigiano- Reggiano
  1. Put a large pot of generously salted water over high heat, and bring to a boil. 
  2. In a small skillet over medium heat, add olive oil and garlic, and cook until the garlic begins to sizzle. Reduce heat to low, and cook very gently until garlic is soft and begins to turn light gold, about 5 minutes. Remove from heat.
  3. When water is boiling, add kale leaves, and cook until tender, but not mushy, about 5 minutes. Pull out the hot, dripping kale leaves with tongs, and put directly into a blender. (Don’t drain the pot; you’ll use that same boiling water to cook the pasta.) 
  4. Add garlic and its oil to the blender, along with a splash of hot water from the pot if you need some more liquid to get the blender going. Blend into a fine, thick green purée. Taste, and adjust seasoning with salt and pepper, then blend again.
  5. Add the pasta to the still-boiling water, and cook according to directions on the package. Ladle out about a cup of the water to save for finishing the dish, then drain the pasta and return it to the dry pot. Add the half of the kale purée, about 3/4 of the grated cheese and a splash of the reserved pasta water. Toss until all the pasta is well coated and bright green, adding another splash of pasta water and more kale sauce if needed so that the sauce is loose and almost creamy in texture. Serve in bowls right away, and top with an extra drizzle of olive oil and the rest of the grated cheese. Any leftover kale sauce can be frozen.

​Additions:
1-pound U26-30 shrimp, peeled and deveined-5 minutes before the pasta is done cooking, add the shrimp to the pasta and continue cooking for 5 minutes. Continue with recipe as written.

More uses for this Kale Sauce
  • add to any soup 
  • add to any pasta sauce
  • add cream to the kale sauce and drizzle over pasta, chicken, steak, pork, seafood
  • spread on sandwiches or wraps
  • stir into eggs to make kale scrambled eggs
  • combine with homemade stock to make a soup
  • add to Asian noodle bowl
0 Comments

Cucumber, Yogurt, and Rose Salad

8/5/2020

0 Comments


Adapted from Six Seasons by Joshua McFadden

Serves 4
​1 lb cucumbers, peeled, seeds scooped out, and sliced ¼ inch thick
1 small handful mint leaves, roughly chopped
3 scallions, sliced on the diagonal into long, thin slices
1 Kosher or sea salt & lots of freshly cracked pepper
¼  cup white wine vinegar
¼  cup walnuts, almonds, or pecans, lightly toasted
½  cup yogurt, plain-whole fat
1 tiny handful rose petals
½  tsp rose water
 
1.Place the cucumber slices into a colander or strainer and toss with 1 teaspoon of salt. Let sit for 30 minutes to allow the salt to draw out the excess moisture. Blot the cucumbers dry with a paper towel. Transfer to a large bowl.
2.Mix the rose water and vinegar together, add to the cucumbers and toss. Add the yogurt and toss again. Add the scallions, nuts, mint, and cracked pepper and toss again. Taste and adjust with more vinegar, salt, or pepper.  Serve soon.
0 Comments

Artisan Bread in 5 Minutes-Quick Guide

5/19/2020

3 Comments

 
Here is a PDF with a Quick Guide to preparing your first batch of dough and baking. I highly recommend you purchase the book "The New Artisan Bread in 5 Minutes a Day" for recipe details, help, and additional bread recipes. 
You will also find lots of info. on the author's website: Artisan Bread in 5
quick_guide.pdf
File Size: 161 kb
File Type: pdf
Download File

3 Comments

Artisan Bread in 5 Minutes A Day

5/4/2020

13 Comments

 
This bread recipe is truly the easiest bread you will ever bake-even if you have never baked bread before! This "Master Recipe" is from the best selling cookbook The New Artisan Bread in Five Minutes a Day
This book/method is so popular, the book is on backorder from every major book seller. Fortunately authors Jeff Hertzberg and Zoe Francios have a website you can go to for all the tips and tricks along with many recipes to help you. You only need 4 ingredients. There’s no kneading required. You will make the dough once and then bake a fresh loaf everyday for 4 days.  All with only 5 minutes of effort. 

Three breads from the Master Recipe
Liz's Quick Guide to Making Your 1st Batch of Dough
Liz's Quick Guide
Master Recipe from The New Artisan Bread in Five Minutes a Day:
​The Discovery That Revolutionizes Home Baking
3 cups (1 1/2 pounds) lukewarm water (you can use cold water, but it will take the dough longer to rise. Just don’t use hot water or you may kill the yeast)
1 tablespoon granulated yeast ( you can use any kind of yeast including: instant, “quick,” rapid rise, bread machine, active dry, or fresh cake yeast*. We’ve always tested with Red Star Yeast and they have a new premium product called PLATINUM, which has worked beautifully in our recipes. You can also decrease the amount of yeast in the recipe by following the directions here. Or you can bake with a sour dough starter, see instructions here.)
*If you use cake yeast you will need 1.3 ounces (37g).
1 to 1 1/2 tablespoons Morton Kosher Salt (adjust to suit your taste or eliminate it all together. Find more information here)
6 1/2 cups (2-pounds) all-purpose flour (we’ve always tested our recipes with typical supermarket flour. If you use a higher protein flour check here)

Equipment list:

5qt container w/lid 
liquid measuring cup
1  and 1/2 cup dry measure cups
butter knife
1 tbs measuring spoon
dough whisk, or large spoon for mixing the dough 
corn meal of dusting your peel or the back side of a baking pan
pizza peel or baking pan
baking stone to bake the bread on or a cast iron pan or similar if you do not own a baking stone

Full Recipe
Shape a Boule
13 Comments

Pasta with Garbanzo Beans, Sausage, and Arugula

4/9/2020

0 Comments

 
Picture
Mark Bittman is an amazing recipe writter. He knows how to scrounge around in the pantry and always come up with something easy to make and delicious. Here is my adaptation of his recipe from his book "Kitchen Express". Check out his website for more recipes.  https://www.markbittman.comwww.markbittman.com
Adapted from Mark Bittman’s Kitchen Express
Serves 4
1 pound sausage meat (or ground beef or ground turkey)
2 tablespoons olive oil
4 cloves garlic, sliced
28 ounces canned diced tomatoes, drained
1 14 ounce can garbanzo beans, drained
1 tablespoon fennel seed, crushed
½ teaspoon crushed red pepper
2 cups arugula (or spinach), roughly chopped
4 tablespoons unsalted butter
1 cup flat-leafed parsley, roughly chopped
Parmesan cheese
Salt and pepper to tastes
8 ounces pasta

  1. Boil salted water for pasta and cook it, reserving some of the cooking liquid. 
  2. Heat a large sauté pan with 2 Tbs olive oil and cook the sausage meat, breaking it up into small pieces, until cooked through.
  3. Add garlic and cook for 2-3 minutes. Add diced tomatoes, chickpeas, a tablespoon of crushed fennel seeds, and red pepper flakes. Simmer for 5 minutes.
  4. Toss the pasta with arugula and let it wilt.  Add the pasta to the sausage mixture, along with the butter and some pasta water if needed to moisten. Add the parsley and season with salt and pepper to taste. Serve with parmesan cheese.  
0 Comments

APPLE GALETTE- Jaques Pepin

10/5/2018

0 Comments

 
Back when I lived in my first apartment in Hoboken, NJ I taught myself to cook. My dad gave me my first cookbook-Jaques Pepin's "Everyday Cooking". I would recommend this book to anyone. The recipes are easy, elegant, and delicious. Pepin is an amazing teacher and my go-to chef for cooking technique. 
The filling of thinly sliced apples is easy to do and the layering of the slices creates a beautiful tart. Be sure to use a firm, baking apple so the slices hold up and don't get mushy. I like Granny Smith and Honey Crisp apples for my tarts. 
The Pate Brisee dough is easy to make, freezes well, and can be used for any pie recipe. 
This Apple Galette recipe is a favorite of mine and I have shared it with family and friends for over 30 years! I hope you love it too. ​
Picture
Picture
Picture
Picture
Apple Galette
Recipe From:  Jacques Pepin “Everyday Cooking”

Makes 8 servings
1/2 recipe pate brisée (see recipe below or use 1/2 recipe of the Basic Crust recipe from "Art of the Pie"
5 large granny smith apples (or other firm cooking apple variety-Mutsu, Honey Crisp, Pink Lady, Jonagold, Northern Spy)
1/4-cup sugar
3 tablespoons butter, cut into small pieces
4 tablespoons apricot preserves
1 tablespoon Calvados or Cognac (optional)

Preheat oven to 400 degrees
 
1. Make pâte brisée (recipe below or Basic Crust recipe from "Art of the Pie" ). Roll out the dough 1/8 to 1/16 inch thick, in a shape that fits roughly on a cookie sheet—approximately 16 X 14 inches using the Pate Brisse recipe below. If using the Basic Crust from "Art of the Pie", roll out dough to 14 inches. (The best cookie sheets are made of heavy aluminum that is not too shiny.) If the dough is not thin enough after you lay it on the cookie sheet, roll it some more, directly on the sheet.
 
2. Peel (or not as you like) and cut the apples in half, core them, and slice each half into 1/4-inch slices. Set aside the large center slices of the same size and chop the end slices coarsely. Sprinkle the chopped apple over the dough.
 
3. Arrange the large slices on the dough beginning at the outside, approximately 1 1/2 inches from the edge. Stagger and overlap the slices to imitate the petals of a flower.  Cover the dough completely with a single layer of apples, except for the border. Place smaller slices in the center to resemble the heart of a flower.
 
4. Bring up the border of the dough and fold it over the apples.
 
5. Sprinkle the apples with the sugar and pieces of butter, and bake in a 400-degree oven for 40-50 minutes, until the galette is really well browned and crusty.  Do not remove the galette from the oven too soon; it should be very well cooked. It should be very crusty, thin, and soft inside. Do not worry about the discoloration of the apples after you peel and arrange them on the dough. The discoloration will not be apparent after cooking. 
 
6. Slide it onto a board. Dilute the apricot preserves with the alcohol (or use 1 tablespoon of water if the jam is thick and you prefer not to use spirits) and spread it on top of the apples with the back of a spoon. Some can also be spread on the top edge of the crust. Follow the design so that you do not disturb the little pieces of apple.

Serve the galette lukewarm, cut into wedges. 

Pate Brisee
Recipe From:  Jacques Pepin “Everyday Cooking”
 
Makes Enough for 2 Galettes
3 cups all-purpose flour (dip the measuring cup
into the flour, fill it, and level it with your hand)
1 cup (2 sticks) sweet butter, cold, and cut with a knife into thin slices or shavings
1/2 teaspoon salt
Approximately 3/4 cup very cold water
 
“In a well-made pâte brisée the pieces of butter are visible throughout the dough. If the pieces of butter get completely blended with the flour so that they melt during cooking, the pastry will be tough. The flour and butter must be worked and the water added as fast as possible to obtain a flaky pastry. If you work the dough too much after adding the water, it will be elastic and chewy. If you use too much butter and not enough water, it will resemble sweet pastry dough and will be hard to roll thin and pick up from the table; it will be very brittle before and after cooking, sandy, and with no flakiness.

This is deceptively simple dough. You may get excellent results one time and an ordinary pastry the next. Try it a few times to get a feel for it. Wrapped properly, it can be kept in the refrigerator for 2 or 3 days, or it can be frozen.”
 
1.Mix the flour, butter, and salt together very lightly, so that the pieces of butter remain visible throughout the flour.
 
2.Add the ice-cold water and mix very fast with your hand just enough that the dough coheres.
 
3. Cut the dough in half. The pieces of butter should still be visible. Refrigerate for 1 or 2 hours or use it right away. If you use it right away, the butter will be a bit soft, so you may need a little extra flour in the rolling process to absorb it.

For one galette, roll half the dough between 1/8 and 1/16 of an inch thick, using flour underneath and on top so that it doesn't stick to the table or the rolling pin. When the dough is the desired shape and thickness, roll it onto the rolling pin and unroll it on the pie plate, tart form, or cookie sheet that you plan to use. Repeat with the other half or reserve for later use. Bake according to the instructions for the particular recipe. 

0 Comments
    Picture

    Picture
    Follow Liz on Instagram

    Picture
    photo credit-Judy Santos-jsantosphotography.com

    Recipe Categories

    All
    15 Minute Meals
    Air Fryer
    Appetizers/Hors D'oeurves
    Avocados
    Baking
    Beautifully Delicious
    Beef
    Bread
    Breakfast
    Chaffles
    Charcuterie
    Chicken
    Cocktails
    Cookies
    Cooking For 1 Or 2
    Cooking With Chocolate
    Cooking With Wine
    Cooking W/Spices
    Cook's Corner TV
    Cook The Book Cookbook Series
    Dairy
    Desserts
    Dressings
    Drinks
    Edible Flowers
    Edible Garden
    Edible Landscapes
    Eggs
    Entrees
    Facebook Live
    Fall Recipes
    Fats
    Food Film/TV
    Grain Bowls
    Herbs
    Hollis NH Recipes
    Instant Pot
    Intermittent Fasting
    Kitchen/Pantry
    Knife Class
    Lamb
    Lobster Tails & Cocktails
    Local Farms
    Lowcarb
    Low Carb Breakfast
    Pantry
    Passionate Dishes For Your Valentine
    Pasta
    Pie Classes
    Pies Savory
    Pork
    Rubs
    Salads
    Sandwiches
    Sauces
    Seafood
    Seasoning Blends
    Seed Oils
    Sheet Pan Meals
    Side Dishes
    Smoothies
    Soups/Stews
    Starches/Pasta/Beans
    Stock
    Tapas
    Tarts Savory
    Thanksgiving
    Turkey
    Vegetables
    Vegetarian
    Winter Pantry


    Liz's Cookbook

    Liz's Gardens

    Picture

    Liz's Kitchen

    Picture

    Archives

    February 2023
    January 2023
    December 2022
    November 2022
    October 2022
    September 2022
    August 2022
    July 2022
    June 2022
    May 2022
    April 2022
    March 2022
    February 2022
    January 2022
    December 2021
    November 2021
    October 2021
    September 2021
    August 2021
    July 2021
    June 2021
    May 2021
    April 2021
    March 2021
    February 2021
    January 2021
    December 2020
    November 2020
    October 2020
    September 2020
    August 2020
    July 2020
    June 2020
    May 2020
    April 2020
    March 2020
    February 2020
    January 2020
    November 2019
    October 2019
    September 2019
    May 2019
    October 2018
    March 2018
    November 2017
    October 2017
    September 2017
    August 2017
    June 2017
    May 2017
    February 2017
    June 2016
    February 2016
    December 2015
    November 2015
    October 2015
    August 2015
    July 2015
    June 2015
    May 2015
    April 2015

    RSS Feed

CONTACT US

Email

lizb@thecreativefeast.com

Telephone

Location

603-321-5011
Hollis, NH