Liz Barbour's Creative Feast
  • HOME
  • Programming
    • Pick A Class
    • Schedule a Class >
      • Fees
      • Testimonials
      • Class Survey
  • EVENTS
    • Calendar
    • Intermittent Fasting Classes
    • Liz's Open Garden 2022
  • FOOD & FUN
    • Recipe Blog
    • Intermittent Fasting
    • Recipes from Hollis
    • Low-Carb
    • Kitchen Tools Liz Loves
    • Barbour Chicks
    • Liz's Edible Gardens
    • Liz's Kitchen Remodel
    • Artisan Bread
  • STORE
    • Liz's Cookbook
    • Shop
  • Contact Liz
  • About Liz
    • Liz's Story
    • Liz in The Press >
      • Newspaper
      • Magazine
      • Television
      • Articles by Liz

Apple Galette w/ Apricot Jam

11/22/2021

0 Comments

 
Picture
A note on your apples: When choosing apples for your tart, select apples that have red, green, and yellow skins. If you prefer to use all one apple color that will be beautiful too! Be sure to choose a selection of apples that will hold their shape in baking and offer a variety of flavor. 

Supermarket Variety Options
Combination #1: Granny Smith, Golden Delicious, and Cortand
Combination #2: Granny Smith, Braeburn, and McIntosh

Farm stand Variety Options
Combination #1: Suncrisp, Stayman Winesap, and Northern Spy
Combination #2: Pink Lady, Johna Gold, and Mutzu
_________________________________________________________
Galette Dough
Go here for the perfect dough. This recipe will make enough dough for 2 galettes or one pie with a top and bottom crust.
For a gluten free option I will send you to Kate McDermott's recipe. And, here is a link to the her video to help you prepare her gluten free dough.

Galette Filling
1 Granny Smith apples
1 Golden Delicious apple (or other yellow-skinned apple)
2 Cortland apples
1/3 cup apricot jam
1 disk of Art of the Pie Master pie dough (recipe here)
1 egg beaten with 1 teaspoon water
1/4 cup granulated sugar
 

  1. Heat oven to 400°F . Turn your baking pan over and place the parchment paper onto it. You will assemble your galette here.
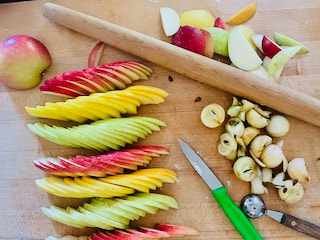
  2. Cut each apple in half from top to bottom. Core the apples with a melon baller or paring knife. Place the apples cut side down on your cutting board. Using a sharp paring knife, slice each half into ¼ inch thin slices (keeping each apple half together). Repeat until all the apples are sliced. Remove the end slices of each apple. Using two hands, hold a sliced apple half and press from the center pieces to the outside pieces, fanning the slices outward into a line. Do the same with the other half of the apple. Join both lines of apple slices together to form one line. Do this with the remaining apples.
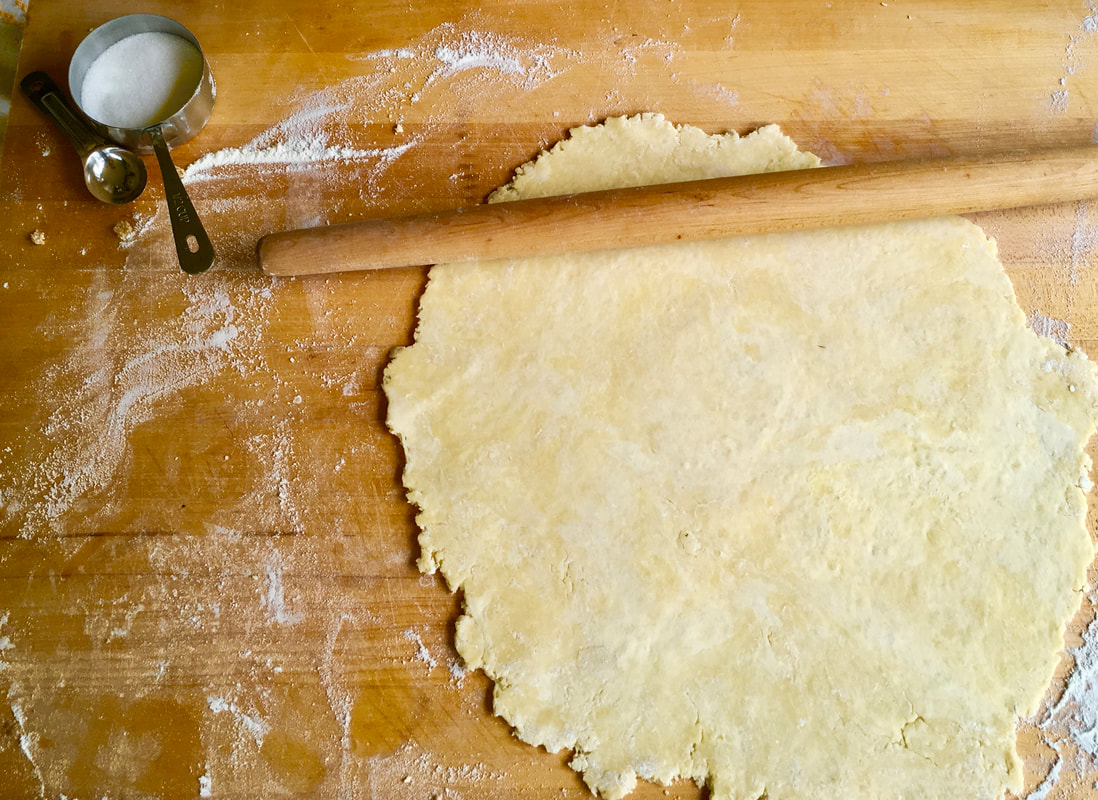
  3. To assemble your galette: On a floured counter, roll the dough out into a large round-ish shape, about 14 inches across. Place your rolling pin at the center of your rolled dough. Fold the dough over your rolling pin and gently lift and transfer it to the parchment paper in the pan.
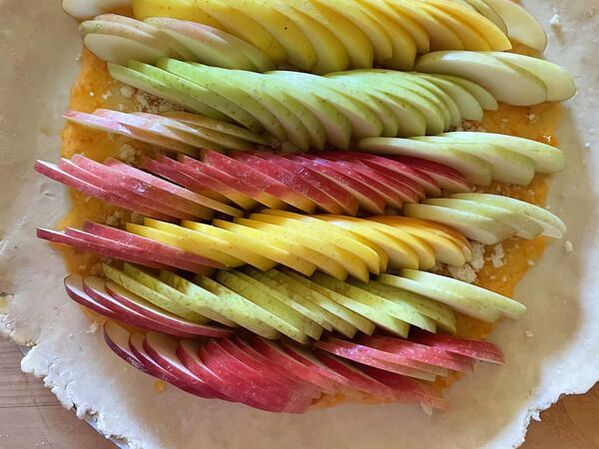
  4. Place the apricot jam onto the center of the dough. Spread the jam outward leaving a 2-inch border uncovered.
  5. Place your alternating colors of fanned apples onto the apricot filling starting from the center out. Place them snuggly up against each other. Fill in the gaps at each end with any remaining apples.
  6. Fold the border over fruit, pleating the edge as you go. Brush egg wash onto the folded crust. Sprinkle the apples and the crust with the sugar.
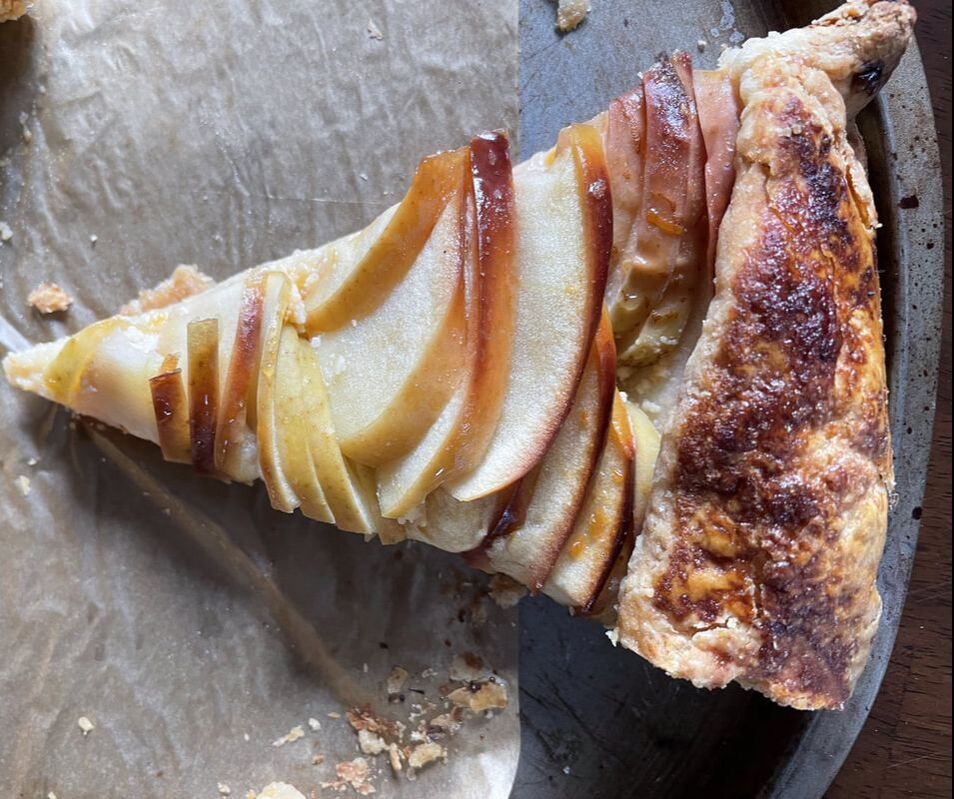
  7. Bake the galette for 35-40 minutes, or until the crust is golden and the apples are gently bubbling. Remove the galette from the oven and slide onto a wire rack to cool for at least 20 minutes. Try to slide the parchment paper out from under the galette for cooling. This will keep the bottom crust crisp. Serve warm or at room temperature. Fruit galettes keep at room temperature for a few days and up to a week in the fridge.
 
Variations
  • Pear Galette option: you may use ripe pears in place of apples. Bosc and Bartlett (both red and green) ar both excellent for pies when ripened. If using pears, purchase them 3 days before class and allow to ripen at room temperature.
  • Almond filling option: Instead of apricot jam under your apples or pears, try this easy and delicious almond filling. Almond filling
  • Cran-Raspberry filling option: If you have leftovers of your cran-rasperry sauce use them in your next galette! 1/3 to ½ cup of sauce is all you need. Cran-Raspberry Sauce
Picture
Picture
Picture
Picture
0 Comments

Vanilla Waffles

11/16/2021

0 Comments

 
Picture
Makes 8-10 Belgian waffles or 14-16 4-inch waffles
 
4 cups all-purpose flour
1 tablespoon plus 1 teaspoon baking powder
1/4 cup sugar
1 teaspoon salt
6 large eggs, separated
3 cups whole milk
3/4 cup plus 1 tablespoon (13 tablespoons) unsalted butter, melted
1 tablespoon neutral flavored cooking oil or coconut oil plus more for the waffle iron
2 teaspoons vanilla extract
 
  1. Measure the flour, baking powder, sugar, and salt into a large bowl.
  2. In another bowl, whisk together the yolks, milk, melted butter, cooking oil, and vanilla until combined. Slowly whisk the wet mixture into the dry mixture just until combined. The result should be slightly lumpy yet still combined.
  3. Whip the egg whites with an electric mixer until they reach medium peaks. Stick your finger in, they should drip over a bit and stand up.
  4.  
  5. Gently fold half of the whipped whites into the batter with a large rubber spatula. Then gently fold the remaining whites into the batter. The batter should remain slightly lumpy and have large parts of egg whites not fully incorporated. (The batter will last a few hours in the fridge without deflating too much.)
  6. Heat the waffle iron. Be sure it is hot before proceeding or your waffles may stick. Lightly brush the hot surface with some oil. Drop ¼ to 1/3  cup batter per waffle onto the waffle iron. Let it set, do not open until your waffle iron light goes on. The waffles will be golden brown on both sides. Remove to a plate or cool on a rack to serve warmed up later or frozen for up to 3 months.
0 Comments

Chaffles

11/16/2021

0 Comments

 
Picture
These delicious “chaffles” are a low-carb version of traditional waffles. Honestly, I don’t think you will be able to taste the difference. The texture is similar too. Hot out of the waffle maker, the waffle is soft. Let your waffles cool on a rack and they will crisp up and be perfect as a substitute for sandwiches and toasted bread.
For cheese, I prefer to use shredded part-skim, low moisture mozzarella cheese. The mild flavor is perfect for both sweet and savory chaffles. Feel free to bump up the flavor with other cheeses like cheddar, swiss, Monterey Jack, and feta or goat cheese. Pre-shredded cheese usually have added starch to prevent the cheese from sticking in a clump in the package. I prefer to shred my mozzarella to avoid this additive. I use a 4-inch waffle maker by Dash. If you use a traditional sized Belgian waffle maker, double the recipes below.
Basic Chaffle
Makes four 4-inch chaffles

2 large eggs
1 cup mozzarella, grated
½  cup almond flour
½  teaspoon baking powder
 
  1. Preheat waffle maker. Be sure to preheat fully or your chaffles will stick to the waffle maker.
  2. Combine all the batter ingredients in a bowl and mix thoroughly. You can also place the ingredients in a food processor or blender and mix.
  3. Place ¼ cup of batter onto the hot waffle maker for each chaffle. Cook for 3-4 minutes or until the waffle maker indicates your chaffle is done (a light should come on). Be patient and do not open the waffle maker until the waffle is cooked.
  4. Serve hot or place onto a cooling rack for crisper chaffles that can be used for sandwiches or other recipes that usually call for sliced bread.
Sweet Chaffle
Makes four 4-inch chaffles

2 large eggs
1 cup mozzarella, grated
½  cup almond flour
½  teaspoon baking powder
1 teaspoon low-carb sweetener
½ teaspoon vanilla extract
 
Follow directions above to cook.

Picture

Variations

Savory Variations: Use the Basic Chaffle recipe and add to it-
  • Spinach and Feta Chaffle: 3 tablespoons grated parmesan cheese, 1 package frozen spinach(thawed with water squeezed out), ¼ cup crumbled feta cheese, 1 tablespoon fresh herbs (dill, basil, parsley, or chives).
  • Lemon Herb Chaffle: 1 teaspoon lemon zest, ¼ cup fresh herbs (dill, basil, cilantro, parsley, or chives)
  • Smoked salmon and cream cheese. Sprinkle w/Everything Bagel seasoning.
  • Poached eggs with ham and hollandaise sauce.
  • Turkey, avocado, and tomato with homemade fail-proof mayonnaise.
  • Guacamole and salsa with cheese.

Sweet Variations: Use the Sweet Chaffle recipe and add to it-
  • Orange Cardamom: 1 teaspoon orange zest, 1/8 teaspoon of cardamom (or cinnamon)
  • Chocolate Chaffles: ¼ cup melted butter, ¼ cup cocoa powder, 2 teaspoons flax meal or coconut flour, 1 teaspoon low-carb sweetener or 1 tablespoon sugar.
 
Dips and Sauces:
  • Chocolate dipping sauce: 2 ½ ounces dark chocolate, 1 teaspoon coconut oil -melt the chocolate and the coconut oil together in the microwave and serve warm.
  • Vanilla Whipped Ricotta: 4 ounces whole milk ricotta cheese, 1 teaspoon vanilla extract, 1 teaspoon low-carb sweetener or 1 teaspoon sugar. Whip in a food processor.
  • Cran-Raspberry sauce: recipe here
Picture
0 Comments

Gremolata Roast Mushrooms-and other ideas...

11/1/2021

0 Comments

 
Picture
Picture
Serves 4-6 as a side dish

1 1/2 pounds whole baby Bella mushrooms w/stems
3 tablespoons extra virgin olive oil
4 large garlic cloves, chopped
kosher salt and freshly ground pepper to taste
½ cup loosely packed chopped flat-leaf parsley
Zest of 1 lemon
2 small garlic cloves, minced
½ cup grated Parmesan cheese
4 tablespoons extra virgin olive oil
 
  1. Heat the oven to 400 degrees.
  2. Brush of any dirt from the mushrooms. Leaving the stems on, cut each mushroom in half and place into a large bowl. Toss the mushrooms with 3 tablespoons extra virgin olive oil and the chopped garlic. Toss to coat. Add 1 teaspoon of kosher salt and a few grinds of pepper. Toss again.
  3. Place the mushrooms in one layer onto one or two baking sheets as needed. Be sure they are not too crowded. Roast them in the oven for about 15-20 minutes or until just beginning to crisp up. 
  4. Prepare the gremolata while your mushrooms or roasting. Combine the chopped parsley, lemon zest, minced garlic, cheese, and olive oil. Set aside.
  5. Remove the mushrooms from the oven and toss with 1/2 cup of the gremolata. Taste and season with salt and pepper and add more gremolata if you like. If you have leftover gremolata, look below for other ideas for serving.

How to serve your gremolata:
  • Sauté sliced garlic in butter or olive oil, turn off the heat and add hot cooked linguini. 
  • Add the gremolata and 1-2 spiralized zucchini.
  • Toss gremolata with 1 pound of hot linguini or fettucine
  • Toss gremolata with thinly sliced sweet potatoes or baking potatoes. Stack them and bake them, covered, for 15 minutes (or until a fork pierces the stacks easily), then uncover and cook another 5 until browned.
  • Serve gremolata with cooked green beans
  • Stir 1 spoonful of gremolata into a bowl of soup or stew
  • Serve gremolata with roasted or seared chicken
  • Serve with grilled fish
0 Comments
    Picture

    Picture
    Follow Liz on Instagram

    Picture
    photo credit-Judy Santos-jsantosphotography.com

    Recipe Categories

    All
    15 Minute Meals
    Air Fryer
    Appetizers/Hors D'oeurves
    Avocados
    Baking
    Beautifully Delicious
    Beef
    Bread
    Breakfast
    Chaffles
    Charcuterie
    Chicken
    Cocktails
    Cookies
    Cooking For 1 Or 2
    Cooking With Chocolate
    Cooking With Wine
    Cooking W/Spices
    Cook's Corner TV
    Cook The Book Cookbook Series
    Dairy
    Desserts
    Dressings
    Drinks
    Edible Flowers
    Edible Garden
    Edible Landscapes
    Eggs
    Entrees
    Facebook Live
    Fall Recipes
    Fats
    Food Film/TV
    Grain Bowls
    Herbs
    Hollis NH Recipes
    Instant Pot
    Intermittent Fasting
    Kitchen/Pantry
    Knife Class
    Lamb
    Lobster Tails & Cocktails
    Local Farms
    Lowcarb
    Low Carb Breakfast
    Pantry
    Passionate Dishes For Your Valentine
    Pasta
    Pie Classes
    Pies Savory
    Pork
    Rubs
    Salads
    Sandwiches
    Sauces
    Seafood
    Seasoning Blends
    Seed Oils
    Sheet Pan Meals
    Side Dishes
    Smoothies
    Soups/Stews
    Starches/Pasta/Beans
    Stock
    Tapas
    Tarts Savory
    Thanksgiving
    Turkey
    Vegetables
    Vegetarian
    Winter Pantry


    Liz's Cookbook

    Liz's Gardens

    Picture

    Liz's Kitchen

    Picture

    Archives

    January 2023
    December 2022
    November 2022
    October 2022
    September 2022
    August 2022
    July 2022
    June 2022
    May 2022
    April 2022
    March 2022
    February 2022
    January 2022
    December 2021
    November 2021
    October 2021
    September 2021
    August 2021
    July 2021
    June 2021
    May 2021
    April 2021
    March 2021
    February 2021
    January 2021
    December 2020
    November 2020
    October 2020
    September 2020
    August 2020
    July 2020
    June 2020
    May 2020
    April 2020
    March 2020
    February 2020
    January 2020
    November 2019
    October 2019
    September 2019
    May 2019
    October 2018
    March 2018
    November 2017
    October 2017
    September 2017
    August 2017
    June 2017
    May 2017
    February 2017
    June 2016
    February 2016
    December 2015
    November 2015
    October 2015
    August 2015
    July 2015
    June 2015
    May 2015
    April 2015

    RSS Feed

CONTACT US

Email

lizb@thecreativefeast.com

Telephone

Location

603-321-5011
Hollis, NH