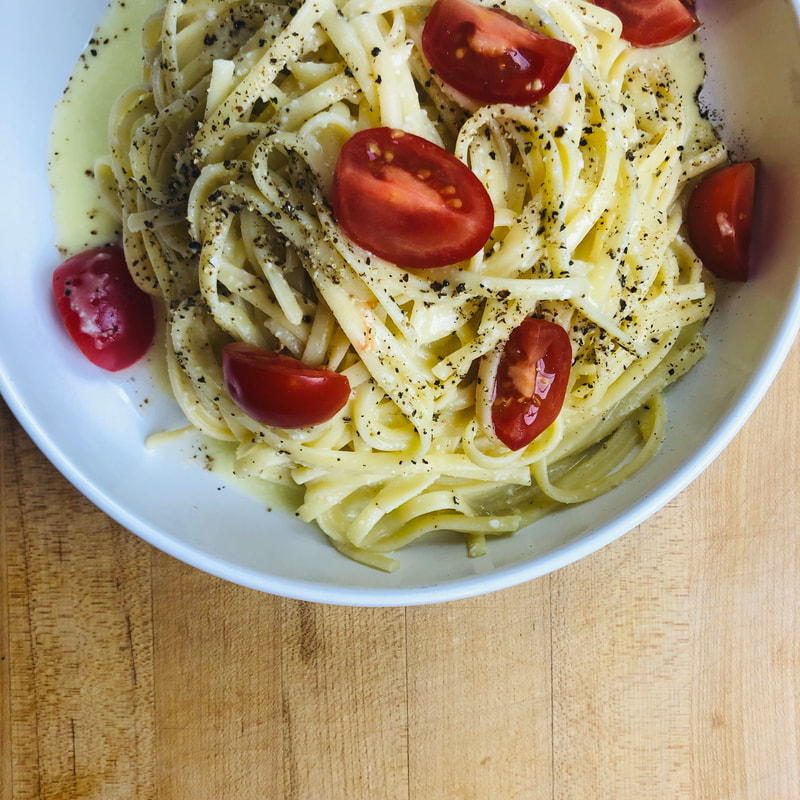
Liz Barbour's Creative Feast
  • HOME
  • Programming
    • Pick A Class
    • Schedule a Class >
      • Fees
      • Testimonials
      • Class Survey
  • EVENTS
    • Calendar
    • Intermittent Fasting Classes
    • Liz's Open Garden 2022
  • FOOD & FUN
    • Recipe Blog
    • Intermittent Fasting
    • Recipes from Hollis
    • Low-Carb
    • Kitchen Tools Liz Loves
    • Barbour Chicks
    • Liz's Edible Gardens
    • Liz's Kitchen Remodel
    • Artisan Bread
  • STORE
    • Liz's Cookbook
    • Shop
  • Contact Liz
  • About Liz
    • Liz's Story
    • Liz in The Press >
      • Newspaper
      • Magazine
      • Television
      • Articles by Liz

Winter Squash and Spinach Pasta Bake-Smitten Kitchen

10/11/2022

1 Comment

 
Picture
Picture
Picture
Picture
Picture
Picture
This recipe is from one of my favorite recipe authors Deb Perelman. Smitten Kitchen is her website and Instagram page. I suggest you follow both and buy every one of her cookbooks. This recipe popped up in my Instagram feed and because I had all of the ingredients on hand, I went right into the kitchen and got busy. I hope you enjoy! Here is the link to her recipe page.
I taught this recipe in a recent class and used only 4 oz of Rotini and 1 1/4 cups water. I really liked it. I think the pasta and the squash were softer and creamier. 
This is Deb's recipe with her notes. I did make one change and noted it below.

​Serves 8

​1 large egg
1 cup (250 grams) ricotta
1 cup (100 grams) finely grated parmesan, divided
1 cup (85 grams) coarsely grated fontina cheese
1 1/4 cups (300 grams) water
3 tablespoons (45 ml) olive oil, divided
1 tablespoon (8.4 grams) kosher salt (I use Diamond; use less of other brands)
Freshly grated nutmeg (optional)
Freshly ground black pepper
1/4 to 1/2 teaspoon red pepper flakes, to taste
3 garlic cloves, thinly sliced
5 ounces (140 grams) baby spinach, roughly chopped
2 tablespoons thinly-sliced sage leaves or 1 teaspoons chopped thyme leaves (optional)
1 1/4-pound (560-grams) butternut or another sturdy winter squash, peeled, seeded, sliced thin or 1 pound (455 grams) in prepared chunks, sliced thin
**8 ounces (225 grams) dried pasta (see Note), broken into pieces if large/long
​
  1. Heat oven to 350°F (176°C). Line a 9-inch springform with 3-inch sides (see Note) with a sling of parchment paper, pressing it across the bottom and creasing the sides to get it to fit as best as possible. If the sides aren’t well covered, repeat with a second piece of parchment in the other direction.
  2. Whisk egg and ricotta in a large bowl. Stir in half of the parmesan, fontina, water, 2 tablespoons of olive oil, salt, a few gratings of fresh nutmeg, lots of freshly ground black pepper, red pepper flakes, and garlic. Stir in squash, spinach, and sage or thyme, if using. Add dried noodles and stir until everything is coated.
  3. Pour into prepared pan and press gently so everything is in as even of a layer as possible. Sprinkle with second half of parmesan. Gently fold any parchment that extends over the rim of the pan into the center and cover the pan tightly with foil. Bake on a sheet (for extra security against drips) for 1 hour, then remove foil, reopen the parchment folded over the top, and drizzle the dish with remaining 1 tablespoon olive oil. Return to the oven uncovered for 30 minutes. Pasta will be baked through and the top will be crisp. If it doesn’t have as much color as you’d like on top, you can finish it under the broiler for a minute or two.
  4. Cool in pan on a rack for 30 minutes before removing the springform ring, sliding the pasta bake by its parchment onto a serving plate, and cut it into wedges.
Do ahead: This keeps in the fridge for up to 1 week. Rewarm uncovered in a 350-degree oven. I haven’t frozen it, but would expect it to freeze well, tightly wrapped.


Notes:
***Liz's Note: I used 4 ounces of pasta (Rotini) and 1 1/4 cups water. I thought the pasta and the squash cooked up a little creamier than with 8 oz of pasta. I liked the texture better with less pasta.
* Structural note: Like a lasagna, this is more wet and messy when it first comes out of the oven. I recommend a 30-minute rest at minimum (what you see here in the loose slices) but it will be cleaner to cut and more set the longer it hangs out. It reheats fantastically and keeps up to a week in the fridge. Last night, we reheated wedges from 6 days ago and they were (still) perfection.
* Pan size: I only tested this in a 9-inch springform but would expect it to also fit in a 11 to 12-inch ovenproof skillet and also, less glamorously, a 9×13-inch baking dish. No need to line with parchment if you’re serving it from the pan or not worried about leakage.
* Pasta shape: I am using a ribbon-shaped pasta called mafaldine or reginette. You can find it from many brands with slight variations such as: Anna (what I used), Sfoglini, Garofalo, Eataly. Classic ruffle-edged lasagna noodles broken into pieces will work too.
* Adaptation notes: I used Ottolenghi’s recipe as general inspiration, but not a literal guide. I skipped the tomatoes, pine nuts, feta, basil, parsley, and even the fresh noodles, instead using dried ones and adding more liquid so they could fully cook. I add some fontina for richness, a bit more parmesan, more salt, and sage.
* Salt [an update]: There have been so many comments about the salt level, I’m adding the weight of the salt and more guidance. As originally noted, Diamond brand kosher salt is much lighter than other brands of kosher salt so if you’re not using it, it’s a good practice to use half of any other brand when reading a recipe. More about salts here.

1 Comment

Spaghetti with Swiss Chard

9/14/2022

0 Comments

 
By Joshua McFadden “Six Seasons”
 
Serves 4
½ cup raisins
Red wine vinegar
Kosher salt and freshly ground black pepper
8 ounces spaghetti
Extra-virgin olive oil
2 garlic cloves, thinly sliced
½ cup pine nuts           
½ teaspoon dried chile flakes
1 bunch Swiss chard, dried ends trimmed, stems thinly sliced, leaves torn into strips
3 tablespoons unsalted butter
Parmigiano-Reggiano cheese, for grating
 
  1. Combine the raisins, a splash of vinegar, and warm water just to cover in a bole and plump for 20 minutes. Drain.
  2. Bring a large pot of water to a boil and add salt until it tastes like the sea. Add the spaghetti and cook according to the package directions. Start tasting a minute or so ahead of time so you don’t overcook it. With a ladle or a measuring cup, scoop out about ½ cup of the cooking water, and drain the pasta well.
  3. Meanwhile, pour a healthy glug of olive oil into a large skillet over medium-low heat. Add the garlic and pine nuts and let them toast very slowly until lightly browned, about 5 minutes. Add the chili flakes and cook for another 10 seconds so they can bloom, then add the drained raisins. 
  4. Increase the heat to medium, add the chard stems, season with a bit of salt and black pepper, and cook slowly until the stems are slightly tender, 3-4 minutes. Add the torn chard leaves and splash of water (use the pasta water, needed), cover the pan, and cook until the leaves are wilted, 2-3 minutes. 
  5. Add the drained pasta the butter to the chard and toss well. Taste and adjust the seasoning with more salt, black pepper, or chile flakes. Grate a bit of Parmigiano over everything, drizzle with more olive oil and pile into bowls. Serve with more cheese.
0 Comments

Sheet Pan Carbonara

5/16/2022

0 Comments

 
Picture
Low-carb version w/cauliflower
This is so simple and delicious. Using the store bought, vacuum-sealed gnocchi is a game changer in this recipe. No need to boil it, you’ll be baking it instead. When I am feeling like a low-carb alternative, I replace the gnocchi with cauliflower florets. They are a lovely alternative. 
 
Serves 4-6
 
2 ¼ cups grated Parmesan cheese
¾ cup water
2 packages fresh or vacuum-sealed gnocchi or 1 small head cauliflower cut into florets
6 ounces diced pancetta
2 onions, thinly sliced
3 tablespoons olive oil
1 ½ cups frozen green peas, thawed
4 egg yolks
 
  1. Preheat oven to 425 degrees. Place oven rack in the middle position.
  2. In a small bowl, combine the grated Parmesan and water.
  3. Combine the gnocchi, pancetta, onions, and oil on the sheet pan. Bake for 20 minutes, stirring after 10 minutes. Cook until the pancetta and gnocchi are golden and crispy.
  4. Remove the pan from the oven and add the cheese mixture and the peas to the pan ingredients. Stir to combine well. 
  5. Bake for another 2 minutes or until the cheese has melted.
  6. Remove the pan from the oven and season with freshly ground pepper. 
  7. Divide evenly on plates or shallow bowls. Place an egg yolk on the center of each gnocchi dish and season the egg with pepper and a pinch of salt.  Serve immediately and tell everyone to stir the lovely yolk into the dish to create a creamy sauce.
0 Comments

Pasta Puttanesca

2/1/2022

1 Comment

 
Picture
Serves 4
2 tablespoons olive oil 
6 cloves garlic, sliced
2 ounces anchovy fillets, drained or anchovy paste 
½ teaspoon crushed red pepper flakes 
20 Kalamata olives, pitted and chopped
3 Tbs capers, rinsed 
1 (28-ounce) can crushed tomatoes 
1 (14.5-ounce) can diced tomatoes, drained 
A few grinds black pepper 
1 cup flat leaf parsley, chopped 
1/2 pound dry spaghetti
Cold water to cover
1 teaspoon coarse salt

​grated cheese for passing 

  1. Heat a large sauté pan over medium-low heat with the oil, garlic, anchovies, and crushed pepper. Sauté the mixture until anchovies melt into the oil and completely dissolve and garlic is fragrant, about 3 minutes. 
  2. Add olives, capers, tomatoes, black pepper, and parsley. Heat the sauce until it bubbles then reduce the heat and simmer 8 to 10 minutes. 
  3. Prepare the pasta while the sauce is simmering. Combine pasta, water to cover and salt in a 3-quart, high-sided saute pan. (Water should just barely cover pasta). Cover and set over medium-high heat.
  4. When water reaches a boil, remove the lid and decrease heat to medium to maintain a simmer. Stir the pasta every minute or so, making sure the ends of the noodles stay submerged and that they aren't sticking together. Add more water as needed to keep it submerged. Drain when cooked and serve with the sauce. Pass grated cheese on the side.
 
*Low-carb Pasta Substitution:
  • 1-2 packages Shirataki Noodles-drain, rinse, dry-fry to remove extra moisture (3-5 minutes, stirring occasionally).
  • Roasted spaghetti squash

1 Comment

Roasted Stacked Potatoes

1/30/2022

0 Comments

 
​Serves 4
4 medium Yukon Gold potatoes- I purchase potatoes that are about the circumference of the muffin tins I am using. 
olive oil spray or 1 tbs olive oil
½ teaspoon fresh thyme or ¼ teaspoon dried
1 teaspoon Kosher salt
½ teaspoon ground pepper
2 teaspoons olive oil


Preheat the oven to 400-degrees. Spray 8 standard muffin cups generously with olive oil cooking spray or brush each cup well with olive oil. 
*If you don't have muffin tins, line a baking pan with foil and spray the foil. You will make free form stacks to cook.
Peel the potatoes and slice them thinly (about ⅛ of an inch) using a sharp knife or mandolin. Place the potato slices in a large bowl with the thyme, salt, pepper, and olive oil. Toss well to coat the potatoes evenly.
Stack the potatoes to fill each muffin cup over the rim by about ½ inch (if you are not using a muffin tin, place the stacks on the foil lined baking pan). Press the stacked potatoes down firmly. 
Bake until the tops and edges of the potatoes are browned, and the centers are tender when pierced with a fork, about 35 to 45 minutes depending on how thick your potatoes were sliced. 
Remove the potatoes from the oven. Slide a knife around each stack and remove them. Serve hot. 
These can be made one to two days in advance and reheated, covered, in a 300-degree oven for 20 minutes, or until heated through. Serve two stacks per person.
0 Comments

Tart & Spicy Indian Potatoes

1/12/2022

0 Comments

 
No one writes better recipes for the air fryer than Urvashi Pitre. Her website www.twosleevers.com is full of many easy and delicious recipes. This recipe is from her book Every Day Easy Air Fryer. You must buy this book and try every delicious recipe.
I often double and triple the spice mix in this recipe and use it to season vegetables, meat, and rice.

Serves 4
4 cups yellow baby potatoes cut into 4 pieces each
3 tbsp olive oil, coconut or avocado oil
1 tsp turmeric
1 tsp amchoor, sumac, or lime or lemon zest
1 tsp salt
1/4 tsp ground coriander
¼ tsp ground cumin
1/3 tsp cayenne pepper
1 tbsp fresh lime or lemon juice
1/4 cup fresh cilantro or parsley chopped

  1. In a large bowl, add potatoes, oil, turmeric, amchoor, salt, cumin coriander, and cayenne pepper. Mix well. 
  2. Place the seasoned potatoes in the air fryer basket and cook at 400F for 15 minutes. Check to ensure the potatoes are cooked through. 
  3. Sprinkle lime or lemon juice and chopped cilantro onto the potatoes. Toss and serve. 
*this recipes is excellent using small cauliflower florets, brussels sprouts (cut in half), radishes, sweet potatoes (cut into 1 inch cubes), or sliced carrots.
0 Comments

Gnocchi-with variations

12/21/2021

0 Comments

 
Picture
Picture
Picture
Picture
​Makes 4-6 appetizer servings
 
Gnocchi:
1 ½ pounds russet baking potatoes
2 teaspoons kosher salt
1 1/2 cups all-purpose flour, plus more for dusting 
1 egg
  1. Preheat the oven to 400 degrees. Roast the potatoes until fork tender or steam-do not boil. Boiling the potatoes will add too much moisture to the potatoes and make the gnocchi heavy and dense. While hot, remove the skin and rice the potatoes with a potato ricer(use the disk with the smallest holes) onto your work surface. Spread it out as you work to avoid piling up. You want the potatoes to air cool. You can also use a fork too, do not use a food processor.
  2. Form a well in the center of the potatoes. Sprinkle 1 ½ cups of flour and the salt over the potatoes.
  3. Crack the egg into the well. Using a fork, lightly beat the egg, and incorporate the remaining ingredients to form a dough. Knead lightly on the work surface until the dough is soft and smooth. Add just enough flour to keep the dough from sticking.
  4. Working on a lightly floured surface, divide dough into 3 equal pieces. Roll each piece into a long rope, about 1-inch in diameter, sprinkling with additional flour as needed to prevent sticking. Using a sharp knife or bench scraper, cut each rope into 3/4-inch bite-size pieces.
  5. To roll the gnocchi, you’ll need a fork or gnocchi board to give them ridges. The ridges will catch the sauce. Be sure to use enough flour so that the gnocchi don’t stick, and roll them down the front of the fork tines using your index and middle finger to push on the dough, while holding the fork at a 45 degree angle. Do the same if you are using a gnocchi board. Be sure to flour the board before beginning.
  6. To cook, fill a large pot with 4 quarts of water, bring to a boil, and add 1 tablespoon of salt. Drop in about 2 dozen gnocchi. When they float to the surface, allow them to simmer for about 30 seconds and remove them from the boiling water with a slotted spoon. Place the drained gnocchi onto a warm platter and cover with hot tomato sauce and Parmesan cheese.  Serve hot.
 
Herbed Gnocchi:
When forming the dough, add 1 tablespoon chopped parsley and 1 tablespoon chopped chives with the egg and incorporate into the dough.
 
Brown Butter Sauce:
3 tablespoons butter
4 large sage leaves
Parmesan cheese
  1. Heat 3 tablespoons of butter over medium-high heat in a skillet large enough to accommodate all of the gnocchi without crowding. When the butter begins to foam, add the gnocchi to the skillet and cook, turning as necessary, until they're browned and crisp on all sides, 5 to 6 minutes. Add sage leaves and cook until crisp, 30 seconds. Serve with Parmesan cheese.
 
Baked Gnocci:
Preheat oven to 400 degrees
1 lb sausage meat
1 jar pasta sauce-Rao’s is a favorite
2 teaspoons fennel seed
4 oz whole milk ricotta
8 oz mozzarella, shredded or in pieces
2 tablespoons parsley
Parmesan cheese for serving

  1. Preheat oven to 400°F.
  2. In a large ovenproof skillet, brown the sausage meat over medium/high heat until its cooked through, about 5 minutes. Remove the pan from heat.
  3. Add the pasta sauce, gnocchi, and fennel seed to the pan with the cooked sausage, and stir gently until the gnocchi is coated with the sauce and the sausage is well-distributed.
  4. Top with spoons of ricotta and the mozzarella. Bake on an upper rack for 15-20 minutes until heated through and the cheese has crisped up a bit. If you want more of a browned crust, place under the broiler for a few minutes.
  5. Top finished baked gnocchi with a sprinkling of fresh parsley and serve warm.
 
To Freeze Gnocchi:
To freeze, place uncooked gnocchi in a single layer on a parchment-lined baking sheet. Let them air dry at room temperature for at least 1 hour, up to 4 hours. Transfer baking sheet to the freezer until frozen solid. Transfer to freezer bags. Cook frozen gnocchi in the same way as fresh.
0 Comments

Spanish Potato Omelet-Tortilla A La Espanola

10/19/2021

0 Comments

 
Picture
Recipe by Penelope Casas-Tapas: The Little Dishes of Spain
Serves 6
1 cup olive oil
4 large potatoes, peeled and cut into 1/8 inch slices
1 large onion, thinly sliced
Course salt
4 large eggs

  1. Heat the oil in an 8–9-inch non-stick skillet.  Add the slices of potato to the hot oil one at a time to avoid sticking together. Next, add a layer of the onion. Alternate layers of potatoes with layers of onions.
  2. Cook slowly over medium heat, (the potatoes will really “boil” in the oil rather than fry) lifting and turning the potatoes until tender, do not brown.  The potatoes should remain separated, not in a “cake”.  Drain potatoes and onions in a colander, save oil. Make sure skillet is very clean to avoid sticking for later use.
  3. In a bowl, beat eggs with a fork until slightly foamy. Salt to taste.  Add the potatoes to the egg pressing down to cover potatoes completely. 
  4. In the clean skillet, heat 2 tablespoons of the saved oil until smoking point.  Add the potato, onion, egg mixture, spreading it out rapidly. 
  5. Lower the temperature to medium-high.  Shake the pan often to avoid sticking. When the eggs begin to brown underneath, invert the plate of the same size over the skillet and flip the omelet onto the plate. Add about 1 tablespoon more oil to the pan, then slide the omelet back into the skillet to brown on the other side.
  6. Lower the heat to medium and flip the omelet two or three more times, cooking briefly on each side. It should be juicy within. Transfer to a platter and cool, then cut in thin wedges or into 1 ½ -inch thick squares that can be picked up with toothpicks. Serve at room temperature. Can be made ahead and warmed to serve.
0 Comments

Kimchi Fried Rice with Scallion Salad

8/25/2021

0 Comments

 
Recipe by Julia Turshen Small Victories The entire book is filled with easy, delicious recipes. I love her "small victories". They will give you so many different ways to use her recipes.
​
4 scallion stalks, white and pale green parts only
1 tsp toasted sesame oil
1 tsp rice wine vinegar
1 tsp toasted sesame seeds
1/2 tsp red pepper flakes
1 16-oz jar cabbage kimchi, including juice
3 tbsp avocado oil
1 small yellow onion, diced
2 garlic cloves, minced
salt
4 cups day-old cooked white rice
1 tbsp soy sauce, plus more as needed

  1. Julienne scallion into 2″ matchsticks. Combine with sesame oil, vinegar, sesame seeds, and red pepper flakes. Set aside.
  2. Drain kimchi, retaining juice. Chop finely and set aside. In a large wok over medium-high heat, heat up oil. Add onions and garlic and cook until translucent, around 5 minutes. Turn heat to high and add kimchi. Cook for another 5 minutes until the edges become crispy and kimchi begins to stick to the pan.
  3. Add chilled rice into the wok, and as it heats up, use wooden spatula to break up the chunks. Combine thoroughly. Add in reserved kimchi juice and mix until thoroughly red-orange in color. Turn off heat and drizzle over soy sauce. Taste and adjust as preferred.
  4. Transfer fried rice to a bowl, top with scallion salad.
0 Comments

Smashed Potatoes with Garlic and Bacon

11/9/2020

0 Comments

 
Picture
​Serves 6


2 pounds fingerling potatoes-or other small potatoes
4 tablespoons olive oil
½ teaspoon kosher salt
¼ teaspoon fresh cracked black pepper
4 cloves garlic, thinly sliced
¼ pound thick-cut bacon, diced-or diced pancetta
½ cup parsley, chopped
salt and pepper
 
 
  1. Preheat oven to 425 degrees. Drizzle a rimmed baking sheet with 2 tablespoons oil. Place the potatoes onto the baking sheet and shake the pan to coat the potatoes on both sides with oil. Season with the salt and pepper.
  2. Place the pan into the oven and cook for 25 minutes or until the potatoes are tender when pierced with a fork.
  3. While the potatoes are cooking, heat a large sauté pan over medium heat. Add 1 tablespoon of olive oil and the bacon. Cook until the bacon begins to brown. Add the sliced garlic and cook for 1 minute. Remove the pan from the heat and set aside. 
  4. When the potatoes are fork tender, remove the pan from the oven. Gently press down on each potato to “smash” it and flatten a bit. Be careful to not flatten too much. You don’t want the potatoes to break apart losing their shape.
  5. Warm the bacon and garlic on the stove. Add the potatoes in a single layer. Turn the potatoes over to coat both sides with the garlic and bacon. Place the potatoes onto a warmed platter. Continue with the remaining potatoes and place onto the platter. Drizzle any remaining garlic and bacon onto the potatoes and sprinkle with parsley. Serve hot. 
Additions: Add 1 teaspoons chopped rosemary when cooking the garlic.
0 Comments

Creamy Coconut Pudding

10/29/2020

0 Comments

 
Serves 4
2 cups cooked rice 
½ can unsweetened coconut milk-I like Thai Kitchen or other thick coconut milk)
1/4 cup sugar
1/2 teaspoon salt
1 tablespoon butter
1/2 teaspoon vanilla extract
1 cup fresh, frozen or dried fruit 


  1. Combine the  cooked rice, coconut milk, sugar and salt in a 4 qt saucepan over medium-low heat.
  2. Cook, stirring frequently to prevent the rice from sticking to the bottom of the pan. Continue cooking until thick and creamy, 15 to 20 minutes. Remove from the heat and stir in the butter and vanilla. Serve warm or cold, topped with fruit.
0 Comments

Cheesy Pasta

10/14/2020

0 Comments

 
Adapted from Alton Brown's "Cacio e Pepe"
Picture
​Serves 6
1 pound dry spaghetti
Cold water to cover
1 teaspoon coarse salt
3 ounces parmesan cheese, finely grated
1/3 cup extra-virgin olive oil
3/4 to 1 cup pasta water
Salt and pepper to taste
1 ounce grated parmesan cheese for serving
​
Additions: Add any of the following: Cherry tomatoes, cooked chicken, sausage, broccoli, or other vegetable of your choice.
​
  1. Combine pasta, water and salt in a 3-quart, high-sided saute pan. (Water should just barely cover pasta and measure 1 1/2 inches deep total.) Cover and set over medium-high heat.
  2. When water reaches a boil, remove the lid and decrease heat to medium to maintain a simmer. Stir the pasta every minute or so, making sure the ends of the noodles stay submerged and that they aren't sticking together. Add more water as needed to keep it submerged.
  3. While the pasta cooks, begin the sauce. Combine the Parmesan and the olive oil in a large, deep mixing bowl. Work ingredients together with a whisk until it forms a batter-like sauce.
  4. When the pasta has been simmering for 5 minutes, ladle 1 cup of the cooking water into a measuring cup then slowly drizzle 3/4 cup into cheese paste while mixing until smooth.
  5. After the pasta has been cooking for 10 minutes start checking for doneness; you want it to be just barely al dente (a little bite).
  6. Use tongs to lift the pasta out of the cooking water and allow to briefly drain before adding to the cheese paste. Grasp the pasta with the tongs and stir vigorously for 2 minutes. The pasta will continue to release starch and the sauce will emulsify. Around a minute thirty you will see cheesy water magically transform into a proper sauce. If you find your sauce clumping, add a bit more of the pasta water and continue working the pasta. Season with salt and pepper to taste.
  7. Portion pasta into bowls, top with reserved parmesan cheese and serve immediately.


0 Comments

Kale-Sauce Pasta by Joshua McFadden

9/21/2020

0 Comments

 
Picture
I enjoy creating delicious recipes to share with my students, but when I discover a recipe by another chef I never hesitate to share it. And, when that chef has cookbook that I love, you know I'm going to share that too. Joshua McFadden's book Six Seasons-A New Way with Vegetables has become a favorite, seasonal cookbook for me. You MUST get this book! McFadden has opened my mind and my pallet to so many new flavor combinations and wonderful ways to prepare vegetables seasonally. This recipe is a wonderful example of an easy, beautiful, and delicious recipe I use often. Enjoy!
Makes 4 cups
Kosher salt, to taste
¼ cup extra-virgin olive oil, plus more for serving
2 cloves garlic, smashed flat and peeled
1 pound kale, thick ribs removed (dark green, curly kale)
 Freshly ground black pepper, to taste
½ pound pasta, like pappardelle or rigatoni
¾ cup coarsely grated Parmigiano- Reggiano
  1. Put a large pot of generously salted water over high heat, and bring to a boil. 
  2. In a small skillet over medium heat, add olive oil and garlic, and cook until the garlic begins to sizzle. Reduce heat to low, and cook very gently until garlic is soft and begins to turn light gold, about 5 minutes. Remove from heat.
  3. When water is boiling, add kale leaves, and cook until tender, but not mushy, about 5 minutes. Pull out the hot, dripping kale leaves with tongs, and put directly into a blender. (Don’t drain the pot; you’ll use that same boiling water to cook the pasta.) 
  4. Add garlic and its oil to the blender, along with a splash of hot water from the pot if you need some more liquid to get the blender going. Blend into a fine, thick green purée. Taste, and adjust seasoning with salt and pepper, then blend again.
  5. Add the pasta to the still-boiling water, and cook according to directions on the package. Ladle out about a cup of the water to save for finishing the dish, then drain the pasta and return it to the dry pot. Add the half of the kale purée, about 3/4 of the grated cheese and a splash of the reserved pasta water. Toss until all the pasta is well coated and bright green, adding another splash of pasta water and more kale sauce if needed so that the sauce is loose and almost creamy in texture. Serve in bowls right away, and top with an extra drizzle of olive oil and the rest of the grated cheese. Any leftover kale sauce can be frozen.

​Additions:
1-pound U26-30 shrimp, peeled and deveined-5 minutes before the pasta is done cooking, add the shrimp to the pasta and continue cooking for 5 minutes. Continue with recipe as written.

More uses for this Kale Sauce
  • add to any soup 
  • add to any pasta sauce
  • add cream to the kale sauce and drizzle over pasta, chicken, steak, pork, seafood
  • spread on sandwiches or wraps
  • stir into eggs to make kale scrambled eggs
  • combine with homemade stock to make a soup
  • add to Asian noodle bowl
0 Comments

Pantry Tuna with Pasta

6/24/2020

0 Comments

 
Picture
Note: I prefer to use less pasta for a lower-carb meal. 4 ounces for this recipe is fine if you choose. If you cook 8 ounces of pasta, you can set aside half for another meal. The pasta you refrigerate becomes a resistant starch and is healthier for you!

4-8 ounces linguini-dried.
2 tablespoons olive oil
5 large garlic cloves, thinly sliced
¼ teaspoon dried red pepper flakes
3 tablespoons capers, drained and chopped
10 ounces frozen spinach, pressed to drain well 
2 (5 ounce) cans Yellowfin Tuna in Olive Oil
kosher salt and freshly ground black pepper to taste
½ cup fresh parsley, chopped
1 lemon, quartered lengthwise 
Parmesan cheese for grating
  1. Bring a large sauté pan filled halfway with water to a boil with 1 teaspoon of kosher salt. Add the pasta to the boiling water, stirring occasionally, and cook until the pasta is al dente. You will see that the pasta will absorb most of the water and the water will become cloudy with the starch from the pasta. Plan to use some of the left over water to help create a sauce for your dish.
  2. While the pasta is cooking, heat a large sauté pan with the olive oil, sliced garlic, and red pepper flakes. Sauté, stirring frequently, for 2 to 3 minutes or until the garlic is fragrant and lightly golden. Add the capers and spinach with 1/2 cup of the pasta water.  Cook, stirring gently for 1 minute. 
  3. Add the tuna, with the olive oil from the cans to the pan. Combine the ingredients gently, breaking up large pieces of tuna. Reduce the heat to low and season to taste with salt and pepper.
  4. Using tongs, transfer the pasta into the skillet. Add the chopped parsley and ½-1 cup more of the remaining pasta cooking water (add hot tap water if you don't have enough pasta water). With the pan over low heat, gently toss the pasta with tongs to coat the pasta evenly. Add additional pasta water if necessary. Season with salt and pepper to taste. Serve immediately with Parmesan cheese on the side.
Additions:
Use fresh pasta. Pasta cooking time will be less.
Heavy cream-add 1/2 to 1 cup with the spinach. Let cook 3-5 minutes to reduce.
Substitute broccoli (frozen and thawed) for the spinach
Canned artichokes can be added with spinach. Cut reach into halves or quarters
1 can diced tomatoes, drained. 
Substitute 1 can cannelloni beans for the pasta.


0 Comments

Stacked Potatoes with Gremolata

4/10/2020

0 Comments

 
Serves 6

​Gremolata is a traditional Italian herb paste that is a simple combination of five ingredients: parsley, garlic, lemon, Parmesan, and extra virgin olive oil. With its bright, citrusy flavor, gremolata transforms ho-hum recipes into amazing dishes! Here I’ve combined gremolata with thinly sliced potatoes and roasted them to create a tasty side dish. It’s simple, delicious, and gorgeous!  
Low-carb trick-prepare and cook the stacked potatoes one day ahead and refrigerate. The refrigeration changes the structure of the starches in the potatoes to make them "resistant starches". Resistant starches have a reduced absorption rate in our bodies and helps to keep our insulin low. Learn more about this amazing phenomenon RESISTANT STARCH
 
½ cup loosely packed chopped flat-leaf parsley
Zest of 1 lemon
2 small minced garlic cloves
½ cup grated Parmesan cheese
4 tablespoons extra virgin olive oil
½ teaspoon Kosher salt
1 pinch pepper, freshly ground
8-10 Yukon Gold potatoes
 
Preheat the oven to 400 degrees. Spray 12 standard muffin cups generously with nonstick cooking spray.

To make the gremolata, combine the parsley, lemon zest, garlic, Parmesan, oil, salt, and pepper in a bowl and set aside. 

Peel the potatoes and slice them thinly (about ⅛ of an inch) using a sharp knife or mandolin. Add the potato slices to the gremolata and toss to coat. I use my hands to be sure to coat the potatoes evenly. Stack the potatoes to fill each muffin cup over the rim by about ½ inch. Press the stacked potatoes down firmly. Bake until the tops and edges of the potatoes are browned and the centers are tender when pierced with a fork, about 35 to 45 minutes. Remove the potatoes from the oven. Cut around each stack with a sharp knife and remove them with a spoon. Serve hot. These can be made one to two days in advance and reheated, covered, in a 300 degree oven for 20 minutes, or until heated through.  
Picture
0 Comments

Baked Polenta

4/9/2020

0 Comments

 
Traditionally prepared polenta is amazing, but it takes lots of stirring and time. If you are looking for a quicker, less labor intensive method for making polenta, baking it in the oven is a nice alternative. Please, never, ever, ever, ever buy pre-made polenta in a package. It is an awful substitute for homemade. I won't say anything more about that. 
1 cup polenta
4 cups hot water
1 teaspoon salt
4 Tbs unsalted butter (or more if you like)         
1/2 cup grated Parmesan cheese
kosher salt and ground pepper 

  1. Preheat the oven to 350 degrees. Combine the polenta, hot water, and salt in a 8X8 pan or other 2 quart baking dish. Bake for 25-30 minutes or until the liquid is almost absorbed and the polenta is creamy when stirred. Remove from the oven. 
  2. Stir in the butter and the parmesan cheese. Season with salt and pepper to taste.
    Serve hot or refrigerate for later use.
Polenta Serving Notes:
  • If you’d like a firm polenta for grilling, frying, or as an hors d’oeurves leave the polenta in the serving dish until the polenta is firm and cool, about 2 hours or overnight in the refrigerator.  When firm, turn polenta out onto a cutting board and cut into squares, triangles, or use a cookie cutter and cut into shapes.  
  • To Grill: Brush polenta pieces with olive oil.  Grill as desired.
  • To Fry: Heat butter in a sauté pan and fry pieces until light brown on both sides.  Serve hot.
0 Comments

Shirataki Noodles A Low-Carb Alternative for Pasta

3/31/2020

0 Comments

 
Shirataki noodles are my favorite low-carb alternative to pasta. Shirataki noodles have only 6g of carbs per 8oz serving while pasta has 45g of carbs per 1 cup serving...45grams!!!!
Shirataki noodles are made from plant-based ingredients including yam flour and soybeans. They are packaged in water and can be found in the refrigerated produce section of the grocery store with the tofu products. You can use shiritaki noodles in soups, noodle bowls, and as a pasta substitute. Preparation is key to achieving the right consistency for your dish.

Rinse your noodles

When using the noodles in a soup or noodle bowl simply rinse the noodles. You will notice a "fishy" odor when you open the package and drain it. No worries, this will rinse away. Allow the hot broth of your soup or noodle bowl to heat up the noodle. Over cooking them will make them too soft and gummy.


How to "dry fry" your noodles
If using the noodles as a pasta substitute, you'll want to "dry fry" them. This technique will steam away the excess water in the noodles and result in a firmer texture that will hold up well to a sauce. 
Heat a large sauce pan. You pan does not need to be a non-stick pan. Do not add anything to the pan-no oil, butter, or fat of any kind. Heat the pan so that it sizzles when you add the noodles-medium heat should be fine. Now let the noodles steam off the excess liquid. Gently move the noodles in the pan for 3-5 minutes. That's it! Serve hot with your favorite sauce, butter, or extra virgin olive oil. Enjoy!
Picture
0 Comments

Sesame Soba Noodles with Veggies

2/20/2016

1 Comment

 
Makes 6-8 servings

1 pound soba noodles, cooked and drained (follow the package directions)
4 scallions, chopped
1 large red pepper, cored, seeded and sliced thinly or 1 bag frozen sliced peppers, thawed
2-3 cups frozen broccoli florets, thawed
4 garlic cloves, minced
1/2 cup fresh cilantro, chopped
1/4 cup soy sauce (low sodium)
3 Tbs toasted sesame oil
 
 
  1. Place the cooked noodles, veggies, and cilantro in a large bowl.
  2. Whisk the soy sauce, garlic and sesame oil together in a small bowl.
  3. Pour the sauce over the soba noodles and veggies and toss to coat.  This can be served warm or cold.

Substitutes and additions:
  • Use whole grain thin spaghetti or brown rice instead of soba noodles.
  • Add shredded chicken, cooked shrimp, or tofu for more protein.  
1 Comment

What's In Your Pantry?

5/18/2015

1 Comment

 
Picture
My pantry
Preparing dinner often takes a back burner to all the other activities that  prevent us from making the time to prepare a healthy meal at home.   If you have attended one of my cooking programs you know how much I stress the importance of cooking at home.  When you prepare your meals at home you know what is in each dish; adding healthier ingredients and keeping salt and sugar in check.  To support your cooking efforts you also need to consider what to keep on hand in your pantry so you can rely on last minute recipes when needed.  Consider that your pantry is not only your dry pantry but should also include your freezer and your refrigerator.  What do you have in your pantry?


Picture

Seared Sausage with Tomato Sauce served over Baked Polenta

This recipe was created with ingredients from my pantry...give it a try!

Serves 6

Sausage and Tomato Sauce

3 Italian sausages
2 Tbs. olive oil
8 cloves of garlic, slivered
1 28 oz. cans diced tomatoes
Pinch of crushed red pepper
2 Tbs fresh basil, sliced thinly
¼ cup flat leafed parsley, chopped
Kosher salt and freshly ground pepper
Parmesan cheese for grating

1.    Boil the sausages in water until cooked through, about 10 minutes.  Slice each sausage in half lengthwise.

2.    Heat a large sauté pan over medium high heat with the oil.  When hot, place the sausages into the pan in a single layer, cut side down.  Cook until browned.   

3.    Add the slivered garlic.  Sauté for 1 minute. 

4.    Add the the basil, crushed re pepper, and diced tomatoes with their juice to the sausages.  Reduce the heat to medium low and simmer while preparing the polenta.

5.    Just before serving add the chopped parsley to the sauce and season with salt and pepper to taste.

6.    Serve hot over polenta with freshly grated Parmesan.

Baked Polenta

1 cup polenta
2 cups hot water
2 cups milk, hot (2% or whole milk)
1 teaspoon salt
4 Tbs unsalted butter (or more if you like)           
1/3 cup grated Parmesan cheese
kosher salt and ground pepper


1.    Preheat the oven to 350 degrees. Combine the polenta, hot water, hot milk, and salt in a 8X8 glass pan or other 2 quart baking dish. Bake for 25- 30 minutes or until the liquid is almost absorbed and the polenta is creamy when stirred. 

2.    Stir in the butter and the parmesan cheese. Season with salt and pepper to taste.
Serve hot with sausage and tomato sauce.


1 Comment

Asian Black Bean Sauce

4/20/2015

1 Comment


A great multi-use recipe!

There is nothing better than a recipe that does double or triple duty.  To find a recipe that starts as one recipe and then becomes something very different by adding or subtracting just a few ingredients makes meal planning so much easier.  

In its original form it is a sauce for salmon, chicken, beef, or pork.  You can put it over rice, spaghetti squash, or steamed broccoli.  Add chicken or vegetable stock to it and it becomes a soup.  Take that soup and puree it, add some left over chicken and it becomes an Asian chili.  To take this recipe and turn it into a Mexican or Latin dish, leave out the ginger, soy sauce, and sesame oil and add in chipotle!  The possibilities are endless. My Asian Black Bean Sauce is one of my favorite multi-use recipes.  The ingredients are always part of my pantry supplies.  And, this recipe freezes well for later use.   I recently featured this recipe at a program I did for the North Reading Garden Club and it received great reviews!
Makes about 2 cups

2 tsp olive oil
2 cloves of garlic, minced
1 Tbs of fresh ginger, minced
1 can of black beans (15 ounces), drained and rinsed (red kidney beans can be added or substituted)
1 cup low-sodium chicken stock or water
1 tsp toasted sesame oil
2 tsp low-sodium soy sauce
Pinch crushed red pepper
2 Tbs fresh cilantro, chopped
2 pieces of scallion, sliced thin on the diagonal.
  1. Heat canola oil, garlic, and ginger in a saucepan over low heat and cook, stirring for 2 minutes (do not brown).  
  2. Add the rinsed black beans, stock, sesame oil, soy sauce, and crushed red pepper. Simmer over low heat for 10 minutes.  Add more stock if you would like a saucier consistency.
  3. Finish with fresh cilantro and sliced scallions.

1 Comment
    Picture

    Picture
    Follow Liz on Instagram

    Picture
    photo credit-Judy Santos-jsantosphotography.com

    Recipe Categories

    All
    15 Minute Meals
    Air Fryer
    Appetizers/Hors D'oeurves
    Avocados
    Baking
    Beautifully Delicious
    Beef
    Bread
    Breakfast
    Chaffles
    Charcuterie
    Chicken
    Cocktails
    Cookies
    Cooking For 1 Or 2
    Cooking With Chocolate
    Cooking With Wine
    Cooking W/Spices
    Cook's Corner TV
    Cook The Book Cookbook Series
    Dairy
    Desserts
    Dressings
    Drinks
    Edible Flowers
    Edible Garden
    Edible Landscapes
    Eggs
    Entrees
    Facebook Live
    Fall Recipes
    Fats
    Food Film/TV
    Grain Bowls
    Herbs
    Hollis NH Recipes
    Instant Pot
    Intermittent Fasting
    Kitchen/Pantry
    Knife Class
    Lamb
    Lobster Tails & Cocktails
    Local Farms
    Lowcarb
    Low Carb Breakfast
    Pantry
    Passionate Dishes For Your Valentine
    Pasta
    Pie Classes
    Pies Savory
    Pork
    Rubs
    Salads
    Sandwiches
    Sauces
    Seafood
    Seasoning Blends
    Seed Oils
    Sheet Pan Meals
    Side Dishes
    Smoothies
    Soups/Stews
    Starches/Pasta/Beans
    Stock
    Tapas
    Tarts Savory
    Thanksgiving
    Turkey
    Vegetables
    Vegetarian
    Winter Pantry


    Liz's Cookbook

    Liz's Gardens

    Picture

    Liz's Kitchen

    Picture

    Archives

    January 2023
    December 2022
    November 2022
    October 2022
    September 2022
    August 2022
    July 2022
    June 2022
    May 2022
    April 2022
    March 2022
    February 2022
    January 2022
    December 2021
    November 2021
    October 2021
    September 2021
    August 2021
    July 2021
    June 2021
    May 2021
    April 2021
    March 2021
    February 2021
    January 2021
    December 2020
    November 2020
    October 2020
    September 2020
    August 2020
    July 2020
    June 2020
    May 2020
    April 2020
    March 2020
    February 2020
    January 2020
    November 2019
    October 2019
    September 2019
    May 2019
    October 2018
    March 2018
    November 2017
    October 2017
    September 2017
    August 2017
    June 2017
    May 2017
    February 2017
    June 2016
    February 2016
    December 2015
    November 2015
    October 2015
    August 2015
    July 2015
    June 2015
    May 2015
    April 2015

    RSS Feed

CONTACT US

Email

lizb@thecreativefeast.com

Telephone

Location

603-321-5011
Hollis, NH