Liz Barbour's Creative Feast
  • HOME
  • Programs
    • Lecture Programs
    • Fees
    • Schedule a Program
    • Testimonials >
      • Class Survey
  • EVENTS
    • Calendar
    • Intermittent Fasting Classes
  • FOOD & FUN
    • Recipe Blog >
      • AARP 2025-Cook-Along Classes
      • AARP 2024-Cook-Along Classes
      • AARP 2023-Cook-Along Classes
      • Artisan Bread-Master Recipe
    • Intermittent Fasting
    • Recipes from Hollis
    • Low-Carb
    • Kitchen Tools Liz Loves
    • Barbour Chicks
    • Liz's Edible Gardens
    • Liz's Kitchen Remodel
  • Contact Liz
  • About Liz
    • Liz's Story
    • Liz in The Press >
      • Newspaper
      • Magazine
      • Television
      • Articles by Liz
  • Blog

Madras Chickpea Soup with Spinach

12/23/2022

0 Comments

 
Picture
Adapted from Lorna Sass-Pressure Perfect

​Makes 4 servings
1 ½ cups dried chickpeas, soaked overnight
3 cups vegetable broth
1 14-oz can unsweetened coconut milk
2 tbsp mild, Madras curry powder or to taste
2 packages (10 oz each) frozen chopped spinach
2 large (about 1 lb) onions, peeled and cut into eights
15-oz can diced tomatoes-including liquid
crushed red pepper flakes to taste
Kosher salt
pinch of cayenne
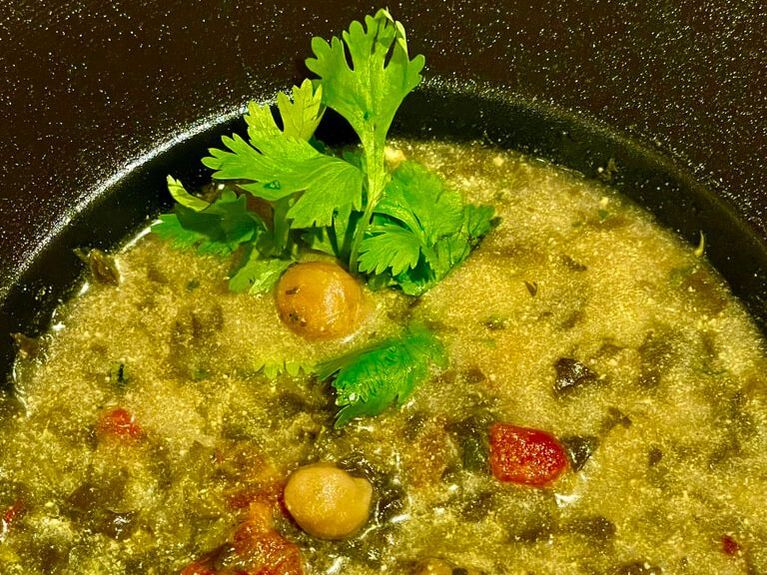
1/4 cup chopped fresh cilantro
  1. In a 6-quart (6 L) or larger pressure cooker (stove top or electric pressure cooker), stir together broth, coconut milk and curry powder. Set over high heat. Add soaked chickpeas, spinach, and onions. Pour tomatoes on top; do not stir.
  2. Lock the lid in place and set the valve to “sealing”. Cook at high pressure for 25 minutes. Allow the pressure to come down naturally for 10 minutes. A longer natural release will result in softer chickpeas. When pressure is released, remove the lid, tilting it away from you to allow any steam to escape.  
  3. Stir well. Add a pinch of cayenne to taste, more curry powder if necessary, and salt to taste. The mixture will thicken as it stands, but if you wish to thicken it immediately, mash some of the chickpeas against the side of the cooker with a fork and stir them in. Stir in cilantro. Serve in large, shallow bowls or lipped plates.
0 Comments

Instant Pot Broccoli and Red Pepper Frittata

10/26/2022

0 Comments

 
Picture
Picture
Adapted from www.twosleevers.com
I highly recommend that you check out Urvashi Pitre's website and cookbooks. She taught me how to use an Instant Pot.

Makes one 6-inch frittata
​
1 cup roasted peppers or sweet red peppers sliced thinly
2 cups frozen broccoli, thawed and roughly chopped
4 large eggs
1 cup half and half or heavy cream
1 cup shredded cheddar cheese (or Swiss, mozzarella or other)
1 tsp Kosher salt
1 tsp ground pepper

  1. Grease a 6 x 3 pan extremely well with butter or olive oil.
  2. Arrange the roasted peppers in the bottom of the pan and cover with the thawed and chopped broccoli.
  3. In a large bowl whisk together the eggs, half and half, salt, and pepper. Stir In the shredded cheese.
  4. Pour the egg mixture on top of your vegetables and cover with foil.
  5. In the inner liner of your instant pot, place 2 cups of water. Place a steamer rack on top of this. Place the covered pan on the steamer rack. Cook on high pressure for 20 minutes. Allow it to release pressure naturally for 10 minutes, and then release all remaining pressure.
  6. Let it sit for 5-10 minutes. Using a knife, gently loosen the sides of the frittata. Place a plate on top of the pan, and turn out the frittata onto the plate. If you want the pepper side up, you’re done. If you want the cheese side up, flip it on a plate once more. You can broil for 3-4 minutes to get the cheese to melt or serve as is.

Notes:
  • You can use any color sweet peppers. Slice thinly to help them cook softer.
  • Any type of cheese that will melt can be used. You can also combine cheeses.
  • Add ½ cup diced ham or seafood if you like.
  • Serve with a salad and a glass of white wine….
0 Comments

Classic Cheesecake-Instant Pot

5/11/2021

0 Comments

 
Picture
1 ¼ cups graham cracker crumbs
5 tablespoons butter melted and cooled, plus additional butter for buttering the pan
1lb cream cheese, full fat-room temperature
½ cup granulated sugar
2 large eggs
¼ cup sour cream-full fat
2 teaspoons lemon zest
1 tablespoon lemon juice
½ teaspoon vanilla extract
¼ teaspoon salt
1 ½ tablespoons all-purpose flour
1/3 cup sour cream
2 teaspoons sugar

  1. Generously butter the inside of a 7-inch round springform pan. Mix the graham cracker crumbs and the melted butter in a medium bowl, then pour this mixture into the prepared pan. Press this mixture evenly across the bottom and about halfway up the sides of the pan to make a crust.
  2. Put the cream cheese and sugar in a food processor, process until smooth. Add the eggs one at a time, processing each until smooth. Open the machine, scrape down the inside, and add the sour cream. Cover and process until smooth.
  3. Add the lemon zest, lemon juice, vanilla, and salt. Process again until smooth — and again, stop the machine and scrape down the inside. Add the flour and process for 1 minute. Pour this mixture into the prepared crust in the pan (it will rise above the crust on the sides). Do not cover the pan.
  4. Pour 1 1/2 cups water into a 6-or 8-quart Instant Pot. Set a trivet in the cooker. Make an aluminum foil sling, set the filled springform pan on it, and use it to lower the pan into the pot. Fold down the ends of the sling so that they do not touch the batter in the pan. Lock the lid onto the pot. Press Pressure cook (Manual) on High pressure for 25 minutes with the Keep Warm setting off.
  5. To make the sour cream topping, combine 1/3 cup sour cream with 2 teaspoons sugar in a small bowl. Set aside.
  6. When the machine has finished cooking, turn it off and let the pressure return to normal naturally, about 20 minutes. Remove the lid. Use the sling to transfer the hot springform pan to a wire rack. Using a paper towel, blot off any water on top of the cake.
  7. While the cheesecake is still hot, spoon the sour cream topping onto the cake and spread evenly over the top.
  8. Cool the cheesecake for 15 minutes, then refrigerate for 1 hour. Cover and continue refrigerating for at least 1 more hour or up to 2 days.
  9. To serve, uncover and run a thin knife between the pan and the cake. Unlatch the sides of the pan and open it to remove the cake inside. If desired, use a long, thin knife to slice the cake
0 Comments

Chicken Stock -Instant Pot

2/22/2021

0 Comments

 
​Makes 10 cups
4 lbs chicken w/bone- (whole chicken-cut into pieces, backs, wings, feet, or legs) or 2 leftover chicken carcasses. *chicken parts w/joints will provide the most collagen to your stock
1 onion, quartered
2 stalks celery, cut into large pieces-if you have celery leaves, add them to the stock
1 large carrot, cut into large pieces
8 sprigs parsley-stems and/or leaves
2 sprigs thyme or 1 tsp dried
2 bay leaves
1 tablespoon salt
1 teaspoon pepper or 4 whole peppercorns 
1 teaspoon vinegar or lemon juice
  1. Place the chicken parts, vegetables, herbs, and salt and pepper into a 6-quart Instant Pot and cover with 10 cups water. 
  1. Lock the lid in its place and turn the release valve to SEALING position. Press SOUP/Broth button and adjust the time to 40 minutes. 

  2. When the cooking is finished, allow the pressure drop naturally before opening (or wait 20 minutes before releasing it manually).

  3. Strain the stock into a large pot or bowl. Use right away or let the stock cool to room temperature and either refrigerate (fat is easier to remove once chilled) or divide into 4 cup containers, label, and freeze.  Once refrigerated, your collagen stock will be very thick. Your stock can be refrigerated for up to 3 days or frozen for one year.
* If using whole chicken, once cooked, remove the meat and save to make salad or add to prepared soup.


0 Comments

Mexican-Style Chicken with Red Salsa by Urvashi Pitre

1/13/2021

0 Comments

 
Picture
This is an easy and delicious Instant Pot recipe. My favorite Instant Pot recipes are from Urvashi Pitre. Here website is twosleevers.com. Go there and you will find many more great recipes.
4-6 servings
2 pounds chicken thighs boneless, skinless cut into bite sizes
1.5 tablespoons ground cumin
1.5 tablespoons chile powder (NOT cayenne)
1 tablespoon salt
2 tablespoons oil- olive, coconut, or avocado
14 ounces diced canned tomatoes
5 ounces can tomato paste
1 small onion chopped
3 cloves garlic
2 ounces canned/pickled jalapenos
 
  1. Turn your Instant Pot or Pressure cooker onto Sauté.
  2. While it heats, coat the chicken with the cumin, chile, and salt.
  3. Pour the oil into the pressure cooker once it is hot, add the coated chicken pieces.
  4. You are doing this step to get the spices to "bloom" a little bit to get their full flavor. So cook it for 4-5 minutes, and you should be good to go.
  5. Add everything else into the pressure cooker and close.
  6. Cook at high pressure for 15 minutes, and allow it to release pressure naturally for 10 minutes. Release all remaining pressure.
  7. Use two forks to shred the chicken a bit more if you're serving as tacos, or eat over rice.
0 Comments

French Garlic Chicken-Instant Pot

12/8/2020

0 Comments

 
Recipe by Urvashi Pitre twosleevers.com


For the Marinade
2 teaspoons Herbes de Provence or dried tarragon
2 tablespoon Olive oil
1 tablespoon prepared Dijon Mustard
1 tablespoon Bragg Organic Apple Cider 
1/2 teaspoon Salt
1 teaspoon Pepper
1 tablespoon minced Garlic
1 pound chicken thighs boneless, skinless
 
For Cooking
2 tablespoons Butter
8 cloves chopped Garlic
1/4 cup water
1/4 cup Cream
 
  1. Mix all the ingredients for the marinade, using a wire whisk to emulsify the oil and vinegar together.
  2. Add in chicken thighs and allow it to marinate at room temperature for 30 minutes. If you need to marinate for longer, put in the refrigerator.
  3. When you are ready to cook, turn your Instant Pot to Sauté and when it is hot, add the butter and allow it to melt. Add chopped garlic and sauté for 2-3 minutes.
  4. Add in the chicken leaving behind as much of the marinade as you can. Do not discard the marinade. 
  5. Cook the chicken thighs so that they can lightly brown on one side, 3-5 minutes. Add the marinade and 1/4 cup water. 
  6. Close the instant pot and set it to cook at High Pressure for 5 minutes. Allow it to release pressure naturally for 10 minutes, and then release all remaining pressure.  
  7. Remove the chicken on to a plate and add 1/4 cup cream into the pot, mixing well with the liquid in the pot. 
  8. As soon as the sauce thickens, pour it onto the chicken thighs and serve.

0 Comments

Cherry Chocolate Bread Pudding-Instant Pot

12/8/2020

0 Comments

 
Serves 6
1 1/2 cups water
1 Tablespoon butter, softened
3 eggs, beaten
½ cup sugar
1 ½ cups half- and- half or whole milk 
½ teaspoon salt 
1 teaspoon vanilla extract
*4 cups bread or croissant cubes (stale bread works best. See *note below if using fresh bread) 
1/3 cup dried cranberries, cherries, or raisins
2 ounces bittersweet chocolate, chopped
 
*Note on bread: If the bread is fresh spread the cubes out on a baking sheet. Put the pan in a 325 degree oven and toast for about 10 to 12 minutes, or until dry. If your bread is already dry or stale, skip this step.

  1. Generously butter a 7-by-3-inch round baking pan or soufflé dish (1.5 quart). If you plan to remove the pudding from the pan for an attractive presentation, cut out a round of parchment paper and place it in the bottom of the buttered dish. 
  2. Place the bread cubes to a large bowl; add the dried cranberries and chopped chocolate and toss to combine. Set aside.
  3. In a medium bowl, combine the eggs, sugar, half-and-half, salt, and vanilla. Whisk until blended.
  4. Pour the egg mixture over the bread cubes and stir gently until the bread cubes are well-coated. Spoon the bread mixture into the prepared baking pan.
  5. Pour 1 1/2 cups of water into a 6-quart Instant Pot.
  6. Butter a 10 or 12-inch sheet of foil. Cover the pan of bread pudding tightly with the foil (buttered side-down). Place the pan in a baking sling or on the steaming rack. Carefully lower the pan and sling or rack into the pot.
  7. Lock the lid in place and set the steam vent to the sealing position. Choose the manual setting (or pressure cook button), high pressure, and set the time for 44 minutes. When the time is up, let the pressure release naturally for 10 minutes.
  8. Release the remaining pressure and remove the lid. Remove the bread pudding to a rack. Let the pudding stand for about 5 minutes. Remove the foil.
  9. If desired, when the bread pudding is cool enough to handle, run a knife around the side of the pan and carefully remove it to a serving plate. Alternatively, spoon the warm pudding into bowls.
0 Comments

Instant Pot Pot-in-Pot Rice and Peas with Eggs

10/26/2020

0 Comments

 
Picture
Serves 4-6
 
1 cup basmati rice
2 cups frozen peas
3 large eggs
½ cup fresh herbs, chopped (any combination of-parsley, cilantro, dill, mint, lovage)
4 tablespoons unsalted butter
Kosher salt and fresh ground pepper, to taste


  1. Place a trivet and 1 cup of water into the inner pot of a 6-quart electric pressure cooker. You can also use an 8-quart. 
  2. Place the rice and 1 cup of water in an oven-proof container and cover with a lid
     or foil. Place the covered container onto the trivet.
  3. Place the frozen peas into a separate oven-proof container and cover with a lid or foil. No added 
    water is necessary.  Place this container on top of the rice container.
  4. Place the three eggs at the level of the peas. 
  5. Close the instant pot, seal the valve, and cook at high pressure for 5 minutes. Release the pressure naturally for 5 minutes, and then release all remaining pressure using Quick Release and 
    remove the cover.
  6. Place the eggs in an ice bath for 5 minutes. Remove the shells and quarter each egg.
  7. Combine the rice, peas, herbs, and butter in a large bowl. Let the butter melt and stir the ingredients 
    gently. Place the egg slices on top to garnish. 
 
Add Veggies:
Dice red peppers, broccoli, asparagus, and 
marinated artichokes are all delicious additions.
 
Serve Cold:
You can serve this salad cold with your favorite vinaigrette. Understand the health benefits of your leftover rice! Resistant Starch

0 Comments

Now and Later Butter Chicken by Urvashi Pitri

10/21/2020

0 Comments

 
This instant pot recipe is from one of my favorite recipe authors. Explore Urvashi Pitri's website twosleevers.com and cookbooks to find recipes that are easy and always delicious. 
 
Serves 4
1 14- ounce can diced tomatoes
5-6 cloves garlic
1-2 teaspoons minced ginger
1 teaspoon turmeric
1/2 teaspoons cayenne pepper
1 teaspoon paprika
1 teaspoon salt
1 teaspoon garam masala
1 teaspoon ground cumin
*1 pound boneless skinless chicken thighs (or use breast, bone-in, or whatever works for you. If frozen, add 1-2 minutes to total time)
To finish
4 ounces butter cut into cubes (use coconut oil if dairy free)
4 ounces heavy cream (use full-fat coconut milk if dairy free)
1 teaspoon garam masala
1/4-1/2 cup chopped cilantro

  1. Place all ingredients into an Instant Pot in the order listed, EXCEPT for the butter, cream and 1 teaspoon of the garam masala, mixing the sauce well before you place the chicken on top of the sauce. If it's frozen, push it into the sauce a bit so it defrosts better
  2. Close the cooker and set for 10 mins on high, and let it release pressure naturally for 10 minutes. After that, release all remaining pressure. 
  3. Open up the pot and remove the chicken carefully and set aside.
  4. Blend together all the ingredients, preferably using an immersion blender
  5. Let the sauce cool just before adding the cut up butter, cream, cilantro, and garam masala and stir until well incorporated. Adding the butter and cream into the boiling sauce will make your sauce very thin. If that happens, just put it in the fridge for a little and let it thicken up. It should be thick enough to coat the back of a spoon.
  6. Take out half the sauce and freeze for later or store in the fridge for 2-3 days
  7. Add the chicken back in and heat through. Break it up into smaller pieces if you need but don't shred it.
  8. Serve over rice, or zucchini noodles
    meld together and there you go. Add some fresh cilantro on top.
 
*double the amount of chicken if you want because there is plenty of sauce for a double batch! 
0 Comments
    Picture

    Picture
    Follow Liz on Instagram

    Picture
    photo credit-Judy Santos-jsantosphotography.com

    Recipe Categories

    All
    15 Minute Meals
    Air Fryer
    Appetizers/Hors D'oeurves
    Avocados
    Baking
    Beautifully Delicious
    Beef
    Bread
    Breakfast
    Chaffles
    Charcuterie
    Chicken
    Cocktails
    Cookies
    Cooking For 1 Or 2
    Cooking With Beer
    Cooking With Chocolate
    Cooking With Wine
    Cooking W/Spices
    Cook's Corner TV
    Cook The Book Cookbook Series
    Dairy
    Desserts
    Dressings
    Drinks
    Edible Flowers
    Edible Garden
    Edible Landscapes
    Eggs
    Entrees
    Facebook Live
    Fall Recipes
    Fats
    Food Film/TV
    Grain Bowls
    Herbs
    Hollis NH Recipes
    Instant Pot
    Intermittent Fasting
    Kitchen/Pantry
    Knife Class
    Lamb
    Lobster Tails & Cocktails
    Local Farms
    Lowcarb
    Low Carb Breakfast
    Mocktails
    Pantry
    Passionate Dishes For Your Valentine
    Pasta
    Pie Classes
    Pies Savory
    Pork
    Rubs
    Salads
    Sandwiches
    Sauces
    Seafood
    Seasoning Blends
    Seed Oils
    Sheet Pan Meals
    Side Dishes
    Smoothies
    Soups/Stews
    Starches/Pasta/Beans
    Stock
    Tapas
    Tarts Savory
    Thanksgiving
    Turkey
    Tuscan Recipes
    Vegetables
    Vegetarian
    Winter Pantry


    Liz's Cookbook

    Liz's Gardens

    Picture

    Liz's Kitchen

    Picture

    Archives

    November 2023
    September 2023
    August 2023
    May 2023
    April 2023
    March 2023
    February 2023
    January 2023
    December 2022
    November 2022
    October 2022
    September 2022
    August 2022
    July 2022
    June 2022
    May 2022
    April 2022
    March 2022
    February 2022
    January 2022
    December 2021
    November 2021
    October 2021
    September 2021
    August 2021
    July 2021
    June 2021
    May 2021
    April 2021
    March 2021
    February 2021
    January 2021
    December 2020
    November 2020
    October 2020
    September 2020
    August 2020
    July 2020
    June 2020
    May 2020
    April 2020
    March 2020
    February 2020
    January 2020
    November 2019
    October 2019
    September 2019
    May 2019
    October 2018
    March 2018
    November 2017
    October 2017
    September 2017
    August 2017
    June 2017
    May 2017
    February 2017
    June 2016
    February 2016
    December 2015
    November 2015
    October 2015
    August 2015
    July 2015
    June 2015
    May 2015
    April 2015

    RSS Feed

CONTACT US

Email

[email protected]

Telephone

Location

603-321-5011
Hollis, NH