Liz Barbour's Creative Feast
  • HOME
  • Programs
    • Online Cooking Programs
    • In-Person Lecture Programs
    • Fees
    • Schedule a Program
    • Testimonials >
      • Class Survey
  • EVENTS
    • Calendar
    • Intermittent Fasting Classes
  • FOOD & FUN
    • Recipe Blog >
      • Artisan Bread-Master Recipe
      • AARP 2023-Cook-Along Classes
    • Intermittent Fasting
    • Recipes from Hollis
    • Low-Carb
    • Kitchen Tools Liz Loves
    • Barbour Chicks
    • Liz's Edible Gardens
    • Liz's Kitchen Remodel
  • STORE
    • Liz's Cookbook
    • Shop
  • Contact Liz
  • About Liz
    • Liz's Story
    • Liz in The Press >
      • Newspaper
      • Magazine
      • Television
      • Articles by Liz

Apple Tarte Tatin

12/15/2021

0 Comments

 
Picture
Picture
Makes One 10” tart
 
½ recipe Art of Pie “Basic Pie Crust” or 1 sheet of frozen puff pastry, defrosted in the refrigerator.
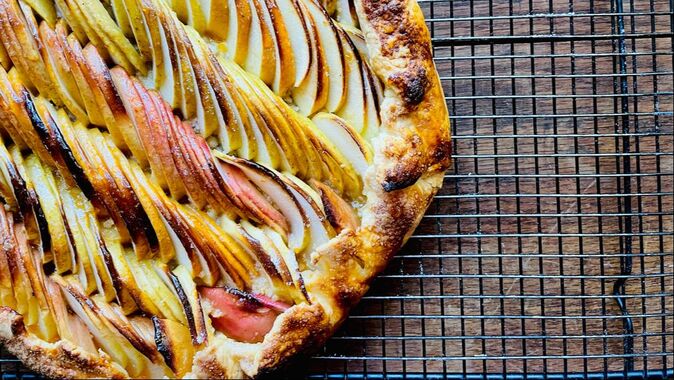
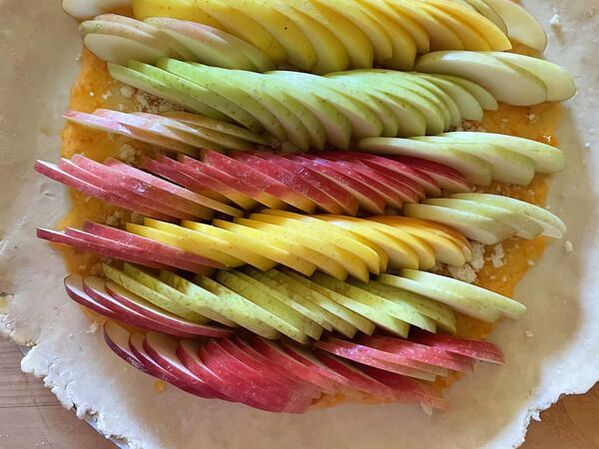
5-6 firm apples, peeled, cored, and quartered-Granny Smith or Golden Delicious-if using pears, Bosc pears work very well
1 tsp. cinnamon
¾ -cup plus 1 Tbs sugar            
4 Tbs unsalted butter, cut into small pieces
1 large egg, beaten with 1 teaspoon of water

  1. Heat the oven to 400 degrees. Place a baking rack in the middle of the oven. 
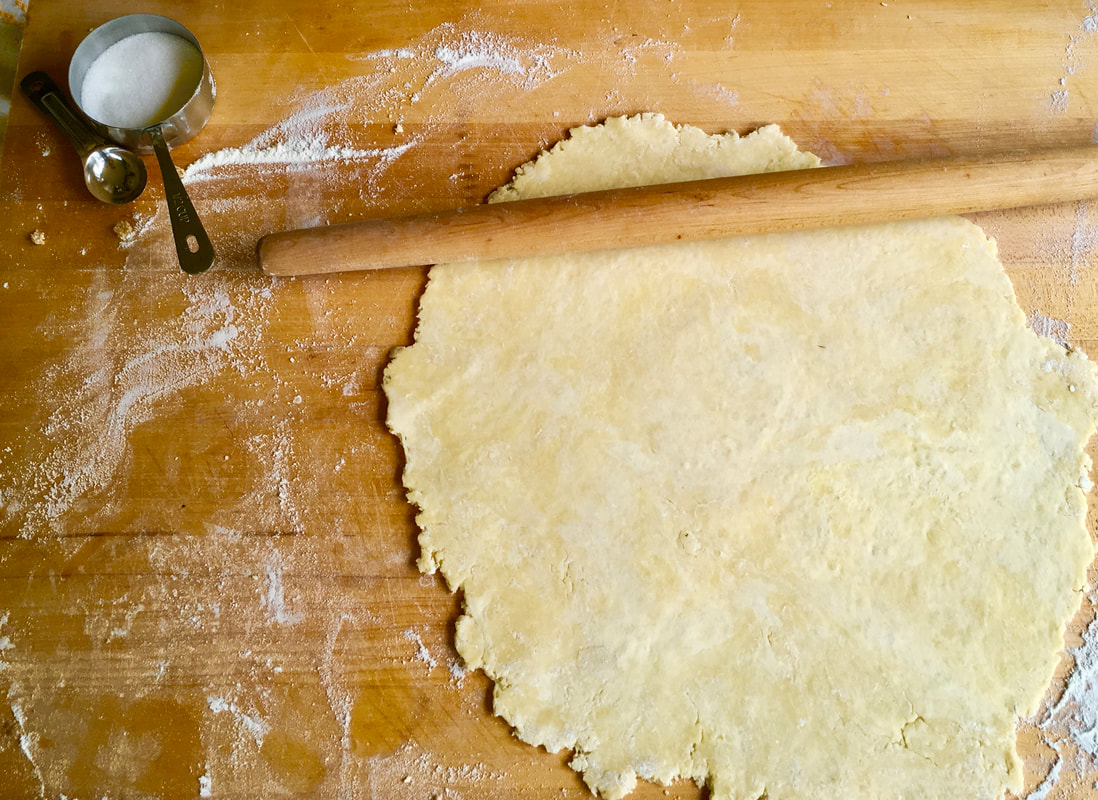
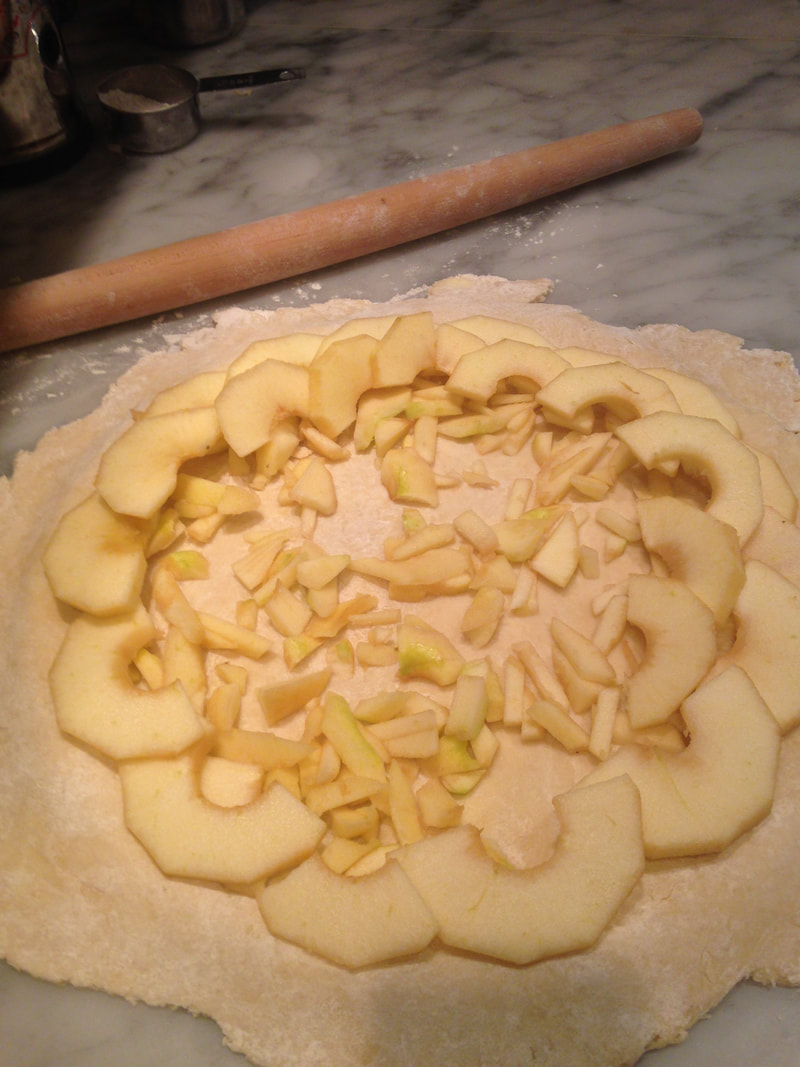
  2. Roll the pie dough into a 10-inch circle. Place it onto a plate, cover, and place into the refrigerator until ready to add to the tart. If using a sheet of puff pastry, unfold it and place into the refrigerator until ready to use. 
  3. Toss the apples with the cinnamon and 1Tbs of sugar. 
  4. In a 10-inch cast-iron pan or other oven proof skillet, heat the remaining ¾ cup sugar over medium-high heat, stirring until the sugar has turned a dark amber. (Check for color by drizzling some onto a white plate.) 
  5. Add the butter to the pan and stir it into the caramel until melted and smooth; be careful, as the butter will make the caramel sputter. 
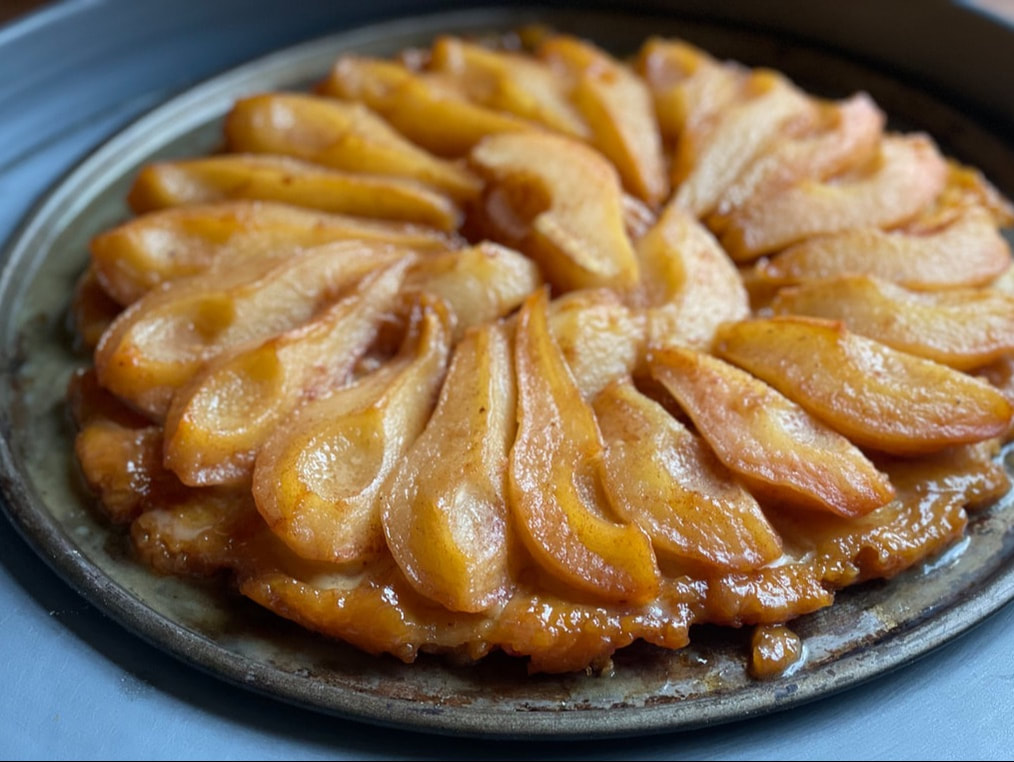
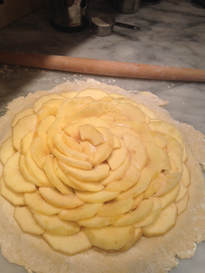
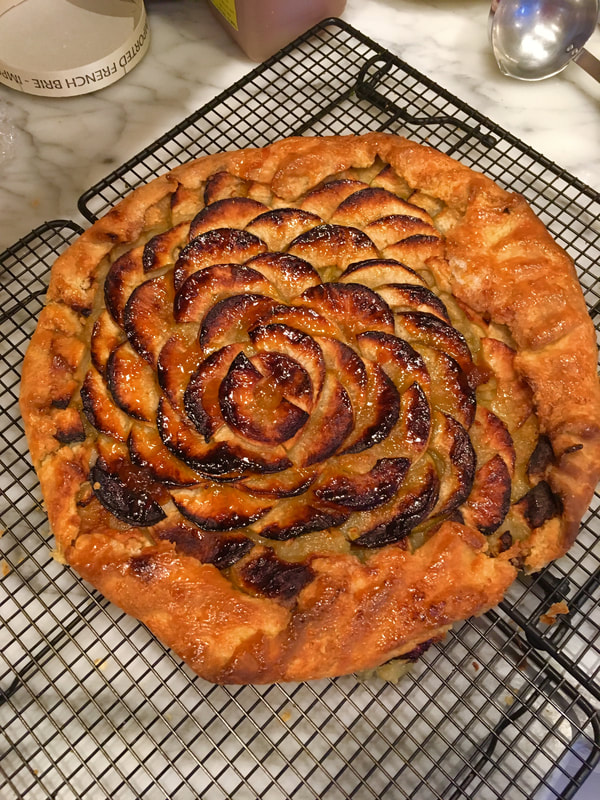
  6. Remove the pan from the heat. Starting on the outside of the pan, carefully set the apple quarters in the caramel, arranging them in a circle so that they all face the same way.  Set them very close to one another, trying to get as many as possible into the pan.  Fill in the center of the pan with as many of the remaining apples as will fit.  
  7. Put the pan back on the heat and allow the apples to cook on top of the stove for about 5 minutes.  
  8. Remove the pan from the heat.  Place the cold pastry dough over the apples, tucking the edges into the sides of the pan.  Work carefully so as not to burn your fingers, but also quickly so as not to melt the dough. 
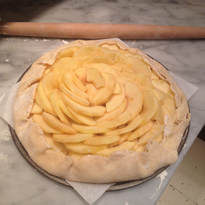
  9. Brush the dough with the beaten egg and immediately put the pan in the oven.  
  10. Bake for 15 minutes.  Lower the temperature to 375 degrees and bake until the crust is browned, and the caramel is bubbling around the edges of the pan, another 15-20 minutes. 
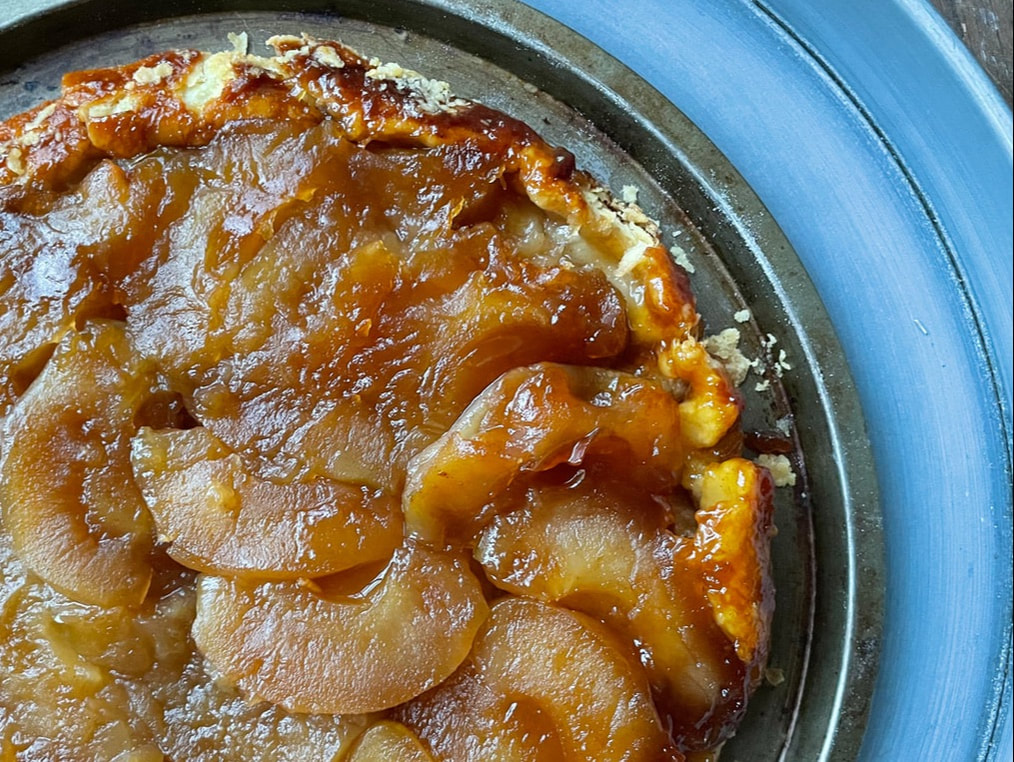
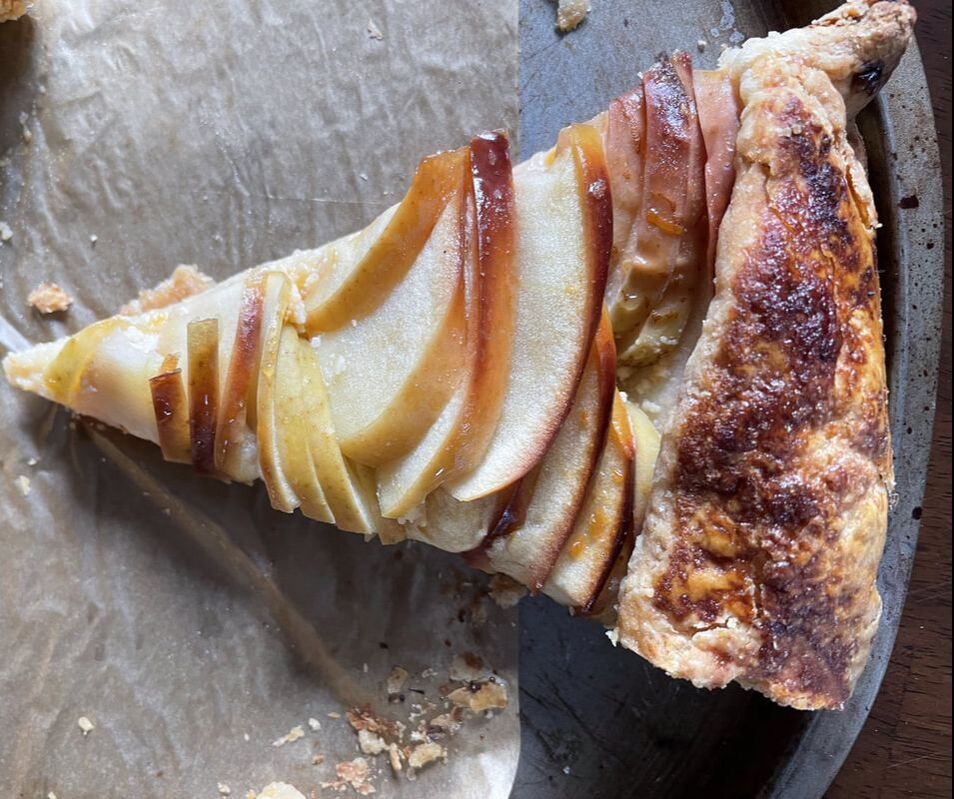
  11. Carefully remove the tart from the oven and cool it on a rack for about 20 minutes.  Invert the tart onto a serving platter.  If any apples stick to the underside of the pan, simply return them to their rightful spot on the tart. 
  12. Tarte Tatin is best served right away, but it can stand a room temperature and be reheated briefly in the oven, if that suits your schedule better.


0 Comments

Apple Galette w/ Apricot Jam

11/22/2021

0 Comments

 
Picture
A note on your apples: When choosing apples for your tart, select apples that have red, green, and yellow skins. If you prefer to use all one apple color that will be beautiful too! Be sure to choose a selection of apples that will hold their shape in baking and offer a variety of flavor. 

Supermarket Variety Options
Combination #1: Granny Smith, Golden Delicious, and Cortand
Combination #2: Granny Smith, Braeburn, and McIntosh

Farm stand Variety Options
Combination #1: Suncrisp, Stayman Winesap, and Northern Spy
Combination #2: Pink Lady, Johna Gold, and Mutzu
_________________________________________________________
Galette Dough
Go here for the perfect dough. This recipe will make enough dough for 2 galettes or one pie with a top and bottom crust.
For a gluten free option I will send you to Kate McDermott's recipe. And, here is a link to the her video to help you prepare her gluten free dough.

Galette Filling
1 Granny Smith apples
1 Golden Delicious apple (or other yellow-skinned apple)
2 Cortland apples
1/3 cup apricot jam
1 disk of Art of the Pie Master pie dough (recipe here)
1 egg beaten with 1 teaspoon water
1/4 cup granulated sugar
 

  1. Heat oven to 400°F . Turn your baking pan over and place the parchment paper onto it. You will assemble your galette here.
  2. Cut each apple in half from top to bottom. Core the apples with a melon baller or paring knife. Place the apples cut side down on your cutting board. Using a sharp paring knife, slice each half into ¼ inch thin slices (keeping each apple half together). Repeat until all the apples are sliced. Remove the end slices of each apple. Using two hands, hold a sliced apple half and press from the center pieces to the outside pieces, fanning the slices outward into a line. Do the same with the other half of the apple. Join both lines of apple slices together to form one line. Do this with the remaining apples.
  3. To assemble your galette: On a floured counter, roll the dough out into a large round-ish shape, about 14 inches across. Place your rolling pin at the center of your rolled dough. Fold the dough over your rolling pin and gently lift and transfer it to the parchment paper in the pan.
  4. Place the apricot jam onto the center of the dough. Spread the jam outward leaving a 2-inch border uncovered.
  5. Place your alternating colors of fanned apples onto the apricot filling starting from the center out. Place them snuggly up against each other. Fill in the gaps at each end with any remaining apples.
  6. Fold the border over fruit, pleating the edge as you go. Brush egg wash onto the folded crust. Sprinkle the apples and the crust with the sugar.
  7. Bake the galette for 35-40 minutes, or until the crust is golden and the apples are gently bubbling. Remove the galette from the oven and slide onto a wire rack to cool for at least 20 minutes. Try to slide the parchment paper out from under the galette for cooling. This will keep the bottom crust crisp. Serve warm or at room temperature. Fruit galettes keep at room temperature for a few days and up to a week in the fridge.
 
Variations
  • Pear Galette option: you may use ripe pears in place of apples. Bosc and Bartlett (both red and green) ar both excellent for pies when ripened. If using pears, purchase them 3 days before class and allow to ripen at room temperature.
  • Almond filling option: Instead of apricot jam under your apples or pears, try this easy and delicious almond filling. Almond filling
  • Cran-Raspberry filling option: If you have leftovers of your cran-rasperry sauce use them in your next galette! 1/3 to ½ cup of sauce is all you need. Cran-Raspberry Sauce
Picture
Picture
Picture
Picture
0 Comments

Chaffles

11/16/2021

0 Comments

 
Picture
These delicious “chaffles” are a low-carb version of traditional waffles. Honestly, I don’t think you will be able to taste the difference. The texture is similar too. Hot out of the waffle maker, the waffle is soft. Let your waffles cool on a rack and they will crisp up and be perfect as a substitute for sandwiches and toasted bread.
For cheese, I prefer to use shredded part-skim, low moisture mozzarella cheese. The mild flavor is perfect for both sweet and savory chaffles. Feel free to bump up the flavor with other cheeses like cheddar, swiss, Monterey Jack, and feta or goat cheese. Pre-shredded cheese usually have added starch to prevent the cheese from sticking in a clump in the package. I prefer to shred my mozzarella to avoid this additive. I use a 4-inch waffle maker by Dash. If you use a traditional sized Belgian waffle maker, double the recipes below.
Basic Chaffle
Makes four 4-inch chaffles

2 large eggs
1 cup mozzarella, grated
½  cup almond flour
½  teaspoon baking powder
 
  1. Preheat waffle maker. Be sure to preheat fully or your chaffles will stick to the waffle maker.
  2. Combine all the batter ingredients in a bowl and mix thoroughly. You can also place the ingredients in a food processor or blender and mix.
  3. Place ¼ cup of batter onto the hot waffle maker for each chaffle. Cook for 3-4 minutes or until the waffle maker indicates your chaffle is done (a light should come on). Be patient and do not open the waffle maker until the waffle is cooked.
  4. Serve hot or place onto a cooling rack for crisper chaffles that can be used for sandwiches or other recipes that usually call for sliced bread.
Sweet Chaffle
Makes four 4-inch chaffles

2 large eggs
1 cup mozzarella, grated
½  cup almond flour
½  teaspoon baking powder
1 teaspoon low-carb sweetener
½ teaspoon vanilla extract
 
Follow directions above to cook.

Picture

Variations

Savory Variations: Use the Basic Chaffle recipe and add to it-
  • Spinach and Feta Chaffle: 3 tablespoons grated parmesan cheese, 1 package frozen spinach(thawed with water squeezed out), ¼ cup crumbled feta cheese, 1 tablespoon fresh herbs (dill, basil, parsley, or chives).
  • Lemon Herb Chaffle: 1 teaspoon lemon zest, ¼ cup fresh herbs (dill, basil, cilantro, parsley, or chives)
  • Smoked salmon and cream cheese. Sprinkle w/Everything Bagel seasoning.
  • Poached eggs with ham and hollandaise sauce.
  • Turkey, avocado, and tomato with homemade fail-proof mayonnaise.
  • Guacamole and salsa with cheese.

Sweet Variations: Use the Sweet Chaffle recipe and add to it-
  • Orange Cardamom: 1 teaspoon orange zest, 1/8 teaspoon of cardamom (or cinnamon)
  • Chocolate Chaffles: ¼ cup melted butter, ¼ cup cocoa powder, 2 teaspoons flax meal or coconut flour, 1 teaspoon low-carb sweetener or 1 tablespoon sugar.
 
Dips and Sauces:
  • Chocolate dipping sauce: 2 ½ ounces dark chocolate, 1 teaspoon coconut oil -melt the chocolate and the coconut oil together in the microwave and serve warm.
  • Vanilla Whipped Ricotta: 4 ounces whole milk ricotta cheese, 1 teaspoon vanilla extract, 1 teaspoon low-carb sweetener or 1 teaspoon sugar. Whip in a food processor.
  • Cran-Raspberry sauce: recipe here
Picture
0 Comments

Almond and Sweet Cherry Galette-Smitten Kitchen

7/20/2021

0 Comments

 
Picture
Recipe from The Smitten Kitchen Cookbook by Deb Perelman. I love this book and I know you will too. Every recipe I have tried has been delicious!
 
Pastry
Go to the recipe at Smitten Kitchen for Deb's dough recipe or you can use 1/2 of the dough recipe from The Art of the Pie. I prepare the entire recipe from Art of the Pie and freeze one of the dough rounds for later use.
 
Filling:
1/3 cup sliced, slivered, or coarsely chopped almonds, blanched if you can get them 
1 1/2 teaspoons all-purpose flour
3 tablespoons granulated sugar
1 tablespoon unsalted butter, softened
1/4 teaspoon almond extract
1 large egg white
1 pound sweet cherries, any variety or a mix of varieties-I pitted mine

​To Finish:
1 large egg yolk
1 teaspoon water
1 tablespoon coarse sugar
Confectioners’ sugar, for dusting


Make pastry: the dough should be refrigerated for at least an hour before you use it in this recipe.
Make filling: finely grind almonds and flour in a food processor. Mix in sugar, butter, and extract, then egg white. Blend until smooth. Cover and chill until needed.
 
Prepare galette: preheat oven to 400 degrees. On a floured work surface, roll the dough out into a 12-inch round. Transfer to a baking sheet lined with parchment paper. Spread the almond filling evenly over the bottom of the galette dough, leaving a 2-inch border. Scatter the cherries on top. Fold the border over the filling, pleating the edge to make it fit; the center will be open. Whisk egg yolk with water, brush crust with egg wash mixture and sprinkle with coarse sugar.
Bake galette until the filling is puffed and the crust is golden brown, about 30 – 40 minutes, rotating front to back halfway through for even browning.  Cool, and serve with dusted powdered sugar, ice cream, and toasted slivered almonds.
 
 
0 Comments

Bill Smith's Atlantic Beach Pie w/ Blueberry Glace

6/15/2021

0 Comments

 
Picture
By: Food52 with adaptations
Bluberry Glace topping
​
​For the crust:
1 1/2 sleeves of saltine crackers (about 6 ounces or 60 crackers)
3/4 cup softened unsalted butter
3 tablespoons sugar

​For the filling:
1 (14-ounce) can sweetened condensed milk
4 egg yolks
Zest of one lemon or lime or both!
1/2 cup lemon or lime juice or a mix of the two
Fresh whipped cream, sweetened with sugar for garnish
Coarse sea salt, for garnish
  1. Preheat oven to 350°F.
  2. Crush the crackers finely, but not to dust. You can use a food processor or your hands. Add the sugar, then knead in the butter until the crumbs hold together like dough. Press into an 8-inch pie pan. Chill for 15 minutes, then bake for 18 minutes or until the crust is golden brown.
  3. While the crust is cooling (it doesn't need to be cold), beat the egg yolks into the sweetened condensed milk, then beat in the citrus juice. It is important to completely combine these ingredients. Pour into the shell and bake for 16 minutes until the filling has set. The pie needs to be completely cold to be sliced. Serve with fresh whipped cream and a sprinkling of sea salt.
Variations:
  • Blueberry jam topping: Buy a good quality blueberry jam. Stir it up a bit in the jar and gently spread onto the top of the chilled pie. Serve.
  • Cran-Raspberry sauce-use my favorite Thanksgiving cranberry sauce! Spoon it right onto the top of your pie. 
  • Make some flowered salt and sprinkle that on top. Assorted dried flowers chopped fine. Mix with some kosher or flaked salt. 
0 Comments

Classic Cheesecake-Instant Pot

5/11/2021

0 Comments

 
Picture
1 ¼ cups graham cracker crumbs
5 tablespoons butter melted and cooled, plus additional butter for buttering the pan
1lb cream cheese, full fat-room temperature
½ cup granulated sugar
2 large eggs
¼ cup sour cream-full fat
2 teaspoons lemon zest
1 tablespoon lemon juice
½ teaspoon vanilla extract
¼ teaspoon salt
1 ½ tablespoons all-purpose flour
1/3 cup sour cream
2 teaspoons sugar

  1. Generously butter the inside of a 7-inch round springform pan. Mix the graham cracker crumbs and the melted butter in a medium bowl, then pour this mixture into the prepared pan. Press this mixture evenly across the bottom and about halfway up the sides of the pan to make a crust.
  2. Put the cream cheese and sugar in a food processor, process until smooth. Add the eggs one at a time, processing each until smooth. Open the machine, scrape down the inside, and add the sour cream. Cover and process until smooth.
  3. Add the lemon zest, lemon juice, vanilla, and salt. Process again until smooth — and again, stop the machine and scrape down the inside. Add the flour and process for 1 minute. Pour this mixture into the prepared crust in the pan (it will rise above the crust on the sides). Do not cover the pan.
  4. Pour 1 1/2 cups water into a 6-or 8-quart Instant Pot. Set a trivet in the cooker. Make an aluminum foil sling, set the filled springform pan on it, and use it to lower the pan into the pot. Fold down the ends of the sling so that they do not touch the batter in the pan. Lock the lid onto the pot. Press Pressure cook (Manual) on High pressure for 25 minutes with the Keep Warm setting off.
  5. To make the sour cream topping, combine 1/3 cup sour cream with 2 teaspoons sugar in a small bowl. Set aside.
  6. When the machine has finished cooking, turn it off and let the pressure return to normal naturally, about 20 minutes. Remove the lid. Use the sling to transfer the hot springform pan to a wire rack. Using a paper towel, blot off any water on top of the cake.
  7. While the cheesecake is still hot, spoon the sour cream topping onto the cake and spread evenly over the top.
  8. Cool the cheesecake for 15 minutes, then refrigerate for 1 hour. Cover and continue refrigerating for at least 1 more hour or up to 2 days.
  9. To serve, uncover and run a thin knife between the pan and the cake. Unlatch the sides of the pan and open it to remove the cake inside. If desired, use a long, thin knife to slice the cake
0 Comments

Fruit Galette-Any Fruit

10/28/2020

0 Comments

 
A galette is a wonderfully rustic tart that is easy to construct and quick to cook. I use one disk of dough from the The Art of the Pie. Prepare the full dough recipe to make 2 discs of dough. Use one now and freeze one for later.
 ​Serves 8

Fruit Filling
​3 1/2 cups berries, stone fruit, or other fruit, chopped or thinly sliced, or any combination. You can also use frozen fruit. Note: do not thaw frozen fruit before baking. If using frozen berries add 1 tablespoon of thickener as there will be lots of juice when the berries thaw in baking.
Pinch of salt
Juice of half a lemon 
1/4 cup granulated sugar 
1-2 tablespoons tapioca flour/starch (see Note, below)
 
To Finish
1 egg beaten with 1 teaspoon water (optional)
Turbinado or coarse sugar for sprinkling
 

  1. Heat oven to 400°F.
  2. Place a piece of parchment paper on a large baking sheet or pizza pan.
  3. Flour your work surface and roll the dough out into 14 inches circle. Carefully transfer the rolled dough to the parchment paper in the pan. 
  4. Combine fruit, salt, lemon juice (if using), sugar, and starch in a medium bowl and set aside. Taste the fruit and add more sugar if you'd like. Place the fruit filling into the center of the dough, leaving a 2-inch border.
  5. Fold the border over fruit, pleating the edge to make it fit. The center will be open.
  6. Whisk the egg with 1 teaspoon of water and brush it over the crust. Sprinkle it with turbinado or coarse sugar.
  7. Bake the galette for 30 to 35 minutes, or until golden all over and the fruit is bubbling* and juicy. If cooking with frozen fruit add 10 minutes to the baking time. * the test to see if the filling is fully cooked, look to see that the filling is bubbling. If it is, the galette is ready and the center will thicken as it cools. Cool the galette on a wire rack for at least 20 minutes. Serve warm or at room temperature.Your galette will keep at room temperature for a few days and up to a week in the fridge. To keep the crust crisper, cover with a cotton towel not plastic wrap.
 
​Variations and notes:
  • Fruit: Use whatever fruit you like to bake with. Berries and very ripe peaches or pears will produce a wetter center. You'll need about 1 tablespoon more of your thickener.
  • Flavor: Spread the bottom of the crust with jam or honey. Add 1 teaspoon of ground ginger to the sugar.
  • Thickeners: Tapioca flour or starch are my favorite for a clear thickening. You can use an equal amount of cornstarch. Different kinds of fruit have different pectin levels, and might need more or less thickener.
    • Apples or blueberries-1 tablespoon.
    • Peaches or fresh cherries- 1 tablespoon.
    • For strawberries, blackberries, raspberries, and rhubarb-2 tablespoons.
    • For frozen berries-2 tablespoons.
0 Comments

Artisan Bread in 5 Minutes A Day

5/4/2020

13 Comments

 
This bread recipe is truly the easiest bread you will ever bake-even if you have never baked bread before! This "Master Recipe" is from the best selling cookbook The New Artisan Bread in Five Minutes a Day
This book/method is so popular, the book is on backorder from every major book seller. Fortunately authors Jeff Hertzberg and Zoe Francios have a website you can go to for all the tips and tricks along with many recipes to help you. You only need 4 ingredients. There’s no kneading required. You will make the dough once and then bake a fresh loaf everyday for 4 days.  All with only 5 minutes of effort. 

Three breads from the Master Recipe
Liz's Quick Guide to Making Your 1st Batch of Dough
Liz's Quick Guide
Master Recipe from The New Artisan Bread in Five Minutes a Day:
​The Discovery That Revolutionizes Home Baking
3 cups (1 1/2 pounds) lukewarm water (you can use cold water, but it will take the dough longer to rise. Just don’t use hot water or you may kill the yeast)
1 tablespoon granulated yeast ( you can use any kind of yeast including: instant, “quick,” rapid rise, bread machine, active dry, or fresh cake yeast*. We’ve always tested with Red Star Yeast and they have a new premium product called PLATINUM, which has worked beautifully in our recipes. You can also decrease the amount of yeast in the recipe by following the directions here. Or you can bake with a sour dough starter, see instructions here.)
*If you use cake yeast you will need 1.3 ounces (37g).
1 to 1 1/2 tablespoons Morton Kosher Salt (adjust to suit your taste or eliminate it all together. Find more information here)
6 1/2 cups (2-pounds) all-purpose flour (we’ve always tested our recipes with typical supermarket flour. If you use a higher protein flour check here)

Equipment list:

5qt container w/lid 
liquid measuring cup
1  and 1/2 cup dry measure cups
butter knife
1 tbs measuring spoon
dough whisk, or large spoon for mixing the dough 
corn meal of dusting your peel or the back side of a baking pan
pizza peel or baking pan
baking stone to bake the bread on or a cast iron pan or similar if you do not own a baking stone

Full Recipe
Shape a Boule
13 Comments

APPLE GALETTE- Jaques Pepin

10/5/2018

0 Comments

 
Back when I lived in my first apartment in Hoboken, NJ I taught myself to cook. My dad gave me my first cookbook-Jaques Pepin's "Everyday Cooking". I would recommend this book to anyone. The recipes are easy, elegant, and delicious. Pepin is an amazing teacher and my go-to chef for cooking technique. 
The filling of thinly sliced apples is easy to do and the layering of the slices creates a beautiful tart. Be sure to use a firm, baking apple so the slices hold up and don't get mushy. I like Granny Smith and Honey Crisp apples for my tarts. 
The Pate Brisee dough is easy to make, freezes well, and can be used for any pie recipe. 
This Apple Galette recipe is a favorite of mine and I have shared it with family and friends for over 30 years! I hope you love it too. ​
Picture
Picture
Picture
Picture
Apple Galette
Recipe From:  Jacques Pepin “Everyday Cooking”

Makes 8 servings
1/2 recipe pate brisée (see recipe below or use 1/2 recipe of the Basic Crust recipe from "Art of the Pie"
5 large granny smith apples (or other firm cooking apple variety-Mutsu, Honey Crisp, Pink Lady, Jonagold, Northern Spy)
1/4-cup sugar
3 tablespoons butter, cut into small pieces
4 tablespoons apricot preserves
1 tablespoon Calvados or Cognac (optional)

Preheat oven to 400 degrees
 
1. Make pâte brisée (recipe below or Basic Crust recipe from "Art of the Pie" ). Roll out the dough 1/8 to 1/16 inch thick, in a shape that fits roughly on a cookie sheet—approximately 16 X 14 inches using the Pate Brisse recipe below. If using the Basic Crust from "Art of the Pie", roll out dough to 14 inches. (The best cookie sheets are made of heavy aluminum that is not too shiny.) If the dough is not thin enough after you lay it on the cookie sheet, roll it some more, directly on the sheet.
 
2. Peel (or not as you like) and cut the apples in half, core them, and slice each half into 1/4-inch slices. Set aside the large center slices of the same size and chop the end slices coarsely. Sprinkle the chopped apple over the dough.
 
3. Arrange the large slices on the dough beginning at the outside, approximately 1 1/2 inches from the edge. Stagger and overlap the slices to imitate the petals of a flower.  Cover the dough completely with a single layer of apples, except for the border. Place smaller slices in the center to resemble the heart of a flower.
 
4. Bring up the border of the dough and fold it over the apples.
 
5. Sprinkle the apples with the sugar and pieces of butter, and bake in a 400-degree oven for 40-50 minutes, until the galette is really well browned and crusty.  Do not remove the galette from the oven too soon; it should be very well cooked. It should be very crusty, thin, and soft inside. Do not worry about the discoloration of the apples after you peel and arrange them on the dough. The discoloration will not be apparent after cooking. 
 
6. Slide it onto a board. Dilute the apricot preserves with the alcohol (or use 1 tablespoon of water if the jam is thick and you prefer not to use spirits) and spread it on top of the apples with the back of a spoon. Some can also be spread on the top edge of the crust. Follow the design so that you do not disturb the little pieces of apple.

Serve the galette lukewarm, cut into wedges. 

Pate Brisee
Recipe From:  Jacques Pepin “Everyday Cooking”
 
Makes Enough for 2 Galettes
3 cups all-purpose flour (dip the measuring cup
into the flour, fill it, and level it with your hand)
1 cup (2 sticks) sweet butter, cold, and cut with a knife into thin slices or shavings
1/2 teaspoon salt
Approximately 3/4 cup very cold water
 
“In a well-made pâte brisée the pieces of butter are visible throughout the dough. If the pieces of butter get completely blended with the flour so that they melt during cooking, the pastry will be tough. The flour and butter must be worked and the water added as fast as possible to obtain a flaky pastry. If you work the dough too much after adding the water, it will be elastic and chewy. If you use too much butter and not enough water, it will resemble sweet pastry dough and will be hard to roll thin and pick up from the table; it will be very brittle before and after cooking, sandy, and with no flakiness.

This is deceptively simple dough. You may get excellent results one time and an ordinary pastry the next. Try it a few times to get a feel for it. Wrapped properly, it can be kept in the refrigerator for 2 or 3 days, or it can be frozen.”
 
1.Mix the flour, butter, and salt together very lightly, so that the pieces of butter remain visible throughout the flour.
 
2.Add the ice-cold water and mix very fast with your hand just enough that the dough coheres.
 
3. Cut the dough in half. The pieces of butter should still be visible. Refrigerate for 1 or 2 hours or use it right away. If you use it right away, the butter will be a bit soft, so you may need a little extra flour in the rolling process to absorb it.

For one galette, roll half the dough between 1/8 and 1/16 of an inch thick, using flour underneath and on top so that it doesn't stick to the table or the rolling pin. When the dough is the desired shape and thickness, roll it onto the rolling pin and unroll it on the pie plate, tart form, or cookie sheet that you plan to use. Repeat with the other half or reserve for later use. Bake according to the instructions for the particular recipe. 

0 Comments
    Picture

    Picture
    Follow Liz on Instagram

    Picture
    photo credit-Judy Santos-jsantosphotography.com

    Recipe Categories

    All
    15 Minute Meals
    Air Fryer
    Appetizers/Hors D'oeurves
    Avocados
    Baking
    Beautifully Delicious
    Beef
    Bread
    Breakfast
    Chaffles
    Charcuterie
    Chicken
    Cocktails
    Cookies
    Cooking For 1 Or 2
    Cooking With Beer
    Cooking With Chocolate
    Cooking With Wine
    Cooking W/Spices
    Cook's Corner TV
    Cook The Book Cookbook Series
    Dairy
    Desserts
    Dressings
    Drinks
    Edible Flowers
    Edible Garden
    Edible Landscapes
    Eggs
    Entrees
    Facebook Live
    Fall Recipes
    Fats
    Food Film/TV
    Grain Bowls
    Herbs
    Hollis NH Recipes
    Instant Pot
    Intermittent Fasting
    Kitchen/Pantry
    Knife Class
    Lamb
    Lobster Tails & Cocktails
    Local Farms
    Lowcarb
    Low Carb Breakfast
    Pantry
    Passionate Dishes For Your Valentine
    Pasta
    Pie Classes
    Pies Savory
    Pork
    Rubs
    Salads
    Sandwiches
    Sauces
    Seafood
    Seasoning Blends
    Seed Oils
    Sheet Pan Meals
    Side Dishes
    Smoothies
    Soups/Stews
    Starches/Pasta/Beans
    Stock
    Tapas
    Tarts Savory
    Thanksgiving
    Turkey
    Vegetables
    Vegetarian
    Winter Pantry


    Liz's Cookbook

    Liz's Gardens

    Picture

    Liz's Kitchen

    Picture

    Archives

    May 2023
    April 2023
    March 2023
    February 2023
    January 2023
    December 2022
    November 2022
    October 2022
    September 2022
    August 2022
    July 2022
    June 2022
    May 2022
    April 2022
    March 2022
    February 2022
    January 2022
    December 2021
    November 2021
    October 2021
    September 2021
    August 2021
    July 2021
    June 2021
    May 2021
    April 2021
    March 2021
    February 2021
    January 2021
    December 2020
    November 2020
    October 2020
    September 2020
    August 2020
    July 2020
    June 2020
    May 2020
    April 2020
    March 2020
    February 2020
    January 2020
    November 2019
    October 2019
    September 2019
    May 2019
    October 2018
    March 2018
    November 2017
    October 2017
    September 2017
    August 2017
    June 2017
    May 2017
    February 2017
    June 2016
    February 2016
    December 2015
    November 2015
    October 2015
    August 2015
    July 2015
    June 2015
    May 2015
    April 2015

    RSS Feed

CONTACT US

Email

lizb@thecreativefeast.com

Telephone

Location

603-321-5011
Hollis, NH